


My top recommendation is to utilize a well-designed backpack that offers dedicated compartments for your photography gear. This approach not only protects your equipment but also allows for hands-free movement through challenging trails. Choosing a pack with adequate padding and weather-resistant materials will ensure your equipment remains safe in various conditions.
This article discusses practical options for transporting photographic gear during outdoor adventures, making it ideal for enthusiasts seeking to explore nature while capturing stunning visuals. It highlights various types of bags, harnesses, and accessories that enhance convenience without compromising accessibility.

In the following sections, I will detail several strategies–from using specialized camera bags to integrating equipment into hiking packs–helping you find the right balance between comfort and functionality. Additionally, I will provide insights on securing and organizing your gear to facilitate smooth access on the go. With the right setup, you can focus on your surroundings while maintaining an efficient workflow, ensuring an enjoyable experience in the great outdoors.
Optimal Storage for Photography Gear During Treks
Using a well-designed backpack drastically improves the experience of transporting photographic equipment. A dedicated compartment for gear ensures both protection and accessibility. Additionally, padded separators help organize various components, minimizing movement and potential damage.
Strap systems also play a significant role; a harness can distribute weight comfortably across the body. This accessory prevents strain on the shoulders and back during extended periods of walking.
Choosing the Right Accessories
- Lens Pouches: These offer extra protection for individual lenses, allowing for easy access without removing everything from the bag.
- Rain Covers: Weatherproofing is essential; a cover can protect gear from unexpected downpours.
- Tripod Straps: Securing a tripod externally frees up space and provides flexibility in mobility.
When moving between locations, it’s advantageous to utilize quick-adjust straps, allowing me to shift my load quickly without hassle. These facilitate brief stops for spontaneous captures without needing to fully unpack.
Maintaining an organized system enhances efficiency. Using different colored markers for various lenses or cameras aids in quick identification and speed of setup. This practice reduces time spent searching for equipment, making each outing more enjoyable.
Ultimately, the goal is to ensure that my gear is safe, accessible, and not burdensome during outdoor activities. Adapting my method based on the nature of the trek helps suit specific needs, whether navigating rugged terrain or leisurely promenading in a park.
Choosing the Right Camera Bag for Hiking
When selecting an optimal bag for outdoor photography adventures, I prioritize comfort and accessibility. A well-designed backpack can significantly enhance my experience by ensuring that my gear is secure and easy to reach.
Next, I analyze the size and shape of the pack. It should have adjustable compartments to accommodate various equipment types, including multiple devices and additional accessories. A bag that fits snugly to my back helps distribute weight evenly, reducing fatigue during long treks.
Key Features to Consider
- Weather Resistance: Look for materials that provide protection against moisture and dust.
- Padding: Ensure that the internal sections are well-padded to safeguard fragile equipment.
- Sorting Options: Consider bags with customizable dividers to organize tools effectively.
- Weight: Choose a lightweight option that won’t add unnecessary strain to your load.
Another consideration is the bag’s external features. Pockets for quick access to essentials, like filters or memory cards, can make a significant difference. Additionally, external attachment points for tripods or water bottles enhance convenience during hikes.
Ultimately, testing the bag before committing is invaluable. I ensure it fits comfortably and provides adequate support through various movements, adjusting straps and compartments to find the perfect configuration.
Essential Features to Look for in a Hiking Camera Pack
Choosing the right pack for my photographic gear on outdoor excursions hinges primarily on a few thoughtful features that enhance both protection and accessibility. I prioritize durability; materials that can withstand varying weather conditions ensure my equipment remains secure. A water-resistant exterior is ideal, providing peace of mind during unexpected showers and keeping my gear dry and functional.
Another significant aspect is comfort. I seek a well-padded back panel and adjustable straps to ensure even weight distribution during long treks. An ergonomic design not only alleviates stress on my back but also allows for free movement, enabling me to focus on capturing stunning moments without distraction.
Storage and Organization
When it comes to compartments, I look for versatile options that can accommodate different sizes of equipment. A modular interior or customizable dividers allows me to arrange my gear efficiently, making it easy to access the items I need quickly. I also value exterior pockets for carrying personal items or snacks.
Easy Access
- Quick side or front openings: These features enable me to grab my gear swiftly without having to remove the entire pack.
- Dedicated hydration reservoirs: Staying hydrated while trekking and shooting is crucial, so having a pouch for a water bladder is advantageous for efficiency.
Lightweight Materials
A lightweight design is key for maintaining my stamina. I favor products that use high-quality, lightweight fabrics without compromising strength. This ensures I can pack additional essentials without overloading myself.
Security Features
Security features such as lockable zippers provide an extra layer of safety. I also appreciate built-in rain covers, which offer protection from rain and dust.
| Feature | Description |
|---|---|
| Durability | Water-resistant materials to withstand different weather conditions. |
| Comfort | Padded straps and back for even weight distribution. |
| Organization | Customizable compartments for optimal gear arrangement. |
| Accessibility | Side openings for quick access to equipment. |
| Lightweight | Fabric choices that do not add unnecessary weight. |
| Security | Lockable zippers and built-in rain covers for protection. |
In summary, a thoughtfully designed pack greatly enhances my experience outdoors, allowing me to concentrate on capturing beautiful images without worrying about the safety and comfort of my gear.
Ways to Organize Your Camera Gear for Easy Access
Choosing the right method for organizing my photographic equipment significantly enhances accessibility during outdoor activities. I prefer to categorize my gear based on usage, ensuring that I can quickly find what I need without rummaging through everything.
Using lightweight pouches helps me to keep smaller items separated and easy to reach. For example, I designate one pouch for filters and another for spare batteries. This not only reduces clutter but also speeds up my workflow when capturing images in fast-moving situations.
Specific Organization Techniques
- Modular Packing: I utilize modular packing systems that allow me to customize space according to the day’s requirements. Each section can be dedicated to specific items, such as a lens, a tripod, or essential accessories.
- Quick-Access Design: A camera backpack with quick-access compartments positioned along the side makes it easy for me to grab my gear without having to remove the entire bag. This feature is particularly useful during hikes when I need to quickly pull out my camera without stopping completely.
- Color-Coded Cases: Employing color codes for different categories of gear has proven advantageous. I label cases with vibrant colors, which allows for immediate identification, speeding up the process when I am in a hurry.
Additionally, I often lay out my items before I set off on an expedition. This practice helps me assess my needs, ensuring that nothing vital is overlooked. By optimizing packing arrangements and employing these organization techniques, I can enjoy my outdoor photography experience with minimal frustration.
Adjusting Your Gear Load for Comfort and Balance
To enhance comfort and stability during my excursions, I meticulously evaluate the distribution of weight within my pack. It’s essential to position heavier items close to my back and at waist level. This setup ensures that I maintain better balance and reduces strain on my shoulders and lower back.
I also pay attention to the configuration of straps and pockets. I secure lighter accessories at accessible positions so I can reach them without fumbling. This minimizes the need to constantly shift my load, keeping my center of gravity stable as I move.
Assessing Load Distribution
When adjusting my equipment, I take into account the following factors:
- Weight Placement: Keeping heavier gear at the center helps maintain a low center of gravity.
- Accessibility: Place essentials in external pockets or top compartments for quick access.
- Attachment Points: Utilize loops and straps on the outside to balance bulkier items.
Additionally, I often reassess my load during the hike. If I feel any discomfort, I take a moment to redistribute weight or adjust straps. Fine-tuning my gear can significantly impact my experience, enabling longer and more enjoyable adventures.
Using the Proper Gear Setup
In selecting my bag, I consider:

- Padded Straps: Comfort is key; straps should cushion the weight nicely.
- Hip Belt: Employing a hip belt transfers some weight away from my shoulders.
- Adjustability: Opt for a pack that allows for height and fit adjustments for personalized comfort.
Following these adjustments, I find that I can maintain stamina and focus on capturing the beauty of my surroundings rather than battling an uncomfortable load.
Using Camera Straps for Added Security on Trails
Utilizing a reliable strap for my equipment significantly enhances safety during outdoor excursions. I find that securely fastening my gear reduces the risk of accidents, keeping valuable items close at hand.
When selecting straps, I prioritize comfort and adjustability. A well-padded strap not only alleviates pressure on my shoulders, but also allows me to move freely without worrying about my gear shifting or falling. Dual-shoulder straps distribute weight evenly, which is beneficial for prolonged hikes.
Types of Straps to Consider
There are various styles of straps available, each catering to different preferences and needs:
- Neck Straps: Standard options that provide easy access to the equipment.
- Shoulder Straps: Cross-body options that allow for hands-free usage.
- Wrist Straps: Useful for quick shots without the fear of dropping.
- Secure Harnesses: Offer stability and can support heavier equipment.
Incorporating a strap that matches your style of trekking makes a substantial impact on how effectively I manage my gear. It’s also wise to ensure that all connections are robust, minimizing chances of unintended detachment.
As trails can be unpredictable, utilizing additional security measures such as attachment clips can provide peace of mind. These clips often prevent sudden drops and allow for quick adjustments, keeping everything secure while I navigate through challenging terrain.
| Strap Type | Pros | Cons |
|---|---|---|
| Neck Strap | Easy access | Can cause neck strain |
| Shoulder Strap | Hands-free | May shift during movement |
| Wrist Strap | Good for quick shots | Less support for heavier items |
| Secure Harness | Stability for heavier gear | Can be bulkier to wear |
Incorporating these thoughtful choices into my gear management drastically reduces the chances of mishaps, allowing me to focus on capturing stunning visuals without concern for loss or damage.
Tips for Protecting Your Equipment from the Elements
Utilizing waterproof bags and cases is one of the most effective methods for shielding my gear. I make sure to choose bags that have sealed seams, weather-resistant zippers, and padding for extra protection. I often pack my photographic tools in individual pouches to keep them organized and secure. In harsh conditions, this adds an additional layer of safety.
Another important consideration is the use of lens filters. I regularly attach UV or clear filters to my lenses to avoid scratches and damage from dust and moisture. When facing precipitation or splashes, I take preventive measures such as using rain covers or plastic bags for added shielding. If I encounter extreme conditions, I make sure to keep a microfiber cloth handy to wipe away any water or dirt that accumulates on the gear.
Additional Protective Measures
I pay attention to temperature fluctuations, which can impact the internal workings of my equipment. When transitioning from cold to warm environments, I allow my gear to acclimate gradually, reducing the risk of condensation forming inside the camera and lenses. I often store my equipment in a dry bag, particularly when hiking in humid climates.
- I keep silica gel packets in my camera bag to absorb excess moisture.
- Using a sunshade can help deflect direct sunlight, protecting sensitive electronic components.
- Regularly checking weather forecasts helps me prepare for unexpected changes in conditions.
Staying aware of my surroundings is equally important. I choose to avoid placing my gear directly on wet surfaces and be cautious of sandy areas, ensuring I do not expose my equipment to potential hazards. Keeping gear securely fastened to my body or in a sturdy backpack minimizes the risk of falls or slips.

Best Practices for Carrying Additional Lenses
Using a dedicated pouch or case designed for optical equipment is fundamental. These compartments provide necessary protection from dust, moisture, and impacts while keeping the gear organized. I usually opt for lightweight cases that can easily attach to my pack or belt.
Distributing weight evenly is key. I avoid cramming everything into one side of my backpack. Instead, I place additional optics in various pockets. This balance prevents strain and ensures comfort during long treks.
Protection and Access
It’s crucial to keep extra optics secure yet accessible. I choose pouches with zippers or secure flaps, allowing quick retrieval without exposing the items to potential damage. While I hike, I often keep the most frequently used components on the outside for rapid access.
Utilizing lens caps and protective filters is another measure I take. This prevents scratches and other forms of damage during rigorous activities. Additionally, I regularly check for any dirt or debris to ensure that my equipment performs optimally.
- Encapsulate products in padded carriers designed for protection.
- Opt for robust materials that resist the elements.
- Employ carabiners or clips for extra security during movement.
Each lens should have its protection plan. Using separate pouches for different focal lengths simplifies identification and keeps them organized. Categorizing my gear by type enhances efficiency when switching equipment at various scenic spots.
Maintaining minimalism pays off during extensive hikes. Carrying only the necessary attachments enables agility. I avoid packing extras that I might not use, which also lightens the load.
When resting, I ensure that items are out of direct sunlight or inclement weather. This preserves the longevity of the components. A simple cloth can safeguard against condensation during transitions from cold to warm environments.
Incorporating Hiking Poles for Enhanced Gear Stability
Utilizing trekking sticks significantly enhances support for your equipment during outdoor excursions. These tools stabilize your entire setup, ensuring comfort and reducing fatigue while maintaining your balance on varied terrains.
In addition to improving stability, hiking poles can also help distribute weight evenly. Here are a few tactics to maximize their benefit:
- Adjust for Height: Set the poles to your preferred height to provide optimal leverage and support.
- Use with a Shoulder Harness: Attaching your pouch to a well-fitted shoulder harness allows for hands-free adjustments.
- Practice Your Technique: Integrate the poles into your stride, using them to propel forward as you move over uneven surfaces.
- Your Grip Matters: Comfortable grips reduce strain on your hands, which aids in longer hikes.
- Pack Them Wisely: When not in use, secure poles to the side of your pack for easy access and balance.
By addressing these elements, I found that my stability improved remarkably. Moving through rugged paths became a smoother experience. Hiking poles transformed my outings, providing a practical solution for carrying delicate gear.
Best way to carry camera and lenses while hiking
TARION Waterproof Camera Sling Backpack
Features
| Part Number | 1595681-US |
| Model | 1595681-US |
| Warranty | 2 Year Manufacturer |
| Color | Black |
| Size | Medium (15cm x 22cm x 41cm, 6.5L) |
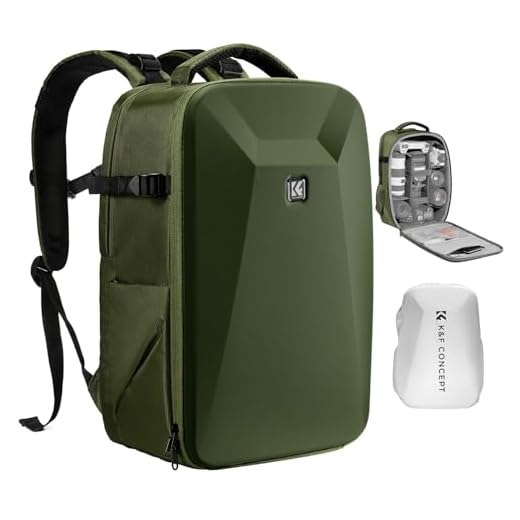
K&F CONCEPT Hardshell Camera Backpack
Features
| Part Number | USKF13.134V3 |
| Model | KF13.134V3 |
| Warranty | Warranty:6-month |
| Color | Green |
| Size | Large |
MOSISO Waterproof Camera Backpack
Features
| Part Number | MO-15-Cam-HS-Backpack-Black |
| Model | MOCAMHSBG004 |
| Color | Black |
| Size | 44 x 30 x 19 cm |
Lowepro PhotoSport Hiking Backpack
Features
| Part Number | LP37339-PWW |
| Model | LP37339-PWW |
| Warranty | 2 Year Manufacturer |
| Color | Grey |
| Is Adult Product | |
| Release Date | 2025-09-04T00:00:01Z |
| Size | Medium |
| Language | English |
K&F CONCEPT 30L Large Capacity Backpack
Features
| Part Number | KF13.178 |
| Model | KF13.178 |
| Warranty | Warranty:6-month |
| Color | 03-black-grey |
| Size | 30L |
SDYSM Tactical Waterproof Camera Backpack
Features
| Model | 5663 |
| Color | Black |
| Size | 12.99 x 7.87 x 17.71 inches |
100g Silica Gel Packets
Features
| Part Number | ASK-40-100G |
| Size | 100G |
FAQ:
What are the best options for carrying a camera while hiking?
When hiking, there are several effective methods for carrying your camera. One popular option is using a sling strap, which allows for quick access while keeping the camera secure. Another method is to use a dedicated camera backpack designed with padded compartments to protect your gear. Some hikers prefer harnesses that distribute the weight across the body, making it easier to carry while moving. Additionally, there are camera bags that attach to waist belts or backpacks. Each option has its pros and cons, so it’s essential to choose one that suits your hiking style and the type of terrain you will encounter.
How can I protect my camera and lenses from damage while hiking?
To ensure your camera and lenses stay safe during hikes, start by using a padded camera bag or a protective case. These cases can shield your gear from bumps and protect against the elements. Consider using lens caps and filters to guard against scratches and dirt. It’s also wise to pack silica gel packets inside your bag to absorb moisture. Avoid exposing your equipment to extreme temperatures and be cautious when navigating tricky terrains. Regularly check that your gear is secure and protected, especially during more challenging parts of the hike.