


For anyone who frequently switches out photographic elements, choosing the right solution to carry them can drastically enhance your workflow. I want to share my experiences and recommendations for choosing a versatile storage option that ensures safety and accessibility for your gear.
This article is tailored for photographers of all skill levels who seek to manage their equipment effectively while on the move. I will provide insights into features that make specific containers stand out, helping you make an informed decision based on your shooting style.
You’ll find a detailed analysis of various options available in the market, highlighting their unique aspects such as padding, organization compartments, and accessibility. By understanding these characteristics, you can select an ideal choice that will best suit your needs while maintaining the integrity of your precious gear.
Best Equipment Carrier for Lens Exchange
When selecting an ideal equipment carrier for swapping optics, I prioritize accessibility and organization. A well-structured interior enhances quick access to my gear, allowing for seamless transitions between different focal lengths and perspectives that my project demands.
Space management is also critical. I look for options that provide tailored compartments, ensuring the safety of each piece of equipment while avoiding clatter and potential damage. The use of padded dividers is a significant advantage, as they can be adjusted to fit various gear configurations comfortably.
Key Features to Consider
- Quick Access: Look for carriers with side openings, providing prompt engagement without requiring a full pack removal.
- Lightweight Materials: Opt for designs that are easy to carry yet durable, enabling comfortable all-day wear.
- Water Resistance: Consider models that offer protection against unexpected weather changes, safeguarding valuable equipment.
- Ergonomic Design: Comfort during transport is non-negotiable; padded straps and adjustable features are a must.
Additionally, a carrier with external attachment points can be beneficial for securing tripods or additional bags, optimizing versatility. Researching user reviews and real-world experiences can also guide the selection process, highlighting practical benefits that specifications alone may not reveal.
Essential Features for Lens Accessibility
When selecting a suitable carrier for my photographic gear, I prioritize specific functionalities that enhance the ease of accessing lenses. Efficient organization is key; compartments must be designed to allow quick retrieval without complicating the workflow during a shoot.
I prefer a structure with easy-to-open closures, such as zippers or magnetic flaps, that enable me to get to my equipment swiftly. A design that allows partial access to selected sections can be beneficial, letting me change lenses while minimizing exposure risk to environmental elements.
Considerations for Design and Functionality
- Quick Access Points: Compartments located on the side or rear can streamline lens changes, allowing for a seamless transition between shots.
- Ample Padding: Sufficient cushioning protects delicate optics while ensuring I can grab and swap without worries about damage.
- Modular Design: Flexibility in organizing sections means I can adapt the setup based on my shooting needs, whether it’s for zoom or prime optics.
- Sufficient Space: Each section should accommodate various sizes of lenses comfortably without being overly tight, preventing any difficulty during retrieval.
In addition, features like adjustable dividers enable personalization, which I find essential in aligning my gear arrangement to my workflow preferences. Durability is non-negotiable; materials should withstand regular use and adverse conditions.
Ultimately, choosing the right setup significantly impacts my overall efficiency in the field. The ability to switch optics quickly transforms my ability to capture moments as they unfold around me.
Material Choices for Protection and Durability
Choosing the right materials is critical for safeguarding your equipment during transport. I prioritize fabrics that combine strength with resistance to various environmental factors.
Some of the most reliable choices include nylon and polyester, both known for their durability and water resistance. In addition, high-density materials show excellent resilience against abrasions and rough handling.
Considerations for Material Selection
- Nylon: Lightweight yet very durable, it resists tearing and provides decent water resistance. It’s often treated with coatings to enhance weather resistance.
- Polyester: Slightly heavier than nylon but offers excellent color retention and durability. It stands up well to UV exposure, which is essential for outdoor use.
- Canvas: Known for its rugged texture and classic look, it provides great protection, though it may lack some water resistance unless treated.
- Neoprene: Often used for padding, it provides exceptional cushioning while being water-resistant, making it ideal for protecting fragile equipment.
I also find that reinforced stitching adds an extra layer of durability, ensuring that seams do not break easily under stress.
While selecting a carrier, I pay attention to additional features like waterproof zippers and protective base materials, as they enhance resilience against the elements.
Size Considerations for Multiple Lenses
Choosing the right size of a storage solution is essential for those who frequently switch between various optical attachments. I prioritize space efficiency while ensuring that all my gear is easily accessible when required.
A fundamental aspect I consider is the interior dimensions of the storage option. The compartments should comfortably hold each attachment without causing any damage. Customizable dividers are beneficial, allowing me to adjust the layout according to the specific combinations of optical devices I carry.
Understanding Dimensions
When I think about dimensions, I also assess the overall weight of the storage solution. It’s crucial to maintain a balance between capacity and portability. An overly heavy option can be cumbersome, particularly during long outings. To mitigate this, lightweight materials without sacrificing durability play a significant role in my decision.
- Check if the size accommodates additional accessories like filters or lens hoods.
- Evaluate whether external pockets can hold items like batteries or memory cards without compromising internal space.
- Ensure there is adequate padding to protect the optical devices while maintaining a compact design.
In scenarios where I need to carry multiple attachments, I prefer a layout that enables quick access. I might choose a design that allows me to leave some devices in place while I reach for another. Knowing that time is often of the essence, I look for storage options that facilitate seamless transitions between optical devices.
Ultimately, the right choice is one that harmonizes size, weight, and ease of access. By prioritizing these factors, I can ensure a smoother experience in any photographic situation.
Designs that Facilitate Quick Lens Swaps
In my experience, one of the most effective designs for quick lens transitions incorporates a side-opening feature. This allows me to access my gear swiftly without needing to remove the entire carry system from my body. Such a design minimizes disruptions during a shoot and enhances my ability to capture spontaneous moments without delay.

Another design element that stands out is the inclusion of dedicated compartments specifically shaped for different types of glass. These compartments should be cushioned and clearly labeled, allowing me to quickly identify and select the desired lens. An optimal arrangement not only prevents damage but also makes retrieval smoother, even when time is of the essence.
Key Features to Look For
- Side Access: Enables quick retrieval of equipment without the need to set down the entire unit.
- Padded Compartments: Protects sensitive gear while allowing easy storage and access.
- Secure Closures: Prevent accidental openings during movement, ensuring lenses remain secure.
In addition to these designs, I prefer systems that offer adjustable dividers. This flexibility lets me customize the interior layout based on my specific gear needs, accommodating both wide-angle and telephoto options efficiently.
Lastly, consider models that feature weather resistance. This ensures that adverse conditions won’t hinder my ability to switch out glass, allowing me to concentrate more on my subject rather than worrying about equipment protection.
Comparative Review of Popular Camera Bag Models
When selecting a suitable storage option for my photographic gear, I’ve discovered that functionality and organization are paramount. Different designs cater to varying needs, which can significantly influence the experience while on a shoot. Quality construction and comfortable carrying options are just as important as the interior layout.
I’ve found that a format allowing easy access and swift retrieval of equipment streamlines the shooting process. Some models provide customizable dividers, enabling effective organization of various components. Others offer specialized compartments for additional accessories, ensuring that nothing gets left behind. Depending on the type of assignments, one may favor a backpack style for extended treks or a sling format for quick accessibility.
Key Features to Consider
- Accessibility: Assess how quickly I can reach my equipment, especially during time-sensitive moments.
- Organization: Look for options with flexible compartments that allow me to store multiple pieces of gear securely.
- Comfort: Evaluate the weight distribution and padding of straps to ensure it’s comfortable to carry for longer durations.
- Material: A durable, weather-resistant exterior protects my gear from unexpected elements.
In comparing various styles, I’ve noticed distinct advantages. For instance, some units feature side openings, allowing for swift access without removing it from my back. Others lean towards more robust designs, offering enhanced protection but with a bulkier footprint. This can impact my movement on location, particularly in crowded areas.
| Feature | Model A | Model B |
|---|---|---|
| Weight | 1.5 kg | 1.2 kg |
| Capacity | 3 lenses + body | 5 lenses + body |
| Access Type | Top Opening | Sling Side Access |
| Padded Straps | Yes | No |
Ultimately, the decision comes down to personal preferences and shooting styles. It’s beneficial to test a few options, ensuring that the chosen model aligns with my specific requirements while enhancing my shooting workflow. A thoughtful selection can transform the shooting experience, making it more enjoyable and efficient.
Budget-Friendly Options for Aspiring Photographers
For those who wish to capture stunning images without breaking the bank, selecting an affordable storage solution is important. I recommend looking for a model that provides enough space and flexibility while maintaining reasonable pricing. A well-designed carrier keeps equipment organized, easily accessible, and protected from the elements.
Many economical options include padded internal compartments, which can accommodate different types of gear, including interchangeable components. Features like adjustable dividers allow customization based on individual needs, ensuring easy retrieval of items during a shoot.
Key Features to Look For
- Durability: Choose materials that can withstand wear and tear.
- Comfort: Look for padded straps to make carrying easier during long outings.
- Weather Resistance: Consider models with water-proof zippers or rain covers to protect your equipment.
- Organization: Multiple pockets can help keep smaller accessories in check.
Researching and reading user reviews can also guide buying decisions. It’s beneficial to consider personal photography style. A spacious backpack may suit landscape photography, while a smaller, messenger-style option could fit street photographers better.
| Feature | Benefit |
|---|---|
| Padded Compartments | Protects lenses and devices from damage |
| Adjustable Straps | Enhances comfort and fit |
| Lightweight Design | Easier to carry for extended periods |
| Accessible Pockets | Fast access to accessories |
Exploring options within budget allows for an enjoyable experience without overspending. Investing wisely in storage solutions will support any photographer’s ambitions while keeping their gear secure and organized.
Accessorizing Your Camera Bag for Efficiency
One key aspect of enhancing functionality is choosing the right accessories that complement your equipment. A multi-function lens pouch is a must-have; it allows quick access to your spare glass without rummaging through your entire setup. Additionally, integrating a modular divider system can help organize various components while maintaining flexibility.
Another recommendation is to include external storage options, such as clip-on pouches or adhesive pockets. These can hold extra batteries, memory cards, and filters, providing more storage space without overcrowding your primary compartment. This setup minimizes disruptions when switching out gear, making it easier to focus on photography.
- Lens Pouches: Quick access for spare lenses.
- Modular Dividers: Customized storage layout.
- Clip-On Pouches: Extra storage for accessories.
- Weatherproof Covers: Protection against elements.
- Portable Cleaning Kits: On-the-go maintenance.
These additions create a cohesive and organized space, enhancing my ability to adapt to different shooting situations efficiently. By prioritizing accessibility and organization, I ensure that my workflow remains smooth and interruptions are minimized.
Best camera bag for changing lenses
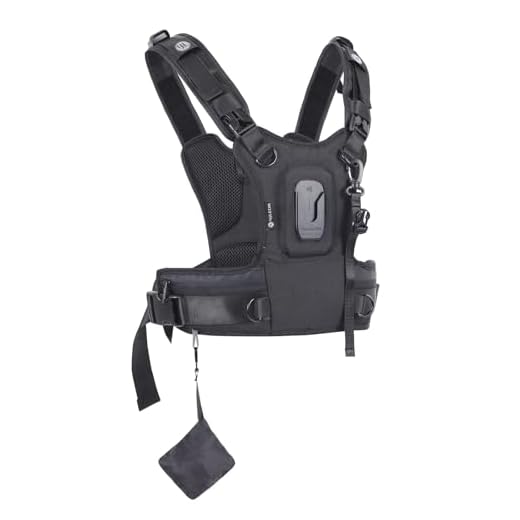
4J LEDR Camera Chest Harness for Travel
Features
| Model | correa camara de fotos |
| Color | Black |
| Size | Adjustable |
MOSISO DSLR Camera Backpack with Tripod Holder
Features
| Part Number | MO-15-Cam-HS-Backpack-Black |
| Model | MOCAMHSBG004 |
| Color | Black |
| Size | 44 x 30 x 19 cm |
Samdew 30-Inch Tripod Storage Bag
Features
| Part Number | CASD05301(T) |
| Model | CASD05301(T) |
| Color | Black |
CASOMAN Waterproof Hard Case for Equipment
Features
| Part Number | CS471 |
| Model | / |
| Color | Black |
| Size | 16" X 13.2" X 7" |
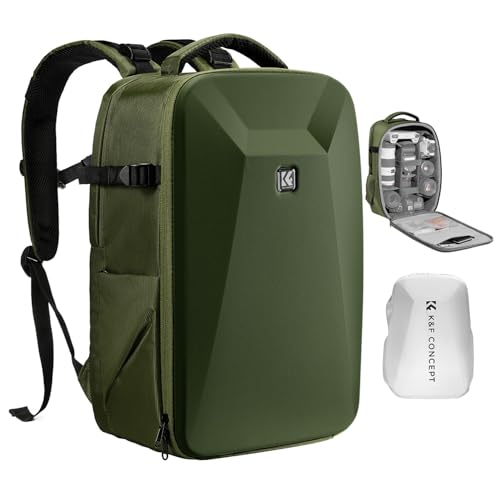
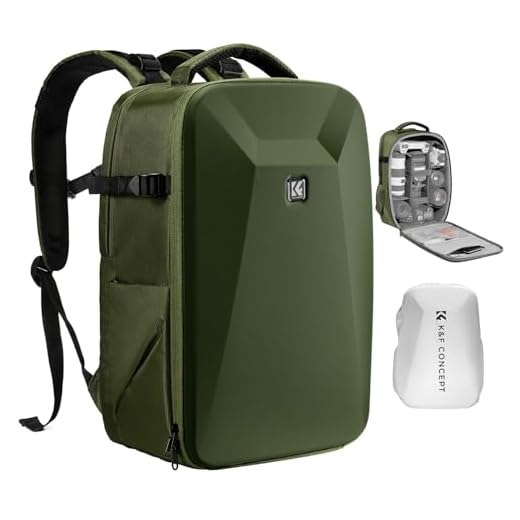
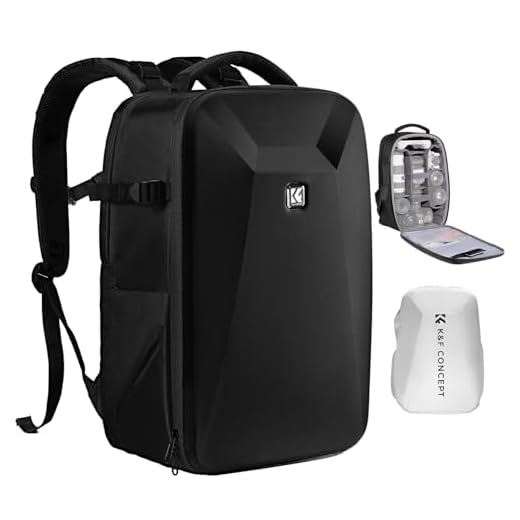
K&F CONCEPT Hardshell Camera Backpack
Features
| Part Number | USKF13.134V3 |
| Model | KF13.134V3 |
| Warranty | Warranty:6-month |
| Color | Green |
| Size | Large |
Lykus Waterproof Hard Case with Dividers
Features
| Part Number | PVC1-2024 |
| Model | PVC1-2024 |
| Warranty | lifetime limited warranty |
| Color | Black PVC1 |
| Size | 16.3 x 13.4 x 6.9 inches |
Waterproof Hardshell Camera Bag by K&F CONCEPT
Features
| Part Number | USKF13.134 |
| Model | KF13.134 |
| Warranty | Warranty:6-month |
| Color | Black |
| Is Adult Product | |
| Size | 17.3 x 11 x 7 inches |
FAQ:
What features should I look for in a camera bag for changing lenses frequently?
When choosing a camera bag suitable for changing lenses often, consider the following features: first, compartments are important. A bag with multiple padded sections helps to keep your lenses safe and organized. Look for quick-access pockets that allow you to reach your equipment swiftly while you’re on the move. Durability is another factor; choose materials that can withstand different weather conditions and protect your gear. Comfort is also key—select a bag that has padded straps and back support, especially if you plan on carrying it for extended periods. Lastly, check for modular options or customizable dividers, which can adapt to your specific lens needs.
How do I ensure my camera bag is suited for different types of lenses?
To ensure your camera bag is versatile enough for various types of lenses, start by assessing the length and diameter of the lenses you own. Make sure the bag has adjustable dividers to accommodate the different sizes securely. Opt for a bag that offers sufficient depth if you’re using longer telephoto lenses. Additionally, if you frequently switch between specific lenses, consider bags with designated sections labeled for each type—you’ll save time during lens changes. Lastly, look for models that provide weather resistance to protect your lenses from moisture and dust when you’re outdoors.