


For anyone experiencing issues with the photography unit on their smartphone, it’s crucial to address the problem swiftly. A malfunctioning or damaged optical element not only affects picture quality but can also result in costly repairs if left unchecked. Accessing and swapping the malfunctioning component is a feasible task, provided the right tools and techniques are employed.
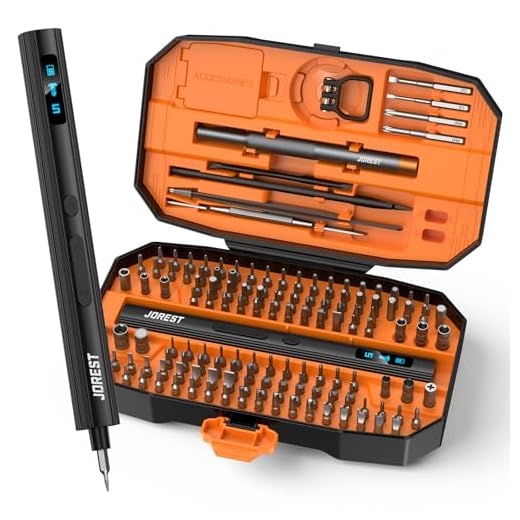
First, gather necessary items such as a heat gun, an adhesive remover, and a set of precision screwdrivers. Proper lighting will also aid visibility throughout the process. Begin by applying gentle heat around the lens area to loosen any adhesive that’s holding it in place. This step is vital for ensuring a clean separation from the housing.
Once the adhesive is softened, use a plastic pick or opening tool to carefully lift the unit away from the device. Take caution not to damage surrounding elements. After removal, clear any remaining adhesive from the mounting area to ensure a secure fit for the new part. Adhering to these methods provides the best chance of success without further damage to the framework.

Finally, align the new optical unit with precision and press gently to secure it in place. Allow the adhesive to cure according to the manufacturer’s specifications for optimal results. Following these steps will significantly enhance your image-capture capabilities and extend the life of your device.
Replacing the Lens on Your Galaxy Note 8
Begin the process by gathering necessary tools such as a small Phillips screwdriver, plastic opening tools, and a suction cup. Ensure the device is powered off and, if possible, remove the SIM card tray.
- Using the suction cup, gently lift the back panel to create a small gap.
- Insert a plastic opening tool into the gap and carefully slide it around the edges to detach the adhesive. Take your time to avoid damaging the casing.
- Once the back is removed, locate the internal components, paying close attention to the protective cover over the optical unit.
- Unscrew the screws securing the cover and gently lift it away to expose the lens assembly.
- Disconnect the flex cable carefully using the plastic tool to avoid damaging it during removal.
- Remove the faulty optical component and replace it with the new one, ensuring the alignment is correct.
Reassemble the device by reversing the steps: replace the cover, secure with screws, and reapply adhesive to the back panel. Ensure everything is securely fitted before powering on.
Testing the newly installed optical unit is critical. Check clarity and functionality of photos to confirm successful installation.
Keep in mind the importance of handling sensitive components delicately and following safety precautions throughout the process.
Understanding the Samsung Note 8 Imaging System
The imaging system on the Samsung Note 8 includes a dual configuration with a 12 MP wide-angle primary sensor and a secondary telephoto lens, also 12 MP. This setup allows for 2x optical zoom and enhanced depth-of-field effects.
For optimal results, switching between the two sensors occurs seamlessly when shooting. The primary lens excels in low-light conditions while the telephoto option proves beneficial for distant subjects. The dual capture mode enables simultaneous shooting with both sensors, combining images for better clarity and detail.
Color accuracy and dynamic range are impressive, attributed to the advanced processing algorithms employed by Samsung. These algorithms enhance image quality by adjusting focus and exposure in real-time. Night mode is particularly useful for capturing clear shots in dim environments, thanks to longer exposure times and noise reduction technology.
It’s crucial to maintain the lenses free from smudges and scratches. Utilize microfiber cloths for cleaning to prevent any potential damage. For additional effects, consider using the built-in Pro mode, allowing manual adjustment of settings such as ISO, shutter speed, and white balance.
| Feature | Description |
|---|---|
| Primary Sensor | 12 MP, wide angle, excellent in low light. |
| Telephoto Sensor | 12 MP, supports 2x optical zoom. |
| Dual Capture | Simultaneous image capture from both sensors. |
| Night Mode | Enhanced low-light photography capabilities. |
| Pro Mode | Manual settings for advanced control. |
Each component in this imaging system contributes to a highly versatile photography experience. Familiarity with various features maximizes creative possibilities when snapping photos or recording videos.
Gathering Necessary Tools for Lens Replacement
Acquire a precision screwdriver set, specifically one that includes Philips and Torx bits. A size smaller than standard will ensure compatibility with tiny screws. An opening tool, preferably made of plastic, helps prevent scratches on the device’s surface.
Invest in adhesive remover or isopropyl alcohol to deal with any stubborn glue. This aids in safely detaching components without risking damage. A tweezer set is beneficial for handling small parts accurately, while a work mat keeps everything organized during assembly.
A bright LED light or a magnifying glass might be useful for inspecting tiny details. A dust blower can assist in keeping the workspace clean and free from debris. Ensure that all tools are readily available before proceeding, as this will streamline the entire process.
Consider wearing gloves to reduce the risk of fingerprints on internal surfaces and maintain cleanliness. Lastly, have a clean cloth on hand for any accidental spills or smudges. Following these guidelines will make the process smoother and more successful.
Powering Down Your Galaxy Note 8 Safely
To turn off the device properly, press and hold the power button located on the right side until the power menu appears on the screen.
Select “Power Off” from the options. A confirmation dialog will pop up. Tap “Power Off” again to confirm your choice.
Once the phone is shutting down, wait for the screen to go completely dark before proceeding with any repair, ensuring no unexpected disruptions occur during the lens replacement process.
To restart the device, follow the same steps, but choose “Restart” instead of “Power Off.” This ensures the system refreshes, preventing any potential glitches.
Always ensure that all unsaved data is backed up before powering down, preventing loss during repairs or updates.
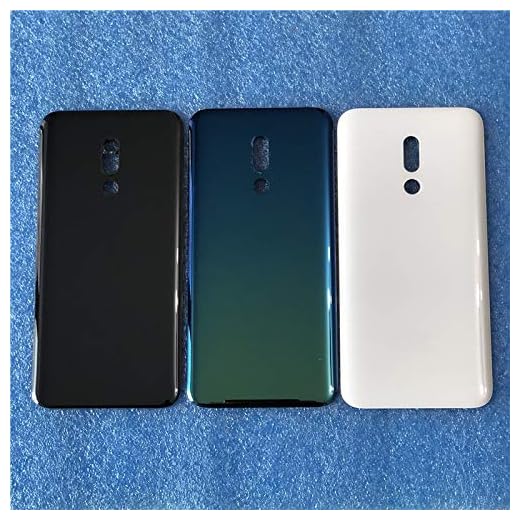
Removing the Back Cover of the Galaxy Note 8
To detach the rear panel, follow these precise steps:
- Ensure a safe environment by switching off the device completely.
- Gather a heat source such as a heat gun or a hairdryer. Apply heat gently around the edges for about 30 seconds to soften the adhesive.
- Use a plastic opening tool or thin blade. Carefully insert it into one corner of the device to create a small gap between the rear panel and the frame.
- Slide the tool around the perimeter to loosen the adhesive. Maintain a gentle pressure, avoiding contact with internal components.
- Once the adhesive is sufficiently loosened, carefully lift the back cover starting from the corner where the gap was created. Ensure it detaches without excessive force.
- Remove the cover completely and place it aside, ensuring it does not come into contact with any hazards.
Verify that all components are intact before proceeding with further modifications or replacements. This ensures optimal functionality and longevity.
Identifying the Camera Lens Assembly
Begin by carefully examining the rear section of the device. Locate the distinct area where the lens module is situated–this is often a circular or rectangular cutout, typically surrounded by the device’s casing.
The assembly comprises several components: the lens itself, the lens cover, and a protective glass layer. Each part plays a vital role in ensuring clear image capture. Pay attention to any visible damage, such as scratches or cracks, which can significantly impact functionality.
Utilize a magnifying tool if necessary, to closely inspect the edges of the lens assembly. Identifying screws or adhesive used in securing the lens is critical for the next phase of the process. A clear understanding of how these components connect will assist in effective disassembly.
Document the condition of the lens and note any peculiarities that might require special attention during the replacement procedure. This will facilitate smoother handling and application of the new lens assembly.
Disconnecting the Camera Lens from the Mainboard
First, I ensured all necessary tools were at hand, particularly the precision screwdriver set and plastic opening tools. With the device powered down, I gently forced the back cover off, following previous guidelines. After that, I located the protective casing over the assembly and carefully removed it with a spudger.
Next, I identified the flex cable connected to the lens assembly. Utilizing the precision tweezers, I delicately lifted the connector off the mainboard, ensuring no damage occurred to surrounding components. Patience is key; applying too much force could lead to unintended breakage.
With the connector unlatched, I moved to the securing screws holding the assembly in place. Using the appropriate size screwdriver, I meticulously removed each screw and placed them in a safe location. This step is vital to prevent losing any components during assembly.
Finally, I gently detached the lens assembly from its placement on the mainboard, ensuring no adhesive residue remained behind. Taking care during this process preserves the integrity of the device and prepares it for the installation of the new lens.
Carefully Removing the Old Camera Lens
Utilizing a heat source, gently warm the rear cover of the smartphone to soften the adhesive holding the lens in place. This can be achieved with a heat gun or a hairdryer. Maintain a safe distance to avoid damage to internal components.
Once warmed, employ a plastic opening tool or a thin blade to create a gap between the lens and its housing. Start at one edge and carefully slide the tool around the perimeter to break the adhesive bond. It is critical to proceed with caution to prevent cracking the surrounding glass.
As the lens begins to loosen, gently lift it out of its encasement using tweezers or a suction cup. Avoid applying excessive force to minimize the risk of damaging nearby parts. If resistance is encountered, apply additional warmth and try again.
Inspect the area for any remaining adhesive fragments after the lens is removed. These should be cleaned carefully using a soft cloth or a plastic tool to ensure a smooth surface for the new lens installation.
Before moving on, verify that all parts are intact, and no residual pieces are left behind that could interfere with the new lens fitting or functionality.
Preparing the Surface for New Lens Installation
Ensure the device is placed on a clean, flat surface. Using isopropyl alcohol on a microfiber cloth, gently clean the area surrounding the lens assembly. This step prevents dust and debris from interfering with the adhesive or the new optical component.
Next, utilize a soft brush to eliminate any remaining particles. Focus on corners and crevices where dirt may accumulate. A thorough cleaning creates a smooth environment for proper adhesion of the new part, leading to optimal performance.
Check Adhesive Residue
Examine the old adhesive residue left behind after the previous assembly has been dismounted. Use a plastic spudger or a similar tool to carefully scrape off any remnants, avoiding damage to the surrounding surface. This ensures a flat surface that will hold the new lens securely.
Final Inspection
Before proceeding with the installation, conduct a final inspection of the lens area. Verify that it is completely free of dust, oils, or adhesive. Proper preparation significantly enhances the longevity and clarity of the newly installed optical element.
Installing the New Lens into Place
Align the new optic component precisely with the mounting bracket. Ensure that the adhesive surface is clean and free of dust before positioning.
Securing the Lens
Gently press down the new element to create a strong bond. It’s crucial to apply even pressure without using excessive force. Verify that it sits flush with the surrounding frame.
Reconnecting Components
Once the new optical unit is secure, reconnect the flex cable to the mainboard. Ensure that it snaps in firmly and double-check for any misalignment.
After securing everything in place, reassemble the device by replacing the back cover followed by a power-up test to confirm proper functionality of the new component.
Reconnecting the Lens to the Mainboard
Align the new lens assembly with the designated connection point on the mainboard. Ensure that the metal pins correspond with their slots to maintain a secure connection. Press down gently until a click is felt, indicating that it is firmly in place.
Steps for Proper Alignment
Check the orientation of the lens. It should fit seamlessly without forcing it into position. If misaligned, carefully adjust before finalizing the connection.
| Step | Detail |
|---|---|
| 1 | Align the lens assembly with the mainboard connection. |
| 2 | Ensure metal pins match their respective slots. |
| 3 | Press down gently until a click is heard. |
| 4 | Verify proper alignment before securing. |
Once the assembly is connected, double-check the stability by lightly tugging on the lens to confirm it is secure. Proceed with reassembly, ensuring that no wires are pinched during the process.
Sealing the Back Cover Securely
After ensuring the new optical component is installed correctly, the next step involves sealing the rear enclosure firmly. Begin by applying a thin yet even layer of adhesive around the perimeter of the back lid. This will help create a strong bond and prevent moisture and dust ingress.
Carefully position the back cover over the device, making sure all alignment points match appropriately. Start pressing gently from one edge and move across to avoid air pockets that could affect adhesion.
Once adequately aligned, apply slight pressure along the edge to ensure a tight fit. It’s advisable to use a soft cloth to avoid fingerprints or smudges on the surface during this process.
To enhance the seal, placing a weighted object on top for a few minutes can aid in securing the enclosure. After some time, remove any excess adhesive that may have squeezed out during the sealing process.
Allow the adhesive to cure completely as per the manufacturer’s recommendations before proceeding to power on the device. This ensures that the enclosure remains intact during daily usage.
Testing the New Lens Functionality
Once the new optic is in position, conducting a thorough examination is paramount. Access the camera app to initiate testing. Capture images under various lighting conditions to assess clarity and color accuracy.
Verifying Auto-Focus and Zoom Features
Test the auto-focus by taking close-up shots and distant views. Adjust the zoom functionality, ensuring smooth transitions between distances without any lag or distortion. Pay attention to any flickering or blurriness during these trials.
Assessing Image Quality
Evaluate sample photos for sharpness, contrast, and performance. Use both low and bright light environments to determine the new unit’s capabilities. Look for any unexpected artifacts or defects in the resulting images. If issues arise, reconsider installation steps or the quality of the replacement unit.
After extensive testing, if the results meet expectations, the enhancement is successful. Keep your device updated for optimal performance and stability with the new addition.
Troubleshooting Common Lens Replacement Issues
Misalignment during installation often leads to blurry images. Ensuring the new component is perfectly seated in the assembly will prevent this. Check the alignment with the mounting points before securing it.
Dust or debris trapped between the new surface and the body can impair functionality or image quality. Use an air blower before placing the new piece to eliminate potential contaminants.
If the replacement doesn’t activate, inspect the connection to the mainboard. A loose ribbon cable or connector can disrupt functionality. Gently reconnect any cables that appear disconnected or loosely attached.
Resolving the Focus Problem
Focus issues may arise after installation if the lens isn’t correctly calibrated. Test focus by capturing images at various distances. If consistent failure occurs, consider repeat installation or resetting the device.
Dealing with a Cracked or Broken Assembly
If the assembly exhibits cracks post-operation, it’s crucial to assess the extent of damage. A minor fracture might not affect performance, but significant damage requires a complete replacement of the assembly itself. Be cautious in handling any broken components to avoid injury.
Maintaining Your Galaxy Note 8 Camera Post-Replacement
Regular care is vital to ensure optimal performance after installing a new lens. Start by keeping the device clean. Dust and smudges can affect image quality.
- Utilize a microfiber cloth to gently wipe the lens surface. Avoid abrasive materials that could scratch.
- Consider using a protective case that may offer added shield against impacts and debris.
Monitor for any irregular behaviors such as blurriness or unexpected errors. If any issues arise, immediate action is required.
- Revisit the installation all connections. Ensure the new assembly is fitted snugly.
- Check settings within the camera application. Resetting them can sometimes resolve software-related glitches.
Regularly update the device’s software. Updates often carry enhancements that can improve functionality and stability.
Finally, if frustration persists after attempted fixes, consulting with a professional repair service might be wise. Expert evaluation can provide insights and solutions not easily discernible otherwise.
FAQ:
What are the steps to replace the camera lens on a Galaxy Note 8?
Replacing the camera lens on a Galaxy Note 8 involves several key steps. First, power off your device to prevent any damage. Next, use a heat gun or hairdryer to slightly heat the back of the phone, which helps soften the adhesive. Carefully use a suction cup and a plastic pry tool to separate the back cover from the frame. Once you have access to the internal components, unscrew any screws securing the camera module. Gently disconnect the camera from the motherboard. After that, replace the old lens with the new one, reconnect it, and secure everything back in place using the screws and adhesive tape. Finally, reattach the back cover, ensuring it is sealed properly. Power the device back on to test the new lens.
Is it necessary to heat the phone before opening it for lens replacement?
Yes, heating the back of the Galaxy Note 8 is recommended before opening it. This process softens the adhesive that holds the back cover in place, making it easier to remove without causing damage to the glass or internal components. Be cautious not to overheat, as excessive heat can harm the electronics inside. A gentle application of heat will usually do the trick.
What tools do I need to replace the camera lens on my Galaxy Note 8?
To replace the camera lens on a Galaxy Note 8, you’ll need a few specific tools: a heat gun or hairdryer for softening the adhesive, a suction cup for lifting the back cover, plastic pry tools to safely detach components, a Phillips screwdriver to remove screws, and tweezers for handling small parts. Make sure to work in a clean, well-lit environment to minimize the risk of losing any small components.
Can I replace the camera lens myself, or should I take it to a professional?
Replacing the camera lens on a Galaxy Note 8 can be done by yourself if you have the right tools and some technical skills. However, if you’re not comfortable with opening your device or are unsure about the process, it’s advisable to seek help from a professional. They have the experience and equipment to handle such repairs without risking further damage to your phone.
Will replacing the camera lens void my warranty?
Replacing the camera lens on your Galaxy Note 8 could potentially void your warranty, especially if it involves opening the device and tampering with internal components. Manufacturers often specify that any unauthorized repairs or modifications may result in the loss of warranty coverage. It’s a good idea to check your warranty terms or consult with the manufacturer before proceeding with a lens replacement.


