


When considering whether this compact device can handle aquatic adventures, I confidently state that it is rated for shallow water use. Its robust design allows for short immersions, making it suitable for activities like swimming or snorkeling without needing additional accessories.
For seamless performance below the surface, I recommend testing it in shallow waters first. Ensure all seals and compartments are properly closed to prevent any potential water ingress. The device’s built-in waterproof rating generally suffices for brief encounters in shallow conditions.
Unfortunately, attempting deeper explorations may lead to complications. Without specialized attachments, limitations on quality and functionality can arise at significant depths. If your interests gravitate towards full diving experiences, acquiring dedicated equipment designed for such environments is advised.
Using TomTom Camera in Aquatic Environments
When engaging in aquatic activities and capturing footage, utilizing the appropriate protection is crucial. The device in question is rated for moisture resistance, allowing for use in splashes and brief exposure to water. However, comprehensive immersion demands additional equipment to ensure functionality and safety.
Recommended Practices
- Check the manufacturer’s specifications to verify moisture ratings.
- Consider investing in specialized housing designed for full submersion.
- Perform tests in shallow water to evaluate performance before deeper excursions.
Potential Limitations
Operating in wet conditions without proper housing can lead to damage, impacting the device’s longevity. The lens may also incur distortions, affecting the quality of captures. Always prioritize the integrity of the equipment and the quality of footage by using suitable protective cases when engaging in submerged activities.

Understanding TomTom Action Camera Specifications
To capture quality footage, it’s critical to understand the specifications of your recording device. Below is a breakdown of important features that will enhance your filming experience.
- Resolution: Look for models that offer at least 1080p recording, ensuring sharp and clear images.
- Frame Rates: Higher frame rates, like 60 fps or more, will provide smoother motion for fast-paced activities.
- Field of View: A wider viewing angle, around 170 degrees, allows for vast scenes to be captured in one shot.
- Stabilization: Optical or digital stabilization reduces blurriness from shaking, resulting in steady footage.
- Water Resistance: Verify if the unit is inherently resistant to moisture, as this is crucial for aquatic shoot conditions.
- Battery Life: Longer operational times prevent interruptions. Look for specs indicating extended recording periods.
- Storage Options: Check compatibility with various microSD cards for increased storage capacity, enabling longer shooting sessions.
- Connectivity: Wi-Fi and Bluetooth functionalities allow for easy sharing and remote control capabilities.
- Durability: Rugged design ensures that the model withstands tough outdoor conditions while maintaining functionality.
Understanding these particularities will assist in making informed choices for specific scenarios, leading to ideal footage results.
Water Resistance Rating of TomTom Cameras
The water resistance rating for these devices typically falls within the IPX7 category, meaning they can withstand submersion in water up to 1 meter for 30 minutes. This is suitable for activities like rain exposure or splashes.
Here’s a detailed breakdown:
- IPX7 rating supports immersion but not prolonged underwater use.
- Always ensure all ports and covers are securely closed before exposure to water.
- Test in a controlled environment first if unsure about water integrity.
For aquatic adventures, adding a protective housing helps extend functionality, particularly at greater depths. This accessory allows for filming in more extreme conditions, protecting from pressure and enhancing image quality.
Recommendations suggest avoiding direct saltwater contact to prevent corrosion. After exposure, rinse the device with fresh water and dry it thoroughly to maintain optimal performance.
In summary, while these models offer resistance to water, they aren’t designed for significant depths. Utilize supplemental housing for enhanced underwater experiences.
Factors Affecting Underwater Performance
Performance in aquatic environments relies on various factors that can significantly influence the quality and clarity of recorded footage. Understanding these elements is key to optimizing results.
Water Clarity
Water clarity can vary greatly depending on location and environmental conditions. In clear waters, I find that colors appear more vibrant, while murky waters can dull the visual quality. Be mindful of seasonal changes, as algae blooms or increased sedimentation can impact visibility.
Lighting Conditions
Natural light penetration diminishes with depth. I often notice that footage captured in shallow waters benefits from ample sunlight, while deeper conditions may require artificial lighting solutions to maintain image quality. A bright sunny day can enhance colors, while overcast conditions can lead to flat images.
| Depth Range | Light Availability | Recommended Adjustments |
|---|---|---|
| 0-5 meters | Good | No adjustments needed |
| 5-10 meters | Moderate | Increase ISO settings |
| 10+ meters | Poor | Use external lights |
In addition, wave actions can create turbulence that may affect stability. Securing the device firmly can help minimize motion blur. Finally, it’s beneficial to consider the type of mount or harness used, as this can influence angles and perspectives for recording.
Limitations of Standard Housing for Underwater Use
Standard housings are not designed for deep exploration. Typically rated for shallow depths, they may become compromised beyond recommended limits. At deeper levels, the increased pressure can cause seal failure or leakage.
Image Quality Issues
Using a regular housing can distort colors and reduce clarity. Water absorbs light differently, leading to less vibrant footage. Additionally, reflections off the housing can create unwanted glare, negatively impacting overall image quality.
Controls Accessibility
The controls may become difficult to operate in standard housings. Rigid buttons respond poorly under pressure and can lead to frustrating experiences. Some features may become completely inaccessible, limiting functionality and spontaneity.
Cross-examining these limitations is crucial for effective utilization. Practical experimentation is recommended to gauge optimal performance within specific environments. Awareness of these constraints will enhance your experience significantly.
Common Misconceptions About Action Cameras
Many assume that all recording devices are suitable for aquatic environments, but this isn’t accurate. A general belief exists that any rugged or waterproof device can endure prolonged exposure to water. Manufacturers often highlight durability, leading to this misunderstanding. It’s crucial to consult specifics about resistance levels and environmental limits.
Misbeliefs Regarding Water Resistance
Users frequently overlook that water resistance and waterproofing are distinct. Devices labeled as water-resistant can withstand splashes or rain but are not necessarily designed for submersion. Relying solely on the stated ratings can result in equipment damage under water.
Battery and Internal Components
There is a common thought that immersion doesn’t affect battery life. In reality, exposure to water can negatively impact battery functionality. Moisture may cause corrosion over time, which further reduces performance. It’s best to be cautious about usage in wet environments.
Best Practices for Using TomTom Cameras in Water
To achieve optimal results in aquatic environments, ensure that the housing is securely sealed. Check for any debris or damage around the seals before each use, as water can easily infiltrate if they are compromised.
Pre-Use Checklist
Prior to launching into activities involving water, fully charge the battery and ensure that all firmware is updated. Familiarize yourself with settings that enhance performance in wet conditions, such as adjusting resolution and frame rate.
Maintenance Tips
After exposure to salt water or chlorine, rinse the equipment with fresh water to prevent corrosion and mineral buildup. Store the unit in a dry place after use, avoiding prolonged exposure to moisture. Regularly inspect the protective casing for scratches or wear that might affect waterproof capabilities.
Utilize adjustable straps or mounts to secure the device firmly, reducing the risk of losing your gear while in action. Experiment with different angles and perspectives to capture dynamic shots, but remain aware of the camera’s buoyancy.
Utilizing external lighting can greatly enhance visibility, especially in deeper waters or cloudy conditions. If you plan to shoot in dim environments, consider investing in compatible accessories that provide additional illumination.
Finally, be conscious of your movement and surroundings. Quick, abrupt motions may introduce blurriness to your footage. Maintain a steady pace to achieve smooth recordings, preserving the quality and clarity of your visual content.
Recommended Depth Limits for TomTom Cameras
For optimal performance, I recommend keeping the device at a maximum depth of 1 meter (approximately 3.3 feet) without specialized housing. Exceeding this limit can lead to potential water ingress and damage.
Here are some key depth guidelines to consider:
- 1 meter (3.3 feet) – Safe operation for short periods, suitable for surface-level activities.
- Up to 5 meters (16.4 feet) – Requires a dedicated waterproof case for sustained use; ideal for shallow snorkeling or pool activities.
- Beyond 5 meters (16.4 feet) – Use of professional-grade environmental enclosures becomes necessary to ensure protection and functionality.
Always ensure the seal integrity of any housing before submersion. Regularly inspect for wear or damage that could compromise watertightness.
When planning underwater activities, consider factors such as water temperature, pressure, and duration of exposure. These elements can significantly affect the device’s performance and longevity.
By adhering to recommended depth limits and utilizing appropriate casing when required, I can enjoy capturing quality moments while mitigating risks associated with deeper water immersion.
Impact of Water Conditions on Video Quality
When capturing footage in aquatic environments, I’ve noticed that various water conditions significantly influence image clarity and overall quality. Factors such as water clarity, light penetration, and surface movement play a crucial role in how well I can document my adventures.
Water Clarity
Clear water enhances visibility, allowing better detail in recorded images. Murky or sediment-filled environments, on the other hand, diminish contrast and color fidelity. I advocate checking the water’s transparency before shooting; if it’s unclear, avoid expecting high-quality captures.
Light Penetration
Light behavior changes underwater. Red hues fade rapidly with depth, leading to a blue or greenish cast in images. Utilizing color correction filters can help, but I prefer staying within shallower limits where natural light is abundant for richer colors and greater vibrancy.
Surface disturbances, such as waves or ripples, can further complicate recordings by creating unwanted reflections and shadows. When possible, I aim for calm water to obtain stable footage. Observing weather and ocean conditions beforehand allows me to choose optimal times for shooting.
Potential Risks of Submerging Without Diving Lenses
Submerging your compact recording device without appropriate protective eyewear poses several threats. Exposure to water under pressure can lead to malfunctions, degrading the quality of your footage significantly. The water can permeate internal components, causing corrosion and potentially irreversible damage.
Common Risks
Here are key risks associated with immersing the equipment:
| Risk | Description |
|---|---|
| Water Damage | Prolonged exposure to moisture can result in short circuits and electrical failure. |
| Image Distortion | Refraction and other optical issues in water can compromise the clarity and fidelity of your recordings. |
| Loss of Warranty | Many manufacturers do not cover damage caused by submersible activities without proper gear. |
| Accidental Drops | The likelihood of dropping the device increases when handling it in slick and slippery conditions. |
Technical Malfunctions
The internal mechanics may also suffer from the rapid temperature changes when transitioning between air and water. Pressure effects can warp seals, leading to potential leaks. Cleaning and servicing might become necessary if contaminants enter the housing, contributing to further costs and inconveniences.
How to Protect Your Camera from Water Damage
To ensure safety from moisture-related issues, I always make it a priority to check the seals on the housing. Regular inspection of gaskets and closures can prevent unwanted leaks during aquatic adventures.
Utilize Waterproof Housing
A robust, waterproof case is essential in keeping electronic equipment safe from liquid exposure. This protective enclosure should meet specific depth ratings to suit various activities, providing an added layer of security against splashes or submersion.
Check for External Debris
Before submerging, I meticulously clean the surface of the device. Sand, dirt, or other contaminants can compromise the integrity of seals and entrances, leading to possible breaches when submerged.
When finished with aquatic activities, promptly dry any outer wet surfaces to avoid prolonged exposure that can lead to corrosion.
Storing away from high humidity environments is crucial. I always keep my gear in a cool, dry location, preferably with silica gel packets to absorb excess moisture, which is particularly beneficial in the long term.
Following these steps contributes to maintaining the functionality and longevity of my equipment against water-related damage.
Testing TomTom Cameras in Shallow Water
For optimal performance, I recommend restricting submersion to depths of 1 to 2 meters when using these devices in shallow aquatic environments. This range minimizes risks associated with water pressure while maintaining video quality.
Prior to any aquatic experiment, I ensure the housing is properly sealed, examining it for any potential leaks. Conducting a brief test in a controlled area lets me check for functionality before deeper exploration.
During my trials, light conditions play a significant role. Bright daylight enhances clarity and color accuracy, leading to superior footage. Under low-light situations, I adopt alternative settings if available, to combat graininess.
The type of water influences the outcome. Clear water yields better visuals compared to murkier environments, which can interfere with lens clarity and color saturation. I find that positioning the lens towards the light source enhances brightness and vibrancy.
Wind and surface conditions also impact the stability of the recordings. Using a stabilizing mount or ensuring a steady grip helps reduce shake, which is critical for achieving smooth imagery.
Lastly, I avoid prolonged exposure as water ingress can damage internal components. Keeping sessions short allows me to monitor performance effectively and ensures longevity for the equipment.
Alternative Accessories for Underwater Filming
Using additional gear can significantly enhance the underwater filming experience. I recommend investing in a waterproof housing or case designed specifically for your device; this provides an extra layer of protection against moisture. Ensure it fits snugly and seals properly to prevent water ingress.
Another valuable accessory is a buoyancy pole, which allows me to extend my reach into the water. This helps to capture a wider range of shots while maintaining comfort and stability. Additionally, consider a flotation strap that prevents accidental sinking and keeps the setup accessible.
Filters for color correction are also beneficial. These can compensate for the loss of color depth when filming at greater depths, enhancing the overall visual quality. Options for red or magenta filters can be particularly effective depending on the environment.
For improved lighting conditions, a compact underwater light can elevate the quality of the footage significantly. Especially in darker waters or during overcast conditions, additional lighting can prevent murky visuals.
Finally, a stabilization gimbal helps maintain smooth footage during movement. This is critical in shifting water currents or while swimming. For anyone serious about underwater storytelling, these accessories are must-haves.
| Accessory | Purpose |
|---|---|
| Waterproof Housing | Protection from water damage |
| Buoyancy Pole | Extended reach and stability |
| Color Correction Filters | Enhance color depth |
| Underwater Light | Improves visibility in low light |
| Stabilization Gimbal | Maintains smooth footage |
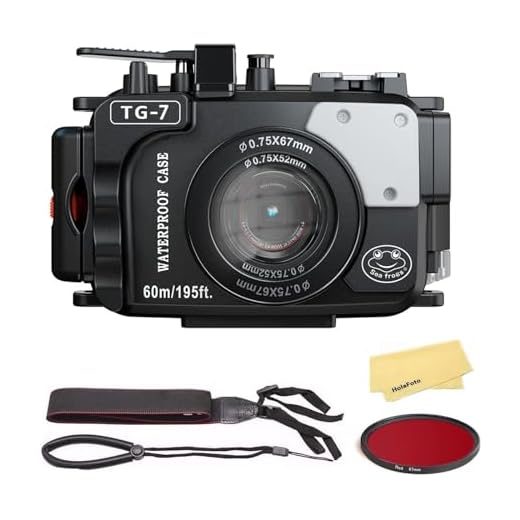
Using Waterproof Cases with TomTom Cameras
For optimal protection against water, utilizing a waterproof housing is paramount. I recommend selecting a case designed specifically for the model, ensuring a snug fit and reliable seals. These housings can withstand substantial pressure, even at notable depths.
When choosing a case, verify its rated depth. Most waterproof housings are capable of withstanding depths of around 30 meters, suitable for recreational use.
| Model | Maximum Depth Rating | Weight |
|---|---|---|
| Model A | 30 meters | 300 grams |
| Model B | 40 meters | 320 grams |
While standard housing offers some protection against splashes or rain, it is not adequate for prolonged submersion. For underwater adventures, always opt for a dedicated waterproof case.
Clear windows enhance visibility, helping to maintain video quality even in challenging conditions. Be mindful of the lens’s cleanliness before each use; any smudges can impact footage clarity.
Post-use care is crucial. Rinse the housing with fresh water after exposure to saltwater environments to avoid corrosion or deposits. Regular maintenance maintains the integrity of seals, especially if the case has been used extensively.
How to Choose the Right Case for Underwater Use
Opt for a case specifically rated for the depths you’ll be exploring. Check the manufacturer’s specifications to ensure compatibility with your device.
Key Features to Consider
- Material: Look for durable materials like polycarbonate or ABS plastic that resist impact and corrosion.
- Sealing: Ensure gaskets are robust and provide a watertight seal. Rubber seals are preferable for reliability.
- Clear Lens: A high-quality acrylic or tempered glass lens is essential for clear visibility and distortion-free images.
- Accessibility: Select a design that allows easy access to buttons and controls. This is particularly important for adjusting settings while in water.
Testing and Additional Tips
Before your aquatic adventure, perform a dry test by submerging the case in a sink or tub to check for leaks. Additionally, take some practice shots in a controlled environment to ensure everything works as intended.
Keep in mind, purchasing a case with an anti-fog feature is advantageous, as this can help maintain clarity during temperature fluctuations. Always store the case properly when not in use to prolong its lifespan.
For beginners, consider starting with shallow water to familiarize yourself with the setup and functionality of your equipment, gradually increasing complexity as you gain confidence.
Comparing TomTom with Other Action Cameras for Aquatic Use
After testing several models, I found that different brands offer varying levels of performance in wet conditions. My experience suggests that while this brand’s equipment performs adequately in shallow waters, competitors excel at depth resilience and optical clarity.
Performance Comparison
Here’s how this brand stacks up against prominent alternatives:
| Feature | TomTom Model | Competitor A | Competitor B |
|---|---|---|---|
| Water Resistance Rating | IPX7 | IP68 | IPX8 |
| Maximum Depth | 1 meter | 10 meters | 20 meters |
| Optical Quality | Average | Superior | Good |
| Battery Life | 2 hours | 3 hours | 2.5 hours |
Overall Insights
This brand’s model is adequate for basic aquatic activities, but if you’re seeking more durability and visual fidelity at greater depths, other manufacturers like GoPro or DJI present compelling options. Recommendations lean toward using specialized gear for optimal aquatic experiences. If submerging for extended periods, accessories tailored for such conditions will significantly enhance performance and protect equipment.
Maintenance Tips After Water Exposure
Immediately after water exposure, dry the exterior thoroughly with a soft, lint-free cloth to prevent residue buildup and corrosion. Pay special attention to all openings and buttons, ensuring no moisture remains trapped inside.
Post-Exposure Cleaning Process
Utilize a gentle cleaning solution for a more thorough clean. Mix lukewarm water with a small amount of mild detergent. Dip a soft cloth into the solution and wipe down all surfaces, particularly around seals and ports. Rinse with clean water to remove any soap residue.
| Cleaning Step | Instructions |
|---|---|
| Drying | Pat dry with a soft cloth immediately after use. |
| Wet Cleaning | Use a solution of lukewarm water and mild detergent, rinse after cleaning. |
| Seals Check | Inspect seals for debris and ensure they are intact. |
| Storage | Store in a dry, cool place to prevent mold growth. |
Regular Maintenance Tips
Regularly check seals for wear or damage, as compromised seals increase the risk of moisture entering sensitive areas. If any parts appear corroded or damaged, consult a professional for repairs. Keeping the unit stored in a protective case during transport will mitigate exposure risks. Additionally, storing it in a silica gel pouch can help absorb any lingering moisture in the environment.
How Temperature Affects Aquatic Filming
Low temperatures can significantly influence footage quality. Frigid water causes condensation inside equipment, impacting clarity. To mitigate this, I recommend keeping gear at room temperature before exposure.
Effects of Temperature Variations
- Cold Water: Produces sharper contrasts but may lead to fogging.
- Warm Water: Enhances color saturation but risks overheating electronics.
- Thermal Layers: Aim to capture through different temperature gradients for unique effects.
Best Practices for Temperature Management
- Pre-warm devices by storing them in insulated cases.
- Utilize anti-fog solutions for lenses.
- Limit exposure time when operating in extreme conditions.
- Take breaks to allow equipment to acclimate.
Maintaining a stable temperature helps ensure that recordings remain clear and vibrant, enhancing the overall quality of aquatic experiences. Protect gear adequately and adjust strategies based on environmental conditions.
Setting Up Your Camera for Aquatic Environments
First, ensure the device is equipped with a high-quality waterproof casing designed for aquatic conditions. This will maintain functionality and protect it from exposure to water.
Key Settings for Water Activities
Before starting, adjust the settings for clarity in aquatic scenes. Here are critical adjustments:
| Setting | Recommendation |
|---|---|
| Resolution | Choose 1080p or higher for sharper images. |
| Frame Rate | Use 60fps for smooth footage during motion. |
| Field of View | Select wide angle to capture more of the surroundings. |
| White Balance | Set to ‘Underwater’ if available, or adjust manually for color accuracy. |
Pre-Trip Check
Conduct a thorough inspection before water activities. Verify that all seals are intact and free from debris. A simple test in shallow waters will help identify potential issues before capturing more significant moments.
Understanding the Functions of the Camera Underwater
Utilizing this device beneath the surface offers several functions that impact the overall filming experience.
1. Image and Video Capture
- The resolution and frame rate remain crucial for clarity; lower light can lead to grainy footage.
- Selectable settings may include slow motion or time-lapse, enhancing dynamic scenes.
2. Autonomy and Battery Life
- Cold temperatures can drain batteries faster; expect reduced operating time.
- Consider carrying spare batteries for extended sessions in aquatic scenarios.
3. Audio Quality
- Water can muffle sound; be prepared for distorted audio recordings.
- Utilizing external microphones may improve audio fidelity in some conditions.
4. Connectivity Options
- Wi-Fi and Bluetooth functionalities allow remote control and file sharing; signal strength may decrease underwater.
- Downloading footage may require adjustments based on various network limitations.
Awareness of these functions enhances the user experience and helps in optimizing footage quality while submerged. Taking into account environmental conditions and settings can lead to significantly improved results. Always experiment and adapt to different scenarios for the best outcomes.
Post-Production Techniques for Underwater Footage
Enhancing aquatic footage requires specific approaches. First, color correction is fundamental due to light absorption in water, which leads to loss of vibrancy. Apply color grading to restore lost hues, particularly reds and greens, using software like Adobe Premiere Pro or DaVinci Resolve.
Stabilization Methods
Shaky clips disrupt the viewing experience. Utilize stabilization tools available in editing software to smooth out movements captured during turbulent conditions. This technique can significantly improve the overall quality and readability of your footage.
Noise Reduction
Underwater recordings often have background noise. Employ noise reduction filters to manage unwanted sounds, allowing the primary audio–like marine life interactions or bubbles–to come through clearly. This adds a more immersive quality to the final product.
Applying these techniques will enhance the visual storytelling of your aquatic adventures. Always keep in mind the unique challenges presented by underwater environments and adjust your post-production workflow accordingly for optimal results.
Common Underwater Video Challenges and Solutions
Within aquatic settings, various challenges arise that can impact the quality of footage captured. Here are some common issues I encountered and how to effectively address them.
- Water Clarity: Murky or turbid water can reduce visibility. To enhance clarity, consider filming during optimal light conditions, such as midday, and utilize filters specific to water conditions.
- Color Distortion: Submerged filming often results in a shift in color, typically losing reds and greens. Employing color correction software during post-production can restore the natural vibrancy of the footage.
- Light Loss: Water absorbs light, resulting in dimmer scenes. To counteract this, increase your ISO settings and adjust the aperture when feasible. Additional artificial lighting can also improve brightness.
- Stabilization Issues: Movement in the water can lead to shaky footage. Using a stabilizing mount or editing software for post-stabilization can significantly improve the end results.
- Surface Reflections: Glare from the water surface can obscure shots. Tilt the lens slightly downwards to minimize reflections and improve focus on underwater subjects.
- Moisture Buildup: Condensation inside the housing can blur footage. It’s advisable to use anti-fog inserts or silica gel packets in the housing to prevent this issue.
- Battery Drain: Cold water can deplete battery life rapidly. Keep spare batteries warm in a pocket or use insulated cases to extend usage duration.
By implementing these strategies, the quality of images captured can significantly improve, making underwater experiences more memorable and visually appealing.
Legal Considerations When Filming Underwater
Before capturing footage below the surface, it’s essential to be aware of the legal framework surrounding underwater filming. Ensure compliance with local regulations which may dictate where and how video recording can occur in aquatic environments.
Permission for Filming
Obtaining consent from relevant authorities or marine institutions is often required, especially in protected areas. This can help avoid legal complications while promoting environmental conservation efforts.
Respecting Privacy Rights
If filming in public spaces, be mindful of individuals who may unintentionally appear in your footage. Familiarize yourself with laws regarding personal privacy and copyright in visual media to avoid infringement issues.
Environmental laws might also come into play, especially if filming involves interactions with wildlife or ecosystems. Responsible filming practices can not only safeguard legal accountability but also contribute positively to environmental stewardship.
Reviewing User Experiences of TomTom Cameras Underwater
Testing these devices in aquatic settings reveals a mix of satisfaction and disappointment. Users generally report that these cameras can function to a certain extent when submerged in shallow depths, particularly in calm water conditions. Most agree that while they handle surface splashes well, extended submersion poses challenges.
- Many users suggest limiting depth to around 1-2 meters to maintain video clarity.
- Color distortions and loss of sharpness are commonly noted as issues beyond a few meters.
- Battery performance diminishes more quickly due to colder temperatures when submerged.
Feedback often highlights the importance of environmental factors. Murky water or strong currents can significantly alter the quality of footage captured. Users recommend testing conditions beforehand to gauge how well the equipment can adapt.
- Pre-dive trials in pools have yielded clearer results compared to rivers or oceans.
- Users advise bringing extra batteries, as water immersion leads to faster drainage.
- Securing the device properly is crucial to avoid losing it in unpredictable water conditions.
Most shared anecdotes involve moments of capturing unexpected marine life or stunning underwater views that enhance their content. However, many also stress the significance of proper preparation, especially when planning to shoot for an extended time.
As a result, while these devices can achieve some impressive results in aquatic environments, achieving consistent quality may require extra precautions and limited expectations regarding depth and conditions. It’s worthwhile to keep practical limitations in mind based on firsthand accounts from fellow users.
Importance of Proper Lighting in Underwater Shots
Capturing stunning images subaquatically requires an understanding of light conditions. Water absorbs colors, particularly red, rapidly as depth increases, leading to images that may appear washed out or predominantly blue. To mitigate this, utilizing external light sources is often required to enhance color fidelity and detail.
Techniques for Effective Lighting
In low-light scenarios, consider using LED lights or video lights designed for aquatic environments. Position these lights at an angle to emphasize textures and features, avoiding direct front lighting that can create harsh shadows. Using diffusers can also soften the light and reduce glare, providing a more natural look to your shots.
Time of Day Considerations
The time of day affects underwater illumination significantly. Shooting during midday ensures optimal natural light penetration, enhancing clarity and detail. Conversely, early morning or late afternoon presents challenges due to lower light levels and potential color distortion. Understanding these elements can dramatically elevate the quality of underwater recordings.
Analyzing Image Distortion Without Diving Lenses
Testing various footage from the underwater world, I’ve observed noticeable image distortion when standard optics are in play. The most common type is barrel distortion, where lines that should appear straight are curved. This is particularly evident in wide-angle shots, which many of us might attempt to capture. The closer the subject is to the lens, the more pronounced this distortion becomes.
In shallow environments, the optical properties of water can further exaggerate these distortions. Light refraction can warp shapes, leading to a significant loss of visual fidelity in recordings. This is where the choice of equipment and settings becomes critical; I often find that adjusting the focal length or experimenting with positioning can mitigate some of the effects.
Another aspect to consider is color accuracy. Without specialized lenses, colors can shift underwater, resulting in cooler tones and a general desaturation. In my experience, utilizing white balance correction in post-production greatly assists in producing more natural-looking colors. However, starting with optimal settings reduces the need for correction later.
The overall clarity of images can also diminish rapidly with the increasing depth of water. Images can appear hazy or foggy, primarily due to the absorption of light wavelengths. This isn’t just a matter of distance; clarity can diminish even at relatively shallow depths, particularly in murky waters. Regular tests have shown that the best practice is to always be aware of the surrounding water conditions before shooting.
In summary, while exploring aquatic environments, maintaining awareness of optical characteristics plays a pivotal role in achieving high-quality results. Adjustments in technique and an understanding of light behavior in water significantly enhance the overall output and minimize unwanted distortions.
How to Achieve Stabilization in Underwater Footage
To minimize shakes and vibrations in aquatic filming, I recommend using optimal mounting techniques. A solid tripod or a stable float can provide an unshakable base. Always ensure the mount is securely fastened to avoid unexpected shifts during capture.
Reducing motion can significantly enhance clarity. Slow and deliberate movements create smoother transitions and avoid blurring effects caused by haste. Practice gliding through the water rather than jerking the camera, which can disrupt overall fluidity in recordings.
Utilizing Built-in Stabilization Features
Many modern devices incorporate stabilization technologies that help smooth out footage. Before shooting, check the settings to ensure these features are enabled. This can drastically reduce unwanted fluctuations in video, leading to much smoother results.
Post-Processing Techniques
After filming, applying software stabilizers during editing can rectify any remaining shakiness. Programs such as Adobe Premiere Pro offer integrated stabilizing options that examine frames and adjust the video accordingly. Regularly exporting clips after stabilization allows for immediate evaluation of the effectiveness.
Experimenting with different levels of stabilization effects can reveal the best balance for your footage. Each environment may require unique adjustments to achieve that seamless visual experience.
Recording Audio Quality Underwater
For optimal audio capture in aquatic environments, I recommend using an external microphone. Built-in audio features often struggle due to water interference, which can alter sound clarity and volume.
Recommended Practices
- Employ a waterproof external microphone designed specifically for submerged use.
- Ensure the microphone is securely fastened to avoid loss or damage.
- Test audio quality in shallow water before venturing deeper.
- Avoid windy conditions, as water movement can amplify background noise.
Additional Insights
When recording in water, be aware that sound travels differently than in air. Frequencies above 1 kHz may become muted. Therefore, adjusting your recording settings to enhance lower frequencies can improve sound quality.
Monitor the recording levels frequently. Consider using a backup recording device to safeguard against potential audio issues caused by water pressure or equipment malfunction. Following these guidelines can significantly enhance the sound quality of your submerged recordings.
Best Settings for Shooting Underwater Videos
For achieving optimal results while capturing footage beneath the surface, I recommend setting the resolution to 1080p at 60fps. This delivers a smooth video while maintaining detail.
Adjust the field of view (FOV) to wide mode. A wider perspective enhances depth and captures more of the surroundings, which is crucial in aquatic environments.
A white balance setting at around 5600K helps counteract the bluish tint caused by water. This adjustment ensures colors remain vibrant and true to life.
Stabilization and Frame Rate Settings
Use stabilization features to offset the natural movements caused by currents and water ripples. This will provide a smoother viewing experience. Additionally, consider lowering the frame rate to 30fps for better low-light performance, especially in deeper waters where light is limited.
Audio Settings
For audio, switch to an external microphone setup if possible, as built-in mics may not perform adequately due to water noise. If an external option isn’t feasible, record audio separately and sync it in post-production.
After testing various settings, I found these configurations offer the best overall video quality and ease of use in aquatic footage. Proper adjustments are key to elevating the quality of your recordings beneath the waves.
Understanding the Effects of Water on Lens Clarity
Water can significantly impact the quality of footage captured, influencing visual clarity and detail. Factors such as refraction and absorption play crucial roles in how images appear when recorded through a wet interface.
Key Factors That Affect Lens Clarity
- Refraction: Light behaves differently when passing from air into water, altering angles and leading to potential distortions.
- Water Clarity: The presence of particles and pollutants can hinder visibility, negatively affecting image quality.
- Lighting Conditions: Insufficient light beneath the surface can cause darker and grainier footage, challenging for viewers to capture fine details.
Tips for Optimizing Clarity in Aquatic Filming
- Ensure the lens is clean and free from residue to avoid spotting.
- Utilize artificial lighting to enhance visibility in murky waters.
- Experiment with angles to reduce distortion effects caused by the water surface.
Be mindful of how water interacts with the lens to achieve the best possible results when capturing images in aquatic environments. Taking these factors into account can enhance the final output, providing viewers with an immersive experience.
Exploring Different Water Environments for Filming
For optimal results while capturing footage in various aquatic settings, knowing the specifics of each environment is paramount. Shallow areas, such as pools and lakes, can provide excellent conditions for vibrant images; however, moving water can introduce challenges like distortion and stability issues.
Types of Water Conditions and Their Implications
| Water Environment | Characteristics | Best Practices |
|---|---|---|
| Calm Freshwater | Clear visibility, minimal movement | Capture reflection shots at dawn or dusk |
| Flowing Rivers | Rapid currents, varying clarity | Use stabilization techniques and secure attachments |
| Saltwater | Higher density, potential for lens corrosion | Apply anti-corrosive treatments and avoid prolonged exposure |
| Open Oceans | Variable lighting, wave action | Set adequate exposure and consider filters for glare |
Each type of water condition influences footage quality. Poor lighting, for instance, can greatly affect color accuracy and detail. It’s advisable to equip yourself with proper filters and use manual settings for exposure adjustments. Adapting to the specific environment transforms how you document underwater experiences and enhances the outcome of your recordings.
Using Filters for Enhanced Underwater Photography
Utilizing color correction filters can significantly improve captured footage. Specific filters compensate for the color loss that occurs as sunlight penetrates water, allowing for more vibrant and true-to-life colors in your recordings.
Recommended Filters
Red filters are particularly beneficial for filming in tropics, where deeper reds and oranges are lost quickly. For shallow, clearer waters, a polarizing filter can reduce glare and enhance contrast. Each filter type plays a vital role in enhancing the visual quality of your videos.
Applying Filters Effectively
Correctly positioning the filter is critical for optimal results. Ensure that the filter is clean and attach it securely to the housing to avoid any issues with unwanted reflections. Experiment with different filters depending on the water conditions and depth for the best outcomes.
FAQ:
Can the TomTom action camera be used underwater without special lenses?
The TomTom action camera is designed to be splash-proof and can handle light rain and splashes, but it is not waterproof for extended underwater use without additional housing or lenses. For any significant underwater activity, it is recommended to use a waterproof case to ensure the camera remains safe and operational under water.
What happens if you use the TomTom action camera underwater without proper protection?
If you attempt to use the TomTom action camera underwater without a waterproof case, you run the risk of damaging the device. Water can enter the camera, potentially leading to malfunctions or complete failure. It’s crucial to check the manufacturer’s guidelines and use the appropriate housing for underwater shooting to prevent any water damage.
Are there any specific recommendations for shooting with the TomTom action camera in wet conditions?
When using the TomTom action camera in wet conditions, it’s advisable to have a waterproof case for protection against water damage. Users should ensure all ports are properly sealed and that any external microphones or attachments are also waterproof if they are planning to shoot in very wet environments. Always test the camera in a controlled environment before exposure to more challenging conditions, ensuring that it performs as expected.


