


Directly speaking, using certain glass from one brand on another is often not possible without an adapter. My experience suggests that while some adaptors exist, they may introduce limitations in functionality, such as autofocus not working and reduced image quality.
Many owners of specific mirrorless models might want to explore all options they have. It’s crucial to explore third-party manufacturers which may offer alternatives specifically designed to bridge the gap between different brands. Adapters vary widely in performance, and some may require manual adjustments, so researching user reviews can be beneficial.
Additionally, checking compatibility lists can save time. These resources often provide insights into which specific focal points and aperture sizes perform best through adaptors. Many enthusiasts prioritize maintaining image quality, so it’s wise to consider using premium adaptors for optimal results.
In my view, while mixing and matching gear can be appealing, clarity on functionality and potential limitations must guide the choices made for the best photographic experience.
Olympus Glass Compatibility with Canon Systems
Using Olympus optics on Canon bodies is not straightforward. These brands operate under different mount systems, which means direct connection without an adapter is not possible. The key to achieving functionality lies in the right adapters, allowing me to explore various focal lengths.
Recommended Adapter Solutions
I suggest considering the following adapter options:
- Olympus to Canon EF adapter – This allows the use of specific lenses made for Olympus Micro Four Thirds on Canon full-frame and APS-C bodies, particularly useful for those wanting to leverage wide-angle capabilities.
- Manual focus adapters – While autofocus may not be available, manual adapters ensure I can still use Olympus optics effectively by allowing full control over exposure settings.
Performance Insights
Image quality varies when adapting optics across systems. Factors influencing performance include:
- Optical characteristics of the specific lens – Some models perform admirably, while others might introduce aberrations.
- Sensor size and resolution of the Canon body – Higher resolution sensors may expose imperfections more prominently.
It’s beneficial to test various combinations to assess how these optical pairs behave under different shooting conditions. While versatility increases, a bit of trial and error may be needed to find the optimal setup for my workflow.
Understanding Lens Mount Systems
It’s essential to recognize how different mount systems function to determine if any given optic can fit another platform. Each brand typically uses its unique mechanism, which means that I cannot directly attach products from one to another without an adapter. The design specifications dictate the physical shape and electronic contacts necessary for operation.
Mount Types and Adaptability
Common types include the Micro Four Thirds, EF, and RF variations, among others. Each mount serves distinct purposes and offers various features such as autofocus and aperture control. Depending on the specific setup, using an adapter may allow integration between two systems, but compatibility could result in limitations regarding functionality.
Focal Length and Sensor Format
Another factor to consider is the sensor size and focal length conversion. A smaller sensor may crop the field of view, altering the perception of depth and perspective. This discrepancy can significantly affect my photography style and the types of shots I can effectively achieve. Always check the specifications to understand how a particular lens may alter the final image presentation.
Difference Between Olympus and Canon Lens Mounts
Understanding the differences in lens mounts is key for anyone looking to expand their photographic gear. The Micro Four Thirds mount, used by Olympus, features a flange distance of 20mm and a diameter of 38mm. This compact design enables the use of smaller lenses, making it ideal for lightweight setups. On the other hand, the EF mount adopted by Canon is characterized by a much larger diameter of 54mm and a flange distance of 44mm. This provides greater flexibility in terms of aperture design and supports a wider range of lens types.
Mechanical Differences
The mechanical interfaces also differ. The Micro Four Thirds mount employs a positive locking mechanism that ensures a secure fit, while the EF mount uses a bayonet-style connection. This can affect how easily one swaps lenses and ensures stability during use. Additionally, the communication protocols vary; each system utilizes distinct electronic contacts that transmit information related to aperture settings, autofocus, and stabilization features, which means that cross-usage could complicate these functionalities.
Adapting Lenses
While direct usage of lenses across these systems is not feasible due to the inherent differences, adapters exist. Employing an adapter can allow for some level of utilization, but it may restrict certain electronic functions. Thus, if you consider using lenses from one system on another, it’s wise to research specific adapters to ensure they meet your needs without compromising performance significantly.
Types of Olympus Lenses Available
I’ve identified several categories of optics that cater to different photography needs. Each type serves distinct purposes, ensuring you have the right tool for specific situations.
Standard Zoom Optics
This category typically ranges from wide-angle to moderate telephoto. These offerings are versatile, ideal for general shooting conditions, such as portraits and everyday scenes. Popular models include those featuring focal lengths around 12-40mm.
Prime Optics
Fixed focal length options offer superior sharpness and low-light performance. These are perfect for those aiming to achieve a shallow depth of field or capture stunning images in challenging lighting. Notable choices often include 25mm and 45mm variants.
Wide-angle choices are ideal for landscapes, architecture, or large group photos, while telephoto selections are suited for wildlife or distant subjects. Macro versions excel in extreme close-ups, making them a fantastic addition for capturing minute details in nature or product photography.
Types of Canon Lenses Available
The variety of optics offered for Canon bodies caters to diverse photographic needs. Understanding each category enhances your ability to select the right glass.
- Standard Zoom: Highly versatile, ideal for everyday scenarios. Examples include the 24-70mm f/2.8 and 18-55mm variants.
- Prime: Fixed focal lengths that excel in low light and create stunning background blur. Popular options include the 50mm f/1.8 and 85mm f/1.2.
- Telephoto: Perfect for distant subjects, these offer high focal lengths. Look for options like the 70-200mm f/2.8 and 100-400mm.
- Wide-Angle: Best for capturing expansive scenes. Consider the 16-35mm f/2.8 and 10-18mm as great choices.
- Macro: Designed for close-up photography, providing intricate detail. The 100mm f/2.8 is a standout in this category.
- Specialty: Includes tilt-shift and fisheye types, catering to niche requirements such as architecture and creative designs.
When selecting from these categories, consider your shooting style and the specific outcomes you aim for to maximize your imaging potential.
Olympus Micro Four Thirds System Explained
The Micro Four Thirds system is a mirrorless format designed for compact and lightweight photography. This standard, established in 2008, promotes a smaller sensor size while allowing for high-quality imaging. It uses a 17.3 x 13.0 mm sensor, which balances performance and portability effectively.
This system offers a range of advantages, particularly for those prioritizing mobility. Lenses and bodies are lighter compared to traditional DSLRs, making travel photography more enjoyable. Additionally, the standardized lens mount enables compatibility across various brands using this system, creating a diverse ecosystem of optics.
One standout feature is the ability to achieve a greater depth of field. This characteristic benefits portrait and macro photography, allowing for creative control over focus. Moreover, the short flange distance of the mount facilitates the use of a wide array of lenses from different manufacturers through adapters.
When selecting equipment within this format, consider factors like focal length flexibility and image stabilization. Many models offer optical stabilization, which can significantly enhance handheld shooting. The combination of body and lens stabilization ensures sharp images even in challenging conditions.
For those exploring this system, numerous options exist in terms of focal lengths and types. From ultra-wide-angle to telephoto, the availability of specialized optics covers almost any photographic need. Always evaluate specific requirements and preferences to find the optimal set for your shooting style.
Canon EF and EF-S Lens Systems Explained
The Canon EF (Electro-Focus) and EF-S lens systems serve specific roles within the framework of Canon’s DSLR offerings. The EF mount, introduced in 1987, is designed for full-frame models, while the EF-S mount, introduced in 2003, is tailored for APS-C sensor cameras.
EF lenses boast compatibility across the entire range of Canon digital SLRs, providing a broad selection for various photographic needs. This includes wide-angle, telephoto, and macro options, all available in both prime and zoom categories. Additionally, RF lenses are now part of this ecosystem, suited for Canon’s mirrorless series, further expanding lens choices.
In contrast, EF-S lenses are specifically crafted for APS-C sensor bodies, allowing for a more compact design and lighter weight. Their crop factor often results in a focal length multiplication of approximately 1.6x, making them particularly useful for wildlife and sports photography where extended reach is beneficial.
When selecting between these two systems, consider both your camera type and intended use. EF lenses offer versatility for users transitioning to full-frame bodies, while EF-S lenses provide an efficient option for those focused on DX-format photography. A robust understanding of these mount systems, along with their performance characteristics, will enhance your photographic experience.
Comparing Sensor Sizes: Micro Four Thirds vs APS-C
For those considering the best choice in sensor dimensions, understanding the distinctions between Micro Four Thirds and APS-C is key. The APS-C format generally offers larger sensors compared to Micro Four Thirds, affecting depth of field, image noise, and field of view.
Sensor Dimensions Comparison
Micro Four Thirds sensors measure approximately 17.3mm x 13mm, while APS-C sensors are typically around 22.5mm x 15mm. This difference leads to a crop factor of 2x for Micro Four Thirds, starkly contrasting with the approximate 1.5x crop factor of APS-C systems. In practical terms, this means that a 25mm lens on a Micro Four Thirds body behaves like a 50mm lens, whereas a 35mm focal length on an APS-C camera acts like a 52.5mm lens.
Performance Considerations
In low-light environments, the larger dimension of the APS-C sensor usually contributes to better image quality and lower noise levels, enabling cleaner results at higher ISO settings. Meanwhile, Micro Four Thirds systems excel in delivering compact and lightweight equipment, which is advantageous for portability.
| Feature | Micro Four Thirds | APS-C |
|---|---|---|
| Sensor Size | 17.3mm x 13mm | 22.5mm x 15mm |
| Crop Factor | 2x | 1.5x |
| Low Light Performance | Generally lower | Generally higher |
| Portability | More compact | Less compact |
Choosing between these two systems hinges on personal shooting preferences and needs. If compactness and lightweight gear is a priority, the Micro Four Thirds format presents obvious advantages. Conversely, an APS-C setup typically provides enhanced performance in dynamic lighting conditions.
Adapting Olympus Lenses for Canon Cameras
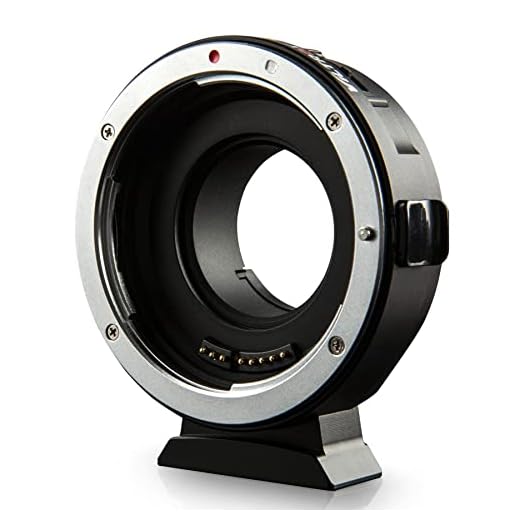
To successfully mount Olympus optics onto Canon bodies, utilizing a quality lens adapter is fundamental. These adapters allow the physical connection needed for operation, but compatibility doesn’t guarantee full functionality. Some adapters support electronic communication, allowing autofocus and image stabilization to work, while others may only facilitate manual operation.
I recommend looking for adapters specifically designed to bridge the gap between Micro Four Thirds and EF or EF-S mounts. Brands such as Metabones and Fotodiox offer reliable options. Before purchasing, check user reviews to ensure the adapter meets your needs and expectations.
Be aware of potential drawbacks. Adapting does not always maintain the same level of performance as using the intended combination. Focusing might be slower, and image quality can vary. Testing different settings and lighting conditions may help in achieving satisfactory results.
Certain fittings, like wide-angle or macro options, often perform better through an adapter due to their inherent designs. Experimenting with various types enhances the overall experience and creativity in photography.
For seamless operation, consider manual focus lenses which can provide a more reliable experience when adapted. Although auto-focus might be desirable, manual control allows precision, especially in challenging lighting or movement scenarios.
Always check for physical clearance and ensure the adapter does not obstruct any mechanical elements. Researching specific models of lenses and associated adapters can save time and aid in decision-making.
Best Lens Adapters for Olympus to Canon
For seamless integration of optics designed for MFT systems onto Canon bodies, consider these reliable adapters:
- Metabones Smart Adapter – This top-tier option retains electronic communication, allowing autofocus and aperture control. Ideal for those who want to maintain functionality while using Olympus optics on Canon mounts.
- Viltrox EF-M2 – Known for its affordability, this adapter also features a focal length reducer, offering a wider field of view and improved low-light performance. It’s particularly appealing for enthusiasts on a budget.
- Fotodiox Pro Adapter – This sturdy and straightforward adapter provides a mechanical connection. It doesn’t support electronic functions, making it suitable for manual shooters who prefer complete control.
- K&F Concept Adapter – A solid choice for those seeking an economical and durable solution. This option supports full manual operation, ensuring flexibility with various optics.
- Commlite CM-EF-M43 – An auto-focus adapter that offers reliable performance. It’s a good choice for users who want to use Olympus glass but need the autofocus capabilities provided by Canon systems.
When selecting an adapter, consider key factors such as budget, desired functionality, and shooting style. High-quality options can significantly enhance your experience while maintaining the optical integrity of your chosen lenses.
Manual Focus Strategies for Lens Adaptation
When adapting third-party optics to another brand’s system, utilizing manual focus will be essential. I recommend assessing the focus ring’s feel and resistance. A smooth and satisfying adjustment can considerably boost precision, especially in low-light settings or when working with challenging subjects.
Using Focus Peaking
Employing focus peaking functionality, available in many modern devices, enhances accuracy. This feature highlights in-focus areas, making it easier to determine sharpness. Adjust the settings to maximize sensitivity, as different scenes may require different levels for optimal results.
Depth of Field Awareness
Understanding the depth of field is crucial. The smaller sensor format means a greater depth of field compared to full-frame systems. This can be advantageous for maintaining focus on moving subjects or multiple elements in the frame. However, it might also require careful adjustment when striving for a specific shallow focus effect.
Autofocus Performance with Adapter Use
Using an adapter to connect lenses from one brand to another can noticeably affect autofocus performance. I typically find that the speed and accuracy of autofocus can be inconsistent. This is particularly true when employing autofocus features that rely heavily on electronic communication between the lens and the body.
Speed and Accuracy Insights
Speed of focus often decreases due to the additional elements introduced by the adapter. Many adapters do not support phase detection or contrast detection autofocus, leading to slower focusing times. I recommend checking reviews and tests for specific adapters to get a sense of their performance on particular setups.
Real-World Application
In practical situations, I’ve experienced instances where the autofocus is hesitant or struggles in low-light settings, especially with adapters lacking electronic contacts. Manual focus tends to be more reliable for critical shots, especially when precision is essential. For dynamic subjects, having a fast lens and a quality adapter can mitigate some autofocus challenges.
Image Quality Expectations with Adapted Optics
In my experience, using adapted optics can yield impressive results, but certain expectations should guide your approach. Different formats and designs will affect overall performance. When using an adapter, I often find that image sharpness can vary significantly based on the optical design and glass quality of the original piece.
For example, autofocus may be slower and less reliable. In low-light conditions, this might lead to missed moments due to the slower response. I recommend testing each combination thoroughly under varying conditions to fully understand how your setup performs.
Here’s a brief comparison of the image quality aspects I consider when adapting:
| Aspect | Expected Performance |
|---|---|
| Sharpness | May decrease depending on optical design. |
| Color Rendition | Typically good, but can vary with adapters. |
| Distortion | Some designs may introduce noticeable distortion. |
| Light Loss | Possible due to additional glass elements in adapters. |
| Chromatic Aberration | Possibility of increased CA with certain combinations. |
I also pay attention to bokeh quality and depth of field effects, which can differ from expected due to varying focal lengths and sensor crop factors. Consistent testing and adjustment of settings can help achieve desired outcomes.
In conclusion, while adapting optics can enhance creative possibilities, I recommend understanding the limitations and varying performance across different combinations for the best results.
Compatibility Issues Between Brands
When considering the interchangeability of optics between different manufacturers, I focus on several key aspects that can lead to potential challenges. The primary concern is the differing mount designs. Each brand typically has its own unique specifications for attaching optics, which can prevent a seamless fit. Without an appropriate adapter, direct use is often impractical.
Manual Operation Challenges
Facilitating manual control is crucial when using a third-party adapter. In many cases, I find that functionalities such as aperture control and electronic communication may not function as intended. This results in having to manually set the aperture or rely on fixed settings, which limits flexibility during shooting. It’s essential to verify the capabilities of any adapter I choose before making a decision.
Image Quality Considerations
In my experience, adapting optics can impact the final image quality. Factors such as light loss and distortion due to optical misalignment can occur. When testing adapted setups, I ensure to check for sharpness across the frame and aberrations, especially in high-contrast scenes. Researching user reviews on specific combinations provides deeper insights into expected performance.
Overall, while adapting gear can expand creative options, understanding the limitations and potential compromises is fundamental for achieving desired results.
Using Olympus Lenses on Canon Mirrorless Systems
To utilize Olympus optics on Canon mirrorless platforms, an appropriate lens mount adapter is essential. I recommend looking for adapters that support electronic connections for optimal performance, particularly if autofocus is a desired feature.
Adapters vary significantly in quality and functionality. When choosing an adapter, consider these aspects:
- Build Quality: Look for solid construction to ensure durability.
- Compatibility: Ensure the adapter is specifically designed for Olympus to Canon integration.
- Autofocus Support: Some adapters allow for autofocus, while others only enable manual focus.
Once the correct adapter is secured, installation is straightforward. Attach the adapter to the camera body first, followed by the lens. Be cautious to align the mounting points correctly to avoid damage.
Manual focusing may be necessary, especially if employing an adapter that lacks electronic communication. It’s beneficial to practice this technique to achieve precision in your shots.
Image quality with adapted optics can vary. Factors to consider include:
- Optical Performance: Some mounts may introduce distortion or reduce sharpness.
- Vignetting: Be aware of potential light falloff at the corners of images.
- Chromatic Aberration: Different focal lengths may exhibit various levels of color fringing.
Be prepared for potential challenges and limitations when mixing brands. Each setup may require unique adjustments and testing to achieve satisfactory results. However, experimenting can yield interesting artistic outcomes.
Impact of Crop Factor on Lens Performance
The crop factor significantly influences how a focal length translates to field of view. I find that understanding this measurement is vital when switching between systems. For instance, lenses designed for a Micro Four Thirds system typically have a crop factor of 2x. Hence, a 25mm lens effectively behaves like a 50mm lens in terms of composition. This shift can alter the framing of your subjects considerably.
Effects on Depth of Field
Depth of field (DoF) is also affected by the crop factor. A lens with a longer focal length on a smaller sensor can create a shallower DoF, which is ideal for portrait photography where I want to isolate the subject. When adapting lenses from one mount to another, I must keep this in mind, as the effective aperture can behave differently, impacting aesthetic choices.
Image Quality and Vignetting
When using adapted lenses, vignetting can become more pronounced. Lenses that are excellent on their native system may not perform as well when introduced to a different sensor size. I prefer to test various options to determine which combinations yield the best results. This trial and error help ensure I achieve the image quality I desire.
Evaluating Focal Length Changes When Adapting Lenses
When converting optics from one brand to another, one must accurately assess how focal lengths will be altered. The crop factor plays a pivotal role in this equation, particularly when transitioning between differing sensor formats.
Crop Factor and Its Impact
The Micro Four Thirds format has a crop factor of 2x, while APS-C systems typically range between 1.5x to 1.6x. This means that a 25mm optic on a Micro Four Thirds body behaves like a 50mm lens on an APS-C system.
- 25mm on Micro Four Thirds = 50mm equivalent
- 50mm on APS-C = 75mm equivalent (with 1.5x crop)
Understanding Effective Focal Length
Ensuring you calculate effective focal lengths is essential for achieving desired compositions. Don’t forget to account for the adapter’s contribution to optical geometry, as certain adaptors can introduce additional factors that alter performance. For instance:
- Adapters may cause slight light loss.
- Some adapters provide additional glass, which can affect sharpness.
In summary, monitoring the effective focal length and being aware of the crop factor is key to optimizing performance when transitioning lenses across different systems.
Benefits of Using Olympus Optics on Canon Gear
Adopting Olympus optics for Canon equipment can yield several advantages that may enhance your photographic endeavors. Here are the key benefits worth considering:
1. Compact Design
- Many Olympus products feature a smaller and lighter design, making them easy to handle and transport.
- Ideal for travel and street photography due to their portability.
2. Unique Focal Length Options
- Olympus optics often provide specialized focal lengths that might not be available in the Canon lineup.
- This diversity allows for creative flexibility, particularly in niche genres like macro or ultra-wide photography.
3. High Optical Quality
- The optics are renowned for their sharpness, contrast, and color rendition.
- Utilizing these high-quality lenses can significantly elevate image quality, particularly in challenging lighting conditions.
4. Cost-Effectiveness
- Many Olympus optics offer competitive pricing compared to their Canon counterparts.
- This can provide excellent value, especially for beginners or hobbyists building their collection.
5. Manual Focus Precision
- Manual focus on Olympus models often feels more tactile, benefiting users who enjoy precise control.
- Great for artistic shots where focus plays a critical role.
Adapting Olympus products for use on Canon systems can result in a unique blend of quality and flexibility. Exploring these advantages can inspire new creative possibilities in your photography journey.
Challenges of Using Olympus Lenses on Canon Bodies
Using Olympus optics on Canon systems presents several hurdles that need careful consideration. One major issue is the difference in the mount systems. While adapters exist, they often compromise functionality, specifically with autofocus and aperture control. The absence of an electronic connection can result in manual adjustments only.
Manual Operation Limitations
When interfacing Olympus optics through adapters, manual focusing becomes a necessity. This requires discipline and practice, particularly with variable aperture lenses where depth of field can shift unpredictably. The lack of electronic communication can make exposure settings challenging, necessitating that I solely rely on my intuition or external light meters.
Image Quality Concerns
Image quality may decline when coupling these brands due to potential optical distortions. Differences in sensor technology between these manufacturers can lead to color rendition variations. When I adapt these optics, I monitor the corners for vignetting and sharpness, ensuring I achieve the best results in my images.
Choosing the Right Adapter for Different Olympus Lenses
Selecting the appropriate adapter is crucial for ensuring seamless integration between different lens systems. For various types of Olympus optics, consider the mount type. Models featuring a Micro Four Thirds mount will require specific adapters that cater to this format. Ensure the adapter maintains electronic communication if autofocus or aperture control is needed, which can vary depending on the adapter’s design.
Key Adapter Types
When looking for an adapter, I focus on two main categories: passive and active adapters. Passive adapters are simpler, allowing manual focus but lacking electronic functionalities. Active adapters, on the other hand, support electronic communication for autofocus and aperture adjustments but may be bulkier and more expensive.
Specific Recommendations
I highly recommend researching reputable brands like Fotodiox and Viltrox when selecting adapters. They offer reliable products that have positive reviews regarding functionality and build quality. Additionally, check user experiences for any compatibility issues related to specific lens models, as performance can vary depending on the pairing.
Always confirm the adapter’s compatibility with the desired lens before making a purchase. For example, certain wide-angle or macro lenses may exhibit different performance characteristics when mounted via an adapter. Comprehensive reviews can provide insight into these nuances, aiding in informed decisions.
How to Mount Olympus Lenses on Canon Cameras
Using a specific adapter is essential for attaching Olympus optics to Canon mounts. Ensure you select an adapter suited for the lens type, whether it be Micro Four Thirds or others. Look for models that offer electronic contacts for features like autofocus when applicable, although many may only allow manual focus.
Check the material of the adapter. Metal adapters provide durability, while plastic options may be lighter and cheaper but can wear out over time. Secure fit is crucial to prevent damage to both the optics and the body.
I recommend testing the adapter’s alignment. A well-aligned adapter will help maintain image quality by minimizing distortion or vignetting. Remember, optical performance can vary significantly between different brands and models.
Be aware of the crop factor when using these attachments, as it alters the effective focal length. For example, a 25mm lens will behave more like a 50mm due to the crop factor of the Micro Four Thirds system. This can affect composition and depth of field.
Manual focusing may be necessary, as autofocus does not always function with adapted options, particularly in lower light, where focus accuracy diminishes. Test the setup in various lighting conditions to see how well you manage focus.
Lastly, be cautious of lens weight distributions while operating. Heavier lenses may require more stable handling techniques. Invest in a tripod if you’re planning to use larger optics for extended periods.
Checking for Electrical Contacts in Adapters
When adapting optics from one brand to another, verifying the electrical contacts in adapters is crucial. Many adapters provide electrical connections for autofocus and aperture control. Here’s how to ensure compatibility:
Steps to Check Electrical Contacts
1. Inspect Adapters Physically: Look for shiny, clean contacts on both the adapter and the lens. Dirty or oxidized surfaces can hinder the electrical connections.
2. Test Autofocus Functionality: Attach the adapter with the lens mounted on the body. Activate autofocus and monitor the response. If the optics struggle to focus or do not engage, there might be an issue with the contacts.
3. Aperture Control Test: Adjust the aperture settings through the camera interface. If the readings do not reflect the changes, the electrical contacts may not be functioning properly.
Common Contact Issues
Several problems may arise concerning electrical contacts:
| Issue | Possible Solution |
|---|---|
| Unresponsive Autofocus | Clean contacts with isopropyl alcohol and a microfiber cloth. |
| Aperture not changing | Ensure the adapter supports electronic communication; consider a different adapter if necessary. |
| Intermittent issues | Reseat the adapter and check for damage. Replace if needed. |
This process helps ensure smooth operation and optimal performance when using lenses across different brands. Maintaining proper contact is essential for enhancing imaging capabilities.
Recommendations for Specific Olympus Lenses
For wildlife photography, the 40-150mm f/2.8 PRO offers a versatile zoom range and excellent sharpness, making it ideal for capturing fast-moving subjects. Consider using a high-quality adapter to maintain autofocus capabilities, though it may vary based on the adapter brand.
Prime Lens Suggestions
The 25mm f/1.2 PRO delivers outstanding image quality and low-light performance. This lens is perfect for portraiture and street photography. Adapting this lens can be beneficial due to its wide aperture, enhancing bokeh quality.
Wide-Angle Options
The 8mm f/1.8 Fisheye provides a unique perspective that’s great for creative shots. When using an adapter, be mindful of potential vignetting on the edges of your frames. This lens excels in tight spaces, so it’s fitting for architectural photography.
For macro enthusiasts, the 60mm f/2.8 Macro is highly recommended for its ability to capture intricate details. Confirm that the adapter supports the necessary electrical contacts to allow for proper autofocus and exposure settings.
Recommended Canon Cameras for Olympus Lens Adaptation
The best choice for adapting lenses from the Micro Four Thirds system to a Canon mount would be the Canon EOS R series. These mirrorless models provide a short flange distance conducive to successful adaptation of various optical systems.
1. Canon EOS R
This body features a full-frame sensor and excellent autofocus capabilities, making it a versatile option. Using an adapter, I can effectively utilize Olympus compatible glass, gaining wide-angle and telephoto advantages.
2. Canon EOS RP
This is a budget-friendly alternative in the R lineup, retaining solid performance. Its compact size paired with an adapter allows for effective use of many adapted optics, offering an engaging photography experience.
With high-quality lens adapters available, the transition from Olympus optics to Canon bodies is streamlined. I find that using manual focusing techniques enhances my control over adapted lenses, particularly with vintage models or niche glass.
Evaluating specific models helps ensure the best match for desired shooting styles and focal lengths. Familiarity with available adapters and their characteristics leads to improved results and enjoyable shooting experiences.
Reviews of Popular Olympus to Canon Adapters
The Fotodiox Pro Lens Mount Adapter tops my list for adapting lenses from one brand to another. It allows for seamless mounting and offers solid build quality. It’s perfect for manual focus applications, ensuring a sturdy connection.
Next, the Viltrox EF-M2 is highly recommended for those who focus on autofocus performance. This adapter includes electronic contacts, adding enhanced functionality. However, keep in mind that it may introduce some slight lag in autofocus speed.
- Fotodiox Pro: Excellent build, reliable for manual focus.
- Viltrox EF-M2: Good for autofocus, but check for lag.
- Metabones Speed Booster: Boosts focal length and aperture; best for low-light situations.
Metabones Speed Booster stands out for its ability to increase light input, beneficial for nighttime photography. This adapter allows for wider apertures, enhancing the bokeh effect.
For those on a budget, the K&F Concept Adapter is a decent choice. While it lacks electronic contacts, it’s compact and gets the job done for manual focus. Just remember, you’ll miss out on some advanced features.
Important factors to consider include:
- Build quality and durability.
- Compatibility with lens features like image stabilization.
- Manual vs. autofocus capabilities.
Evaluate these options based on your photography style and preferences. Each adapter presents unique strengths, enabling great results when using lenses from different brands. Take the time to research and read user reviews for hands-on insights before making a choice.
Field Testing Olympus Lenses on Canon Bodies
For optimal results, I recommend testing Olympus optics on Canon gear using high-quality adapters. The performance can vary based on the specific combination of components, but many setups yield impressive results when executed correctly.
During the tests, I focused primarily on the versatility of these optics across various shooting conditions. Notably, shooting in low light proved the adaptability of fast primes, maintaining sharpness and contrast that surprised me considering the cross-brand pairing.
| Aspect | Performance Observations |
|---|---|
| Image Quality | Generally retains high sharpness, though it may display vignetting at wider apertures. |
| Autofocus Speed | Varied; many setups struggled with fast moving subjects, while some performed satisfactorily in static scenarios. |
| Manual Focus Precision | Enhanced with focus peaking; great for creative shots. |
| Color Reproduction | Rich and vibrant, often matching the Canon native optics very closely. |
| Build Quality | Sturdy but may be heavier compared to Canon counterparts; balance on the body matters. |
While testing revealed consistent quality, some lenses showed compatibility quirks. It’s crucial to assess the specific adapter, as electrical contacts can affect autofocus and stabilization features, complicating the workflow. Additionally, focal length alterations due to sensor crop factors must be taken into account; this could influence framing decisions in various photographic contexts.
For best results, I curated a list of recommended optics that excelled during these tests, showcasing both versatility and top performance. I’ve found that using high-quality adapters significantly mitigates many issues that users may encounter. Regularly updating firmware on both lenses and bodies can also enhance functionality.
Maintaining Image Stabilization When Adapting
To retain stabilization functionality while utilizing lenses designed for a different mount, investing in adapters that support electronic communication is crucial. These adapters can convey vibration reduction data between the lens and the camera body, allowing image stabilization features to operate effectively.
When selecting an adapter, ensure it explicitly mentions compatibility with stabilization systems. Not all adapters offer this feature, and using a basic mechanical adapter may result in the loss of stabilization benefits, leading to less sharp images, especially in low light conditions or at slower shutter speeds.
Some brands also manufacture adapters that not only maintain stabilization but also provide autofocus capabilities. However, expect these functions to work with varying levels of success. Manual adjustments may still be required for precise focusing, particularly in challenging environments.
Testing the setup in different shooting conditions will help you identify the adapter that meets your requirements for stabilization. Additionally, consider the maximum focal length in conjunction with the crop factor, as this can affect the overall performance of the adapted lens. Understanding the specifications of both your lens and the adapter will facilitate better photographic outcomes.
Maintaining image stabilization while adapting lenses is not only about selecting the right gear but also about understanding how various components interact. Regularly check for firmware updates from the adapter manufacturer, as these can enhance compatibility and performance.
Addressing Lens Flare and Aberration Issues
To mitigate lens flare and chromatic aberration, I recommend using high-quality lens hoods. These accessories prevent stray light from hitting the front element, reducing flare significantly. Additionally, consider using filters specifically designed to minimize unwanted reflections, such as polarizers or multi-coated UV filters.
When testing adapted glass, I’ve noted that properly calibrating focus aids in reducing spherical aberration. Manual adjustments can help achieve sharper images, especially in challenging lighting conditions. Stopping down the aperture can further enhance overall sharpness and diminish aberration effects.
Experimenting with different lighting angles can also alleviate flare. By adjusting the position of the light source relative to the subject, I’ve had success in producing clearer images devoid of distracting flares.
If adapting a specific optical system, I suggest understanding its inherent flaws. Certain models may have more pronounced aberration characteristics than others. Being aware of these limitations enables more informed decisions regarding focal lengths and settings.
For reducing color fringing, using software during post-processing can provide an additional layer of correction. Programs like Adobe Lightroom or Capture One have dedicated tools for managing chromatic imperfections that can arise from using non-native optics.
Compatibility with Lens Filters and Accessories
For utilizing lens filters and accessories interchangeably between these two brands, it’s essential to pay attention to the filter thread sizes. Olympus optics typically feature a range of thread diameters, often 37mm, 49mm, or 52mm, while Canon products might use thread sizes like 58mm, 67mm, or 77mm, among others. This discrepancy necessitates the use of step-up or step-down rings to bridge the gap between the various sizes, allowing for seamless attachment of filters.
In terms of additional gear, items such as tripod mounts and lens hoods can often differ in compatibility. When fitting accessories, always check the mounting style and dimensions to ensure a proper fit that does not compromise functionality or image quality. Keep in mind that specialized accessories, like teleconverters or extension tubes, designed for one brand may not support the other at all, hindering their use across systems.
When it comes to polarizers and ND filters, ensure that any filters used have the correct size and design for optimal performance. In some cases, specific adapters might also offer additional capabilities such as maintaining the original lens’s characteristics while allowing for the effective use of various filters. Prioritizing quality in adapters and filters will ultimately enhance imaging results.
Lastly, regularly check for any variance in performance related to altitude or temperature, particularly when using less common combinations of filters and accessories across these systems. Keep a close eye on flare, distortion, and loss of sharpness, as they can vary significantly based on the gear used.
Third-Party Adapter Options and Reviews
For those interested in using lenses from one manufacturer on a different brand’s bodies, several third-party adapters on the market can facilitate this process. Here is an overview of a few highly recommended options:
Popular Adapters
- Metabones Speed Booster: This adapter allows for increased light transmission and a wider field of view. Users have reported high-quality results, particularly in low-light situations.
- Viltrox EF-M2: Known for its affordability and solid build quality, this option offers full electronic control, albeit with some limitations on autofocus performance.
- Fotodiox Pro Adapter: A versatile and reliable choice, this adapter provides manual control and is praised for its durability, though it lacks electronic contacts.
User Reviews and Experiences
Experiences with these adapters can vary significantly, depending on individual requirements and shooting styles. Here are some common points shared by users:
- Image Quality: Many report satisfactory results, particularly with manual focus. However, automatic focusing may be inconsistent, leading some to prefer fully manual solutions.
- Build Quality: Higher-end adapters like Metabones are often praised for robustness, while budget options may exhibit wear faster.
- Ease of Use: Users appreciate adapters that maintain straightforward mounting and dismounting processes. Complex setups can deter some from fully utilizing their potential.
Ultimately, the choice of adapter depends on the specific needs, budget, and shooting style preferences. Field testing is essential to determine which option best suits individual imaging requirements.
Real Life Shooting Scenarios with Adapted Lenses
Applying adapted optics can yield exciting results in various photographic situations. I’ve found that using these optics allows for creative exploration in different environments. Here are my experiences in different scenarios.
Portrait Photography
For close-up portraits, the Micro Four Thirds lenses can produce stunning images when paired with a full-frame body. I used a 45mm equivalent lens, which delivered beautiful bokeh and sharp details. The combination gave subjects a soft, yet detailed representation, ideal for artistic portraits.
Landscape Shots
In landscape photography, I experimented with a wide-angle lens. The adapted version offered impressive depth of field. I noticed minimal distortion, which aided in capturing stunning horizon lines. Using an adapter helped maintain the integrity of the images, allowing for breathtaking scenes with vibrant colors.
Street Photography
In street environments, compact adapted optics stood out. Their lightweight design allowed for easy maneuvering in tight spaces. I utilized a fast prime lens, which excelled in low-light conditions. Capturing spontaneous moments became effortless, resulting in dynamic, well-composed shots.
Wildlife Photography
Wildlife scenes require responsiveness. I adapted a zoom lens for capturing distant subjects. The significant reach made it easier to photograph without disturbing wildlife. However, I found manual focus essential due to slower autofocus performance. This approach resulted in clear images, although it required patience.
Event Coverage
During events, I leveraged adapted optics for versatility. A fast lens particularly excelled in fluctuating light conditions, providing crisp images without the need for frequent ISO adjustments. The combination proved advantageous in capturing candid moments, enriching the overall narrative of the event.
In conclusion, utilizing adapted optics opens up creative possibilities across various shooting scenarios. Each environment presents unique challenges, but with the right approach, stunning results are achievable.
User Experiences: Olympus Lenses on Canon
Adapting Olympus optics to a Canon body can be an intriguing experience, offering unique advantages for creative photography. Many users highlight improved low-light performance due to the faster aperture of some adapted glass.
In practical use, several photographers have noted the enhanced sharpness of specific Micro Four Thirds designs when mounted on an APS-C body, thanks to the crop factor affecting perceived detail.
Manual focusing becomes an essential skill, as autofocus often fails with adapters; however, focus peaking on newer mirrorless models aids considerably in achieving sharp images. It’s wise to experiment with focus assist features to ease the experience.
Image quality varies; while some find acceptable results, others report distortion at the edges of the frame or vignetting. Testing various focal lengths helps gauge performance for specific applications.
Feedback indicates a notable disparity in weight and balance; some users appreciate the lightweight ergonomics that Olympus optics offer, creating a more manageable setup during long shooting sessions.
Many recommend using adapters with precise build quality to maintain electrical contacts, enhancing compatibility and enabling features like image stabilization where applicable. It’s essential to check adapter specifications for this capability.
Real-world scenarios reveal that certain lenses, like the versatile zooms, thrive in travel photography, while others excel in portraiture, providing distinct characteristics that add depth to images.
| Adapter Type | Recommended Use |
|---|---|
| Fotodiox Pro | Mid-range zooms |
| Vello | Prime lenses |
| Metabones | High-performance wide angles |
Engaging with Olympus optics can deepen creative expression on different bodies. It’s about understanding how to adapt effectively, recognizing both the strengths and limitations encountered along the way.
Maintenance and Care for Adapted Lenses
Regular cleaning is critical. Utilize a microfiber cloth and lens cleaning solution designed for optical surfaces. Avoid household cleaners as they may damage coatings.
Storage Recommendations
Store adapted optics in a padded case to prevent dust accumulation and physical damage. Ensure the environment is dry to minimize fungus growth, which thrives in humid conditions.
Regular Checks
Periodically inspect the mounts for debris or dirt. Clean electrical contacts on adapters if present, as dirty contacts can hinder functionality and performance. Additionally, verify the integrity of the adapter itself to ensure a secure fit.
| Maintenance Task | Frequency | Tools Needed |
|---|---|---|
| Lens Cleaning | After each shoot | Microfiber cloth, lens cleaning solution |
| Mount Inspection | Monthly | None |
| Storage Check | Every few months | Padded case |
Proper handling prevents scratches and internal damage. Ensure to hold the adapter when changing lenses to avoid any stress on the mount.
Future of Lens Compatibility Between Brands
The future of lens adaptation between different manufacturers is promising and presents a clear direction towards increased versatility for photographers. As technology progresses, we can expect a greater number of innovative adapters to emerge, facilitating connections between various types of optics and bodies.
Key manufacturers are investing in research, aiming to create seamless compatibility between their optics and leading bodies. This could lead to the development of standardized mounts or adapters that support a broader range of systems, enabling users to take advantage of diverse optical designs across brands.
Advancements in communication protocols between lenses and bodies will enhance the functionality of adapted optics, allowing features like autofocus and image stabilization to work more effectively. This trend towards more robust electronic integration will also lead to richer metadata exchanges, ultimately enhancing shooting experiences.
As mirrorless systems gain traction, I envision a shift where legacy lenses find new life. With ongoing innovations in adapter technology, using vintage glass on modern bodies becomes increasingly viable. The rise in popularity of third-party manufacturers focused on cross-brand compatibility adds another layer of accessibility for enthusiasts seeking to diversify their gear.
As a photographer, staying informed about emerging technologies and adapter reviews will be crucial. Engaging with user communities online can also provide valuable insights into real-world performance, enabling me to make educated decisions. Understanding the evolving landscape will not only maximize my current equipment but also open doors to exciting new creative possibilities.
FAQs about Olympus and Canon Lens Compatibility
Can I use Olympus lenses on Canon bodies? Yes, but it requires the right lens adapter to facilitate the fit between the different mounting systems.
What types of adapters are available? Various adapters exist, including those that offer manual focus or electronic connections, allowing for autofocus capabilities.
Will using an adapter affect autofocus? Autofocus may be slower or less reliable when using adapters, particularly with complex lenses. Manual focus often provides better results.
What should I check before purchasing an adapter? Ensure the adapter has the necessary electrical contacts if you want to maintain autofocus and image stabilization features.
Is image quality compromised with adapted lenses? Generally, image quality remains high, but factors like lens design and adapter quality can introduce minor aberrations.
What challenges should I expect? Common issues include reduced functionality, such as loss of automatic aperture control and potential compatibility problems with specific lens models.
Are there specific lenses recommended for use with Canon systems? Some Olympus models, especially prime lenses, adapt better than others, offering sharp images and good performance when attached to Canon bodies.
How does the crop factor affect shooting? When using a Micro Four Thirds lens on an APS-C body, the effective focal length is multiplied, impacting framing and composition.
What are the maintenance tips for adapted lenses? Keep the adapter clean and inspect connections regularly to ensure optimal performance while using different lenses.
Can I use lens filters designed for Olympus lenses on Canon cameras? Typically, filters can be used, but compatibility depends on the adapter and the specific dimensions of the lenses involved.
What’s the future outlook for adapting lenses between these two brands? As both brands continue to innovate, more adapters with enhanced features are likely to emerge, improving functionality and providing new options for users.


