


Using the Phantom 4 with quality optical attachments can greatly enhance your aerial footage. I recommend the ND filter for managing light exposure during bright conditions, which helps prevent overexposure and keeps colors vibrant. Consider the polarizing filter as well; it significantly reduces glare and enhances contrast in your shots, particularly useful for capturing scenic environments.
Another worthwhile accessory is the wide-angle converter. This attachment expands the field of view, making it ideal for capturing expansive vistas or for architectural photography. The ability to include more of your surroundings without needing to reposition your drone can be invaluable in many scenarios.
If you’re focusing on capturing specific subjects, a telephoto lens can be beneficial. This option allows for greater detail on distant objects without having to fly closer, which can help in preserving safety and privacy. Each of these enhancements brings unique advantages and helps achieve more tailored results in your aerial photography.
Choosing Lenses for the Drone
For optimal performance, I recommend considering the following options tailored to the specifications of your drone:
- Wide-Angle Lens: Ideal for capturing expansive scenes and unique perspectives, these are perfect for aerial photography. I find a 21mm equivalent quite beneficial.
- Telephoto Lens: Offers the ability to zoom in on distant subjects. A 50mm equivalent enhances the detail in your shots, particularly in wildlife or sports photography.
- ND Filters: While not a traditional lens, using Neutral Density filters helps manage light levels, enabling longer exposures during bright conditions for stunning motion blur effects.
- Fisheye Lens: For creative shots with extreme distortion and a wider field of view. This option can add a distinctive touch to your photography, often around 8-12mm focal lengths.
When integrating these options, ensure compatibility with the specific gimbal system to maintain stabilization and avoid vibration interference.
Experimenting with various attachments provides an opportunity to explore different styles and enhance your aerial imaging capabilities.
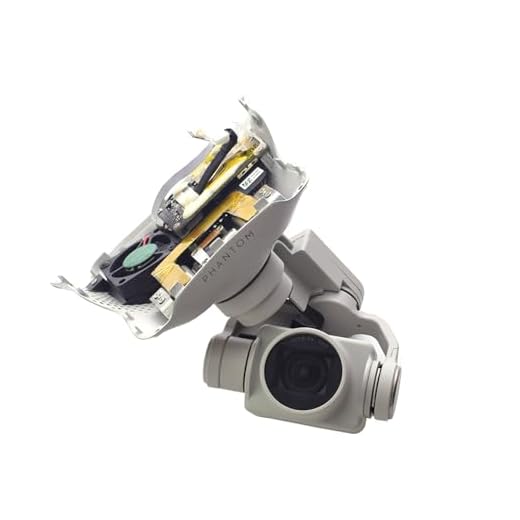
Understanding Phantom 4 Camera Specifications
The sensor utilized in the drone offers a 1/2.3-inch format, resulting in impressive image quality and dynamic range. I recommend taking note of the effective resolution, which stands at 12 megapixels. This is optimal for crisp and detailed captures, allowing for creative flexibility in editing.
Marrying the sensor is a fixed f/2.8 aperture, which plays a critical role in performance across varying lighting conditions. I found that this wide aperture facilitates shooting in lower light while maintaining clarity and detail. However, in bright conditions, a neutral density filter can enhance image quality by reducing light exposure.
Video capabilities are another highlight; it supports 4K resolution at 30 frames per second, along with 1080p at 60 frames. I advise adjusting settings based on the intended output; for cinematic results, 30fps at 4K is preferable, while 60fps provides fluidity for fast-moving subjects.
Stabilization technology integrated into the system significantly reduces shake. I find that utilizing this feature consistently results in smoother, professional-grade footage, crucial for maintaining visual integrity, especially in windy conditions.
In addition to these features, the drone supports various shooting modes such as burst and time-lapse, allowing for versatile photographic options. Experimenting with these modes can yield unique perspectives and creative possibilities.
Pay close attention to the ISO range, which is 100 to 3200. Adjusting it according to your environment can help minimize noise in images, particularly when shooting at higher settings. Keeping the ISO lower generally ensures cleaner results.
Lastly, understanding the field of view offered by the lens is beneficial. The 94-degree perspective provides a wide-angle view, ideal for capturing expansive scenes. Consider compositions that leverage this feature for maximum impact.
Compatible Lenses for Phantom 4 Series
When considering enhancements for the Phantom 4 series, it’s essential to explore accessory optics that fit seamlessly with the drone’s specifications. One popular choice is the PolarPro filters, designed to reduce glare and enhance colors in your aerial shots while maintaining the original lens characteristics.
Recommended Filters
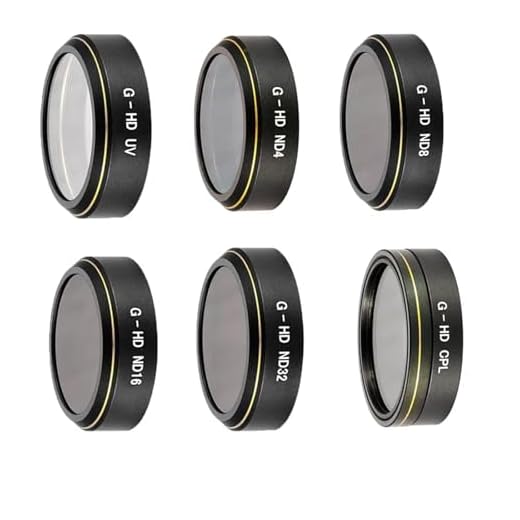
ND (Neutral Density) filters are beneficial for controlling exposure during bright conditions. I prefer the ND16 for clearer skies and vibrant scenery, while the ND32 works well in direct sunlight. Additionally, circular polarizers are excellent for minimizing reflections, providing deeper contrasts in your captured images.
Wide-Angle Accessories
If you’re looking to expand your field of view, wide-angle attachments like the Lensbaby or similar options can dramatically improve your framing. These attachments offer a broader perspective, perfect for capturing larger scenes without sacrificing image quality.
Always ensure compatibility with your device model and pay attention to the weight of added components, as this can affect flight stability. With the proper accessories, I’ve found that the potential for high-quality visuals increases significantly.
Benefits of Using Telephoto Optics
Utilizing telephoto optics with the DJI equipment allows me to capture subjects from a distance without losing detail or quality. These specialized attachments enable enhanced zoom capabilities, resulting in crisp images and vibrant colors, even at far ranges.
Enhanced Compression
When employing longer focal lengths, I achieve a unique compression effect that flattens the visual space. This characteristic is particularly useful for architectural photography or scenes where I want to emphasize patterns and relationships between objects in a single frame.
Improved Subject Isolation
Telephoto options excel at isolating subjects from their backgrounds. This is particularly beneficial when I want to create a shallow depth of field, making the subject stand out dramatically. It adds a professional touch, especially in portrait or wildlife photography, allowing the viewer to focus on the action or emotions portrayed.
The portability of the drone combined with telephoto capabilities opens new avenues for creativity. I can explore landscapes or urban environments with a fresh perspective, capturing images that would be impractical to achieve with standard equipment. The result is a collection of stunning, dynamic shots that tell a story from a unique vantage point.
Using Wide-Angle Options for Aerial Photography
For expansive scenes, I recommend using wide-angle options to capture more of the environment in a single frame. This is particularly beneficial in urban settings or when photographing natural features like valleys or coastlines.
Choosing a lens with a focal length of 12mm to 24mm effectively broadens the field of view, allowing for dramatic compositions and immersive images. The ability to include more foreground elements enhances depth and can create a sense of scale that standard lenses may lack.
The distortion in wide-angle captures can be minimized by shooting at moderate heights and angles. Staying mindful of the horizon line ensures that elements remain proportional, maintaining a natural look while benefiting from the lens’s capabilities.
Using a wide field of view is particularly advantageous for real estate photography, where showcasing entire properties or surrounding areas is essential. This perspective can significantly improve visual storytelling.
Lastly, experimenting with manual settings such as aperture can mitigate exposure challenges that arise due to the increased light intake typical of wide options. An aperture of f/8 to f/11 often yields the sharpest results while providing enough depth of field to keep critical elements in focus.
Macro Lenses: Capturing Close-Up Details from Above
For those interested in examining intricate details from an elevated perspective, incorporating macro optics can significantly elevate your results. These attachments allow for sharp focus on small subjects, such as flora or insects, while hovering above.
Optimal Choices for Close-Up Photography
Consider utilizing specific macro attachments designed to fit the gimbal system. Options like the 100mm or 60mm can deliver stunning detail. Ensure compatibility with your drone’s stabilization features to avoid vibrations disrupting the image quality.
Techniques for Success
When employing macro optics, maintain a steady altitude and slow movement to capture crisp, detailed shots. Experiment with focus settings to ensure the subject remains sharp while the background blurs, enhancing depth. Natural light works best, so plan flights during optimal weather to take advantage of diffused sunlight.
Filters for Phantom 4 Lenses: Enhancing Image Quality
Using filters is a practical way to elevate the image quality captured by your drone. Polarizing filters are particularly effective in reducing reflections and enhancing the saturation of colors, which can lead to more striking aerial shots. Opt for a circular polarizer to retain control over the effect while adjusting the angle as needed.
ND Filters for Longer Exposures
Neutral Density (ND) filters are invaluable for managing exposure in bright conditions. By reducing the amount of light entering the lens, these filters allow for slower shutter speeds, creating beautiful motion blur in clouds or water. Depending on your shooting conditions, an ND8 or ND16 can be effective for varying lighting scenarios.
UV Filters for Lens Protection
While UV filters primarily serve to block ultraviolet light and prevent haziness, their real value lies in protecting the lens from scratches and dust. I recommend keeping a UV filter on at all times to safeguard the optics during flights, especially in challenging environments.
Experimenting with different filters can drastically alter your results. Test various combinations in diverse lighting situations to discover what enhances your particular style of aerial photography.
How to Choose the Right Lens for Your Needs
Identify your primary subject matter first. If capturing expansive views is your goal, opt for a wide-angle attachment. This enables you to encompass more of the scene, providing immersive and dramatic shots. Conversely, for wildlife or distant subjects, a telephoto attachment is preferable, allowing me to zoom in without disturbing the scene.
Next, consider the lighting conditions. If shooting in bright sunlight, a polarizing filter can enhance colors and reduce glare, ensuring clarity in your imagery. For low-light situations, selecting a lens with a larger aperture will maximize light intake, thereby improving performance during dusk or dawn.
Evaluate the level of detail you intend to capture. For intricate close-ups, utilizing a macro attachment allows me to focus on delicate features that standard optics cannot achieve, revealing textures and patterns that add depth to my imagery.
Don’t forget compatibility. Ensure any selected equipment is suitable for your drone’s specifications. This guarantees not only physical fit but also optimal performance without sacrificing image quality.
Lastly, think about convenience and weight. Heavier attachments may affect flight time and stability, so balance functionality with the overall handling of the drone. Keeping the setup light can enhance maneuverability and reduce battery consumption, which is critical during extensive shooting sessions.
Installing Lenses on Phantom 4: Step-by-Step Guide
Begin with ensuring that the drone is powered off and safely placed on a stable surface. Handle the body with care to avoid any accidental damage.
Step 1: Remove the Existing Setup
Carefully twist the current lens counter-clockwise until it detaches from the mount. Place it in a safe location to prevent scratches or damage.
Step 2: Attach the New Optics
Align the new optical module with the threading on the mount. Turn it clockwise until it is securely fastened. Ensure there are no gaps between the lens and the mount.
| Lens Type | Installation Notes |
|---|---|
| Wide-Angle | Align marks on the lens and mount for optimal fit. |
| Telephoto | Tighten gently to avoid overtightening, which can damage threads. |
| Macro | Check for compatibility with drone software before use. |
After securing the new module, conduct a brief check of the drone’s camera settings to confirm that it’s recognizing the new equipment. Power on the drone and take test shots to ensure everything functions properly.
Regularly inspect the connections for dirt or damage after each use, as maintaining proper care extends the lifespan of both the aerial platform and the attached optics.
Common Mistakes when Using Lenses on Phantom 4
One critical error is failing to correct settings once a new optic is attached, affecting exposure and image quality. It’s essential to adjust shutter speed, ISO, and aperture to match the specific lens characteristics.
Another common oversight is inadequate calibration. Every time a new optic is mounted, recalibrating the drone is necessary to ensure optimal performance and image accuracy. Ignoring this step could lead to blurry or distorted images.
I’ve often seen users neglect the importance of maintaining clean glass surfaces. Dust or smudges can severely degrade photo clarity. I make it a point to always inspect and clean the outside of each lens before usage.
It’s a mistake to not check for vignette effects, especially with wide-angle configurations. It’s advisable to preview images at various focal lengths to see if adjustments are needed to mitigate this issue.
Another pitfall is not utilizing appropriate filters, which can enhance color and contrast. I tend to experiment with ND and polarizing filters to see how each affects the final output.
Lastly, ignoring the weight and balance of additional optics can lead to handling issues and affect flight stability. I carefully consider the added weight and adjust settings accordingly to maintain flight efficiency.
| Mistake | Consequence | Recommendation |
|---|---|---|
| Ignoring settings adjustments | Poor exposure and image quality | Always recalibrate settings for the new optic |
| Skipping calibration after lens change | Blurry images | Calibrate each time a new optic is mounted |
| Neglecting to clean the lens | Reduced clarity | Inspect and clean prior to flight |
| Not checking for vignetting | Distorted images at wide angles | Preview images at various focal lengths |
| Ignoring filter use | Poor color and contrast | Experiment with ND and polarizing filters |
| Overlooking weight and balance | Handling issues, stability loss | Consider weight and adjust settings to maintain efficiency |
Understanding Focal Length Impact on Aerial Shots
Choosing the appropriate focal length dramatically influences the outcome of aerial footage. A longer focal length compresses the scene, making subjects appear closer together, while a shorter focal length captures wider views, ideal for expansive scenes.
Effects of Different Focal Lengths
Telephoto options, generally above 70mm, are excellent for isolating subjects, emphasizing details from a distance. These lenses are perfect for wildlife or architectural shots. On the other hand, wide-angle varieties, under 35mm, are suitable for creating a sense of depth and perspective, showcasing vast environments or dramatic skyscapes.
Optimal Focal Length Selection
For dynamic aerial photography, I recommend starting with a focal length between 24mm and 50mm, combining both depth and detail. This range provides versatility, allowing me to capture broad scenes with clarity while still being able to zoom in on specific elements when necessary.
Best Options for Low-Light Conditions with Phantom 4
For capturing stunning twilight or dawn images, my top recommendation is the 18mm f/1.8 prime option. Its wide aperture allows maximum light intake, ensuring sharp and detailed shots even in dim environments.
Another solid choice is the 24mm f/2.0. While not as fast as the 18mm, its build quality and color reproduction excel in shadowy settings. Combining this with a solid post-processing routine yields exceptional results.
Factors to Consider
When selecting gear for lower light, pay attention to the sensor’s sensitivity capabilities. A lens with image stabilization can minimize shakiness and increase clarity during handheld shots at slower shutter speeds.
Using neutral density filters can help manage exposure without needing to compromise on shutter speed. This allows for creative effects while maintaining high-quality images.
Practical Tips
Always utilize manual focus in low-light situations. Autofocus struggles at night, and pre-focusing on your subject ensures that you don’t miss critical moments. Experimenting with ISO settings will also help achieve a balance between brightness and graininess, giving you clearer images after dark.
In summary, I recommend the 18mm f/1.8 for its low-light performance, but the 24mm f/2.0 also presents a reliable alternative. Consider stabilization features and manual focus techniques to elevate your aerial photography in challenging lighting conditions.
Zoom Options for Aerial Filming Versatility
Utilizing zoom capabilities significantly enhances flexibility in aerial photography, allowing for a variety of compositions without the need to reposition the aircraft. Consider the following options:
- Focal Range: Opt for lenses with a broad focal range, such as 24-70mm or 70-200mm, accommodating both wide and telephoto shots in one tool.
- Image Stabilization: Choose models that feature optical stabilization to counteract drone vibrations, ensuring sharp images even at full zoom.
- Low Light Performance: Select zoom options with larger apertures (e.g., f/2.8) to maintain quality in challenging lighting conditions. This aids in capturing details during golden hour or in overcast weather.
- Weight: Prioritize lightweight constructions. As added weight can impact drone performance, finding a balance between quality and weight is key.
- Compatibility: Confirm that selected zoom types are compatible with your drone. Adapter rings may be required for certain lenses. Ensure a secure connection.
The use of zoom equipment allows me to creatively explore perspectives and enhance storytelling in aerial captures. Always test new gear prior to crucial shoots to ensure reliability and performance under varying conditions.
How to Maintain and Clean P4 Optics
I recommend using a microfiber cloth specifically designed for optics to clean the P4’s lenses. Start by gently wiping the surface in a circular motion to avoid scratches. For more stubborn stains or fingerprints, a few drops of lens cleaning solution can be applied to the cloth, never directly onto the glass.
Cleaning Techniques
Always ensure that any debris or dust is brushed off before applying any cleaning liquid. A blower can help remove particles without contact. Never use household cleaners or paper towels, as they can damage coatings. For thorough cleaning, consider using a lens brush to lift off fine dust before wiping.
Storage Tips
When not in use, keep the drone and its optics in a protective case to shield against dust and scratches. Avoid exposing the equipment to extreme weather conditions, as moisture and heat can harm the optics over time. Regularly inspect the lenses for any signs of fogging or damage and address these immediately to maintain optimal functionality.
Price Comparison of Popular Phantom 4 Lenses
I recommend exploring several high-quality lens options available for your drone, each varying in price and features. First, the PolarPro Cinema Series offers excellent filters tailored for aerial shooting, priced around $99. Their multi-coated technology enhances contrast and reduces glare, making them ideal for bright conditions.
Next, the DJI ND filter set is another essential add-on, usually found at approximately $85. This set provides neutral density options that help in controlling exposure, especially in sunny settings.
If you’re considering wide-angle alternatives, the DJI Mavic Pro wide-angle lens retails for about $59. This accessory widens your shooting perspective, great for capturing expansive vistas.
For telephoto enthusiasts, the 3rd Party 2x zoom converter costs around $129, allowing for more distant subjects to be clearly captured without compromising image quality.
I’ve noticed many finding value in macro options, like the Moment macro lens priced around $99. This particular lens excels at detailed close-ups, perfect for intricate aerial shots.
Finally, used equipment platforms sometimes offer considerable savings. Prices can drop significantly, sometimes by 20-30%. Always verify the condition and seller ratings before purchase.
Exploring Specialty Lenses for Unique Perspectives
For achieving unconventional views, I recommend experimenting with a fisheye attachment. This lens provides a dramatic field of vision, allowing for a 180-degree perspective that can transform standard shots into immersive experiences.
- Fisheye Lens: Exceptional for creating circular images with a unique curvature. Ideal for artistic projects and to exaggerate the sense of space in aerial photography.
- Infrared Lens: Perfect for capturing heat signatures. This can aid in environmental studies or search and rescue missions, providing insight that human eyes cannot see.
- Night Vision Add-On: Extremely beneficial for low-light conditions. With this, I can obtain clearer shots during dusk or dawn, unveiling details that are otherwise lost.
Additionally, I recommend using a tilt-shift attachment for specific commercial photography projects. This type of lens will enable me to control perspectives, creating images with sharp detail from front to back.
- Macro Lens: While traditionally used for close-up views, I find it useful for capturing intricate details of large structures or natural formations from a distance, like the patterns on a cityscape.
Each of these specialty attachments can profoundly alter my perspective, providing fresh and innovative angles that stand out from standard options. I suggest considering the project requirements before investing in any specific type.
User Reviews: Feedback on Various Phantom 4 Lenses
After using a range of optics with my aerial vehicle, I’ve compiled insights from fellow enthusiasts. Feedback emphasizes how vital it is to select the right attachment for specific shooting scenarios.
Many users rave about wide-angle options. They highlight the dramatic reduction in distortion, enhancing expansive shots without compromising detail. The ease of capturing vast landscapes with these attachments has impressed numerous reviewers.
On the flip side, telephoto options have garnered praise for their ability to zoom in on distant subjects while maintaining clarity. Enthusiasts appreciate capturing wildlife footage without disturbing the subjects, proving invaluable for nature documentaries.
Macro attachments have received mixed reviews. Some find them ideal for close-up shots, discovering a new world of detail in aerial photography. Others, however, mention challenges with focus and stability, suggesting they require practice to master.
Filters have been a widely discussed topic. Users often report enhanced color saturation and reduced glare, significantly improving overall image quality. Reviews underscore the necessity of proper filter choice based on shooting conditions–polarizing filters are frequently recommended for bright, sunny days.
When it comes to pricing, opinions vary. Some users suggest investing in premium attachments for better durability and performance, while others advocate for budget-friendly options that yield satisfactory results. Notably, community members have shared their experiences with specific brands, often favoring those that offer a balance between quality and cost.
Finally, many agree on the importance of maintenance. Regular cleaning and careful handling help prolong the lifespan of these attachments, with several users sharing their preferred cleaning techniques to prevent scratches and dust accumulation.
Comparative Analysis: Stock vs. Aftermarket Options
When evaluating lenses for my drone, the distinction between stock and aftermarket selections is clear. Each type presents unique advantages and challenges.
| Aspect | Stock Options | Aftermarket Choices |
|---|---|---|
| Image Quality | Designed to meet factory standards, ensuring reliable performance. | May vary widely; some provide exceptional results, while others could underperform. |
| Compatibility | Guaranteed to work seamlessly with my drone’s system. | Requires careful selection; some may need modifications for optimal use. |
| Price | Generally more affordable initially but can lack advanced features. | Higher investment potential, especially for premium designs with advanced capabilities. |
| Variety | Limited range, focusing on basic needs. | Offers extensive options, including specialty and unique perspectives. |
| Warranty | Backed by manufacturer guarantees and support. | Varies; reputable brands often provide good warranties, whereas others may not. |
Choosing between stock and aftermarket lenses depends on the specific requirements of my aerial photography projects. If I prioritize convenience and reliability, the original lens may suffice. However, for specialized shots or higher quality, aftermarket options might be worth considering, despite the potential for a steeper learning curve and investment.
Understanding Lens Distortion in Aerial Photography
To mitigate lens distortion effects, I focus on a few key factors. First, always choose high-quality optics specifically designed for aerial use. These lenses often minimize barrel or pincushion distortion, which can significantly impact the final image quality.
Next, I pay attention to focal length. Wider angles tend to amplify distortion, so selecting a moderate wide-angle lens can yield better results while maintaining a natural perspective. Avoid extreme wide-angle options unless the creative vision demands it.
Additionally, using post-processing software can effectively correct distortion in captured images. I recommend familiarizing myself with a variety of software tools that include lens profiles, allowing for automatic adjustments based on specific optics.
Furthermore, shooting in raw format preserves more image data, making it easier to correct distortion without degrading the final visual quality. This flexibility is vital for achieving the best results.
Lastly, I keep in mind that understanding specific distortion traits of my selected lens can help me anticipate and creatively exploit them rather than combat them. Knowing how distortion interacts with various subjects aids in capturing stunning aerial visuals.
- Choose high-quality optics designed for aerial photography.
- Select moderate wide-angle lenses to minimize distortion.
- Utilize post-processing software for distortion correction.
- Shoot in raw format for better adjustment options.
- Understand the specific distortion characteristics of your lens.
Technical Considerations When Selecting Lenses
In choosing the correct optic for aerial setups, pay attention to the following aspects:
Focal Length
- Shorter lengths provide wider views, great for capturing large landscapes.
- Longer options offer tighter framing and enable enhanced detail from a distance.
Aperture Size
- Wider apertures improve performance in low-light conditions, crucial for twilight shoots.
- Narrower apertures enhance depth of field, ensuring more elements are in focus.
Achieving the desired depth of field involves balancing aperture and focal length. Typically, a lower f-stop number yields blurred backgrounds for standout subjects.
Weight and Balance
- Ensure compatibility with the drone’s weight limit to maintain flight stability.
- Consider center of gravity for optimal maneuverability and control.
Selecting an optic that respects these parameters will lead to improved aerial imaging while maintaining the integrity of the flying unit. Always review user feedback on specific optics to align my choice with project needs.
Effects of Lens Quality on Phantom 4 Footage
Choosing high-quality optics directly influences the clarity and detail in recorded visuals. A sharp and well-constructed optical component enhances image precision, reducing blurriness and soft edges that can detract from aerial shots. This improvement is particularly noticeable in challenging conditions, like low light or high-contrast scenarios.
Sharpness and Contrast
Optics with superior coating technologies minimize glare and reflections, providing richer colors and deeper contrast. This characteristic allows for more dynamic and engaging footage, making scenes appear more lifelike. Investing in reputable brands known for stringent quality control can significantly elevate the overall output of my captures.
Chromatic Aberration and Distortion
Inferior optics often introduce chromatic aberration, resulting in color fringing along edges. High-quality counterparts mitigate these issues, maintaining color accuracy across different focal points. Furthermore, well-designed optics exhibit reduced distortion, ensuring straight lines remain consistent, yielding professional-grade aerial images.
Ultimately, the choice of lens significantly shapes the storytelling potential of aerial content. Selecting lenses with robust construction and glass quality ensures that my visual captures remain extraordinary, no matter the filming conditions.
Recommendations for Amateur vs. Professional Users
Amateurs should opt for versatile options that require minimal adjustments. A standard zoom or a wide-angle variant works well for beginners to capture various scenes without needing advanced skills. These types are generally lightweight and easy to install. Consider the weight and balance of your drone, as it impacts stability during flight.
Amateur Lens Choices
| Type | Recommended Model | Key Features |
|---|---|---|
| Standard Zoom | DJI 28mm | Good flexibility, easy operation |
| Wide-Angle | DJI 14mm | Captures expansive views, lightweight |
For professionals, consider lenses that offer enhanced control over image quality and creativity. Prime options with fixed focal lengths or high-quality telephotos enhance detail and depth in every shot. A selection with variable aperture is beneficial for adjusting exposure based on light conditions.
Professional Lens Selections
| Type | Recommended Model | Key Features |
|---|---|---|
| Telephoto | DJI 100mm | Great for distant subjects, sharpness |
| Prime | DJI 35mm | Superior low-light performance, clarity |
Tailoring your choice to skill level significantly enhances the overall experience and results in aerial photography. Prioritize ease of use for amateur selections while seeking advanced optical features for professional-grade equipment.
Additional Accessories to Enhance Lens Functionality
To maximize the capabilities of your UAV setup, I recommend certain accessories that complement the optics. Quality filters are among the most beneficial; polarizing filters reduce glare from reflective surfaces, enhancing color saturation and contrast. ND filters help manage exposure in bright conditions, allowing for smoother motion blur in video footage.
Gimbal Stabilizers
Installing a gimbal stabilizer significantly improves the stability of shots, especially when using heavier attachments. This accessory minimizes vibrations, ensuring smooth video captures and clearer images, which is crucial during dynamic aerial maneuvers. I’ve found that even slight adjustments in stabilization can result in remarkably more professional footage.
Lens Cleaning Kits
Maintaining optimal image quality requires regular cleaning of your optical components. A proper lens cleaning kit, including microfiber cloths and specialized solutions, allows me to prevent dust accumulation and smudges from affecting image clarity. Frequent upkeep is essential, especially when operating in outdoor and potentially dusty environments.
Additionally, a protective lens case can safeguard your accessories during transport, reducing the risk of damage. By integrating these tools into your workflow, the potential for capturing stunning aerial visuals is greatly enhanced.
Case Studies: Successful Projects Using Phantom 4 Lenses
I recently worked on a real estate project where an ultra-wide option transformed property presentations. Capturing expansive exteriors and interiors allowed potential buyers to feel the space’s flow. The results significantly increased viewer engagement, leading to quicker sales.
For an environmental study, I employed a telephoto variant to monitor wildlife from a distance. This choice minimized disturbance while capturing detailed images of animals in their natural habitat. The data collected contributed to pivotal conservation efforts and impressed the research community.
Another project focused on agriculture, utilizing close-up optics to assess crop health. Aerial shots highlighting plant detail facilitated timely interventions, optimizing yield. The findings attracted attention from local farmers eager to use similar techniques.
A commercial for an adventure tourism company showcased stunning landscapes using a zoom option. This lens flexibility enabled diverse shot compositions, enhancing the visual appeal. As a result, the campaign went viral, boosting bookings significantly.
Finally, I collaborated with a film team that required cinematic quality. Filters paired with specific optical choices elevated colors and contrasts, creating breathtaking aerial sequences. This collaboration demonstrated how professional use can yield superior results in creative projects.


