To grasp the intricacies of photography optics, it’s pivotal to first familiarize oneself with focal lengths. A lens with a shorter focal length, like 18mm, captures a broader view, making it ideal for landscapes or tight spaces. Conversely, a longer focal length, such as 200mm, accentuates distant subjects, allowing for impressive portraits or wildlife shots.
Secondly, the aperture size directly influences exposure and depth of field. A wider aperture (smaller f-number like f/1.8) permits more light, perfect for low-light settings and creating a blurred background. A narrower aperture (larger f-number like f/16) is beneficial for capturing more detail in landscapes, keeping foreground and background in sharp focus.
Next, consider the lens type, as each serves distinct purposes. Prime lenses, fixed in focal length, often deliver superior image quality, making them favored for specific styles. Zoom lenses, which cover a range of focal lengths, offer versatility for various shooting situations. Understanding these differences empowers efficient shooting choices.
Lastly, investing time in practical application is invaluable. Experiment with different optics in various settings to see firsthand how adjustments in focal length, aperture, and lens type alter the final image. This hands-on approach cultivates a deeper comprehension of the craft.
Understanding Optical Equipment
Choose the right focal distance based on your photography style. For portraits, I favor lenses around 85mm to 135mm, as they provide flattering perspectives and reduce distortion. For wide-angle shots, I lean towards 16mm to 35mm options to capture more of the scene while maintaining depth.
Maximum Aperture Control
Pay attention to maximum aperture values. Lenses with lower f-numbers (e.g., f/1.4 or f/2.8) allow more light, which is beneficial in low-light situations and provides a shallow depth of field, perfect for isolating subjects. When selecting, consider how depth of field fits your shooting intent.
Lens Compatibility
Check compatibility with your shooting apparatus. Brands often have specific mounts and electronic communication capabilities, which can affect autofocus and image stabilization. Using adaptors may preserve functionality but often introduces limitations.
Explore prime and zoom types in your collection. Prime varieties tend to offer better image quality and wider apertures, while zoom types offer versatility for varied situations without the need for changing equipment frequently.
Identifying Different Types of Camera Lenses
To distinguish various types of optical attachments, focus on the focal length, aperture, and intended use. Here are key categories to consider:
Prime vs. Zoom
- Prime: Fixed focal length, typically offers better image quality and wider apertures. Ideal for low-light conditions and achieving a shallow depth of field.
- Zoom: Adjustable focal length, allowing for versatility. Useful for dynamic settings where changing lenses is impractical.
Specialized Types
- Wide-Angle: Shorter focal lengths (e.g., 14mm to 24mm). Great for capturing expansive scenes, architecture, and group shots.
- Tilt-Shift: Allows for perspective control, commonly used in architectural photography to prevent distortion.
- Macro: Designed for close-up work, ideal for capturing fine details of small subjects such as insects or flowers.
- Telephoto: Longer focal lengths (e.g., 70mm and above) perfect for isolating subjects at a distance, such as wildlife or sports events.
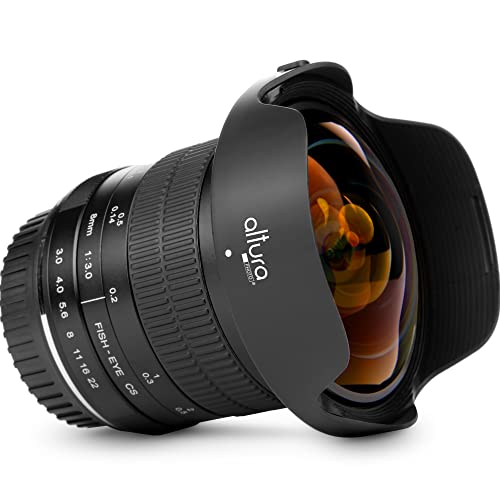
- Fisheye: Extremely wide angle, creates a spherical distortion effect, ideal for artistic applications.
Assessing these factors will aid in selecting the right attachment for your specific photographic needs.
Understanding Focal Length and Its Impact on Composition
Focal length directly influences the way I perceive and capture the world. It determines the angle of view and the scale of objects in my frame. Specific measurements can guide my creative decisions. For instance:
- Wide-Angle (24mm and below): I can include more elements in the composition, perfect for architecture or expansive scenes.
- Standard (35mm to 50mm): Offers a natural perspective, mimicking human vision, ideal for portraits and street photography.
- Telephoto (70mm and above): Compresses space, isolating subjects and creating a sense of intimacy, great for wildlife or sports photography.
The choice of focal length also affects depth of field. Shorter lengths create more context around the subject, while longer focal lengths often result in a shallower depth of field, allowing me to blur the background and emphasize the main subject.
When composing an image, I consider the following:
- Subject Placement: A wide lens allows me to position subjects in interesting ways relative to their surroundings.
- Perspective: Using a longer focal length distorts the perception of space, making distant subjects appear closer. This can enhance storytelling.
- Framing: With telephoto options, I can crop out distractions and focus narrowly on the subject.
Ultimately, understanding focal length not only shapes the technical aspects of my shots, but also profoundly impacts the artistic choices I make in framing every image. Decisions about which lens to employ dictate the narrative and emotion conveyed through the photograph.
Exploring Aperture and Its Effect on Depth of Field
To manipulate depth of field, adjust the aperture setting on your equipment. A wider opening (lower f-stop number) results in a shallower depth of field, isolating your subject against a blurred background. This can enhance portraits or close-up shots significantly.
Understanding Aperture Settings
| F-Stop | Aperture Size | Depth of Field |
|---|---|---|
| f/1.4 | Large | Shallow |
| f/4 | Moderate | Medium |
| f/11 | Small | Deep |
Narrow apertures (higher f-stop numbers) create a larger depth of field, ideal for landscape photography, where sharpness from foreground to background is required. For instance, using f/11 or f/16 can help achieve this effect, ensuring that the entire frame remains in focus.
Practical Applications
Utilizing aperture creatively can transform your images. Experiment with different settings in various lighting conditions to see how they affect exposure and focus. Remember to consider the distance between your subject and the background, as this will also influence the perceived depth of field.
Ultimately, mastering aperture allows for greater artistic control and enhances the storytelling aspect of your photographs.
Learning About Lens Mounts and Compatibility
Choose the right mount type before acquiring any optic. Compatibility between the body and the lens is fundamental. Each manufacturer has specific mounts–Nikon, Canon, Sony, and others have unique designs that dictate which optics fit their systems. Verify the mount type on both your camera and intended lens.
Check for adaptability. Some brands offer adapters for using different mounts, but be cautious; these can affect performance, autofocus, and image quality. Compatibility may restrict certain features, such as image stabilization. Always consult product specifications to confirm functionality with adapters.
Consider focal length ranges offered by optics designed for your specific mount. Wide-angle, standard, and telephoto categories vary by system. Determine what type of photography you’ll pursue, as it heavily influences the choice of mounted optic.
Understand third-party options. Brands like Sigma, Tamron, and Tokina create lenses compatible with multiple mounts. Research their offerings to find alternative solutions that cater to your needs and budget.
Stay informed about updates from manufacturers. Newer models often come with improved features and enhanced compatibility with various mounts. Regularly checking for firmware updates or announcements can provide you with better performance from existing optics.
Distinguishing Between Prime and Zoom Lenses
Choosing between a fixed focal length option and a variable focal length one often boils down to specific needs and shooting styles. Prime options offer a single, unchanging focal length, which often results in superior optical quality, wider maximum aperture, and generally lighter weight. These characteristics are beneficial for low-light conditions and achieving a shallow depth of field. I find that prime types excel in portrait and street photography, where bokeh and detail matter significantly.
Pros of Prime Options
With a wider maximum aperture, prime configurations allow for better light gathering, making them exceptional for indoor environments or during twilight. The simplicity of a singular focal length encourages creativity and composition skills since I find myself frequently adjusting my position rather than zooming in or out.
Pros of Zoom Options
Conversely, zoom varieties provide versatility, enabling quick changes in framing without switching equipment. This flexibility is ideal for events where subjects might be distant or moving. High-quality zooms can offer a range of focal lengths, making them suitable for everything from landscapes to portraits without needing multiple optics. However, be aware that their design might sacrifice maximum aperture and sharpness compared to primes.
Recognizing the Importance of Lens Coatings
Select lenses with high-quality coatings to enhance image clarity and reduce unwanted reflections. Coatings minimize lens flare and ghosting, improving contrast and color accuracy. Look for anti-reflective treatments that allow more light to pass through the glass, especially in low-light conditions.
Different coating types exist, such as multi-coating, which maximizes light transmission by applying several layers of thin films. This technique not only enhances performance but also provides greater durability against dust and scratches. Consider choosing a lens that features a nano-coating, as it supports easy maintenance by repelling water and fingerprints.
Additionally, pay attention to the specific coatings used. For instance, some manufacturers have proprietary coatings that specifically target unique issues like backlight conditions or enhanced sharpness. Make inquiries about these features to ensure the selected model meets individual shooting needs.
Conducting side-by-side tests with coated versus uncoated options can reveal significant differences in performance under various lighting situations. Always prioritize lenses with effective coatings for the best visual results and longevity.
Evaluating Image Stabilization Features in Lenses
Assess the type of stabilization offered by the optic. Most commonly, there are two types: Optical Image Stabilization (OIS) and In-Body Image Stabilization (IBIS). OIS is integrated within the lens, while IBIS works within the camera body. Each has its advantages and can significantly impact performance in low-light conditions or with longer focal lengths.
Factors to Consider
- Stabilization Effectiveness: Test the lens at various shutter speeds to determine how effectively it compensates for camera shake.
- Compatible Settings: Check if the stabilization can be turned off for tripod use or specific shooting scenarios.
- Operational Range: Identify the focal length range during which the stabilization remains effective, as performance may vary across zoom ranges.
Real-World Applications
- Low-Light Situations: Use lenses with effective OIS to maintain sharp images without a flash or increased ISO.
- Video Recording: Stabilization is critical in video work; choose lenses with advanced OIS for smoother footage.
- Dynamic Subjects: For action photography, proper stabilization allows for greater flexibility in tracking moving subjects without blur.
Each of these aspects can make a noticeable difference in output quality. When selecting a lens, prioritize ones with reliable stabilization features to enhance versatility and ensure the best results in challenging conditions.
Understanding Lens Distortion and How to Correct It
Identifying distortion in photographs is critical for achieving professional quality images. Barrel and pincushion distortions are the most common forms affecting wide-angle and telephoto optics, respectively. When photographing straight lines, such as architecture, analyze edges for curvature–a clear sign of barrel distortion if they bulge outward, and pincushion distortion if they curve inward.
Types of Distortion
Correcting distortion usually involves software solutions like Adobe Lightroom or Photoshop. Both programs offer lens correction profiles that can automatically adjust images based on the specific characteristics of the optics used. Manual adjustments may also be necessary, where you can use the transform tools to fine-tune the alignment of lines and angles.
Another option is to shoot in a way that minimizes distortion. For instance, maintaining a consistent distance from subjects in architectural photography helps mitigate the effects. Using tilt-shift optics can also correct perspective distortions during the capture process, ensuring straight lines remain straight.
Preventive Measures
Using high-quality optics can significantly reduce the risk of distortion. Prime lenses tend to exhibit fewer optical flaws compared to zoom alternatives. Additionally, familiarizing yourself with your equipment’s limitations enables better preparation when composing shots that require precision. Keeping an eye on the distortion characteristics of your gear will enhance your ability to achieve accurate and compelling images.
Incorporating these practices will help create a more polished final product, elevating the overall quality of my photographic work.
Choosing the Right Lens for Portrait Photography
For portrait photography, I recommend using a focal length between 85mm and 135mm. This range creates flattering perspectives and minimizes distortion. An 85mm lens is particularly ideal for headshots, while a 135mm can capture more of the surrounding environment with a pleasing compression.
Aperture Selection
A large maximum aperture, such as f/1.8 or f/1.4, allows for a shallow depth of field, which beautifully blurs the background and emphasizes the subject. This effect isolates the model, giving the image a professional quality. I often choose a lens with optical stabilization for handheld shots, especially in lower light conditions, to maintain sharpness.
Prime vs. Zoom
Prime options offer superior optical quality and larger apertures compared to zoom varieties. I find that my 85mm f/1.8 prime lens consistently produces sharp images with excellent bokeh. However, if flexibility is required for varying compositions, a zoom lens like a 24-70mm with f/2.8 can be a practical choice for versatile framing.
Selecting a Lens for Landscape Photography
For capturing expansive views, I prefer wide-angle optics, typically ranging from 14mm to 24mm in focal length. These allow for sweeping compositions and enhance foreground interest by exaggerating the perspective.
Aperture choice is critical; I often opt for f/8 to f/16. This range provides sufficient sharpness across most of the frame while maximizing depth. It ensures that both foreground and background elements remain crisp.
Quality glass makes a difference, particularly for reducing chromatic aberration and other distortions. I choose models with advanced coating technologies that improve contrast and limit flare.
Image stabilization can be beneficial, especially in lower light conditions or when using slower shutter speeds. If available, I look for this feature, as it allows for clearer shots without excessive motion blur.
Compatibility with my camera body is non-negotiable. I verify lens mounts before consideration to ensure a seamless fit, which is critical for achieving optimal results.
Lastly, if budget allows, I experiment with prime options occasionally, as they often provide superior sharpness and clarity compared to zoom variants. However, for flexibility, I appreciate having a quality zoom that can handle various framing scenarios.
Utilizing Macro Lenses for Close-Up Shots
Choose a dedicated macro lens for capturing intricate details in your subjects. These optics excel in achieving high magnification and clarity when photographing small objects.
Maintain a stable position while framing your shot, as even slight movements can lead to blurriness. A tripod or a stable surface can greatly enhance sharpness.
Set the aperture between f/8 and f/16 to achieve a better depth of field, helping to keep more of the subject in focus. Experiment with these settings to find the sweet spot that complements your specific conditions.
Utilize natural light whenever possible, as it enhances textures and colors. If shooting indoors or in low light, consider using a ring light or an external flash to illuminate your subject without casting harsh shadows.
Focus manually to ensure precision, especially when capturing minute details. Autofocus systems may struggle at close distances and may not lock onto the desired point, resulting in missed shots.
Incorporate a shallow depth of field to isolate your subject from the background. This technique draws attention to the intricate details you want to highlight while softening distracting elements.
Explore varying angles and perspectives. Shifting your position can yield captivating compositions that otherwise might be overlooked.
Finally, post-processing plays a significant role in enhancing your close-up images. Utilize editing software to sharpen details, adjust colors, and remove any distractions, ensuring your final image is as striking as possible.
Examining Telephoto Lenses for Wildlife Photography
When capturing wildlife, a telephoto option is paramount for getting close-up shots without disturbing the subject. Look for lenses with a focal length of at least 200mm for effective wildlife photography.
The maximum aperture is another significant factor; lenses with wider apertures (such as f/2.8 or f/4) allow for better performance in low light and create beautiful background blur, helping the subject stand out.
Image stabilization is beneficial in this type of photography. A lens with built-in stabilization can greatly reduce camera shake, especially during handheld shooting. Consider options that offer at least 3-5 stops of stabilization for greater clarity in your images.
Additionally, weigh the weight and portability of your choice. Larger telephoto models can be cumbersome for extended periods, so consider a balance between reach and ease of handling.
Always check the compatibility of the mount with your camera body. Adapters are available, but they can sometimes hinder autofocus and image quality.
Finally, evaluate lens coatings that reduce flare and enhance contrast. High-quality coatings improve overall image quality, particularly during bright daylight when shooting wildlife in their natural habitat.
| Feature | Recommendation |
|---|---|
| Focal Length | 200mm or more |
| Maximum Aperture | f/2.8 or f/4 |
| Image Stabilization | 3-5 stops |
| Weight | Balance reach with portability |
| Mount Compatibility | Check before purchasing |
| Lens Coatings | High-quality coatings recommended |
Comparing Vintage Options with Modern Alternatives
I recommend analyzing the attributes of classic and contemporary optics to make an informed choice tailored to your preferences. Here are some key comparisons:
- Optical Quality: Vintage optics often possess unique character, with less consistent sharpness but more aesthetic imperfections. Contemporary models prioritize precision, offering greater sharpness and clarity across the frame.
- Build and Design: Old-school models typically feature robust metal constructions, lending an appealing weight and feel in hand. Many newer variants utilize plastic components, making them lighter but sometimes less durable.
- Coating Technology: Modern creations benefit from advanced lens coatings that reduce flare and enhance contrast. These attributes can sharply differentiate the performance, especially in challenging lighting.
- Autofocus Capabilities: While many classic designs are manual focus, which can encourage a more thoughtful approach to photography, modern lenses often come equipped with fast and reliable autofocus systems that aid in capturing fleeting moments.
- Price Point: Vintage models can often be more affordable, particularly in the used market, whereas contemporary ones, especially high-end variants, might demand a premium due to advanced technology and brand reputation.
- Versatility: Current selections typically provide broader range options, including weather-sealed designs suitable for various environments. In contrast, vintage variants may require a more specialized approach for specific scenarios.
Ultimately, the choice hinges on personal taste and intended use. Classic options can bring charm and character to images, while modern designs focus on functionality and performance. I suggest testing both types if possible to discover which aligns better with your artistic vision.
FAQ:
What are the different types of camera lenses?
There are several types of camera lenses, each designed for specific purposes. The most common types include prime lenses, which have a fixed focal length, and zoom lenses, which offer a range of focal lengths. Other types include wide-angle lenses, which capture a broader scene, telephoto lenses, designed for distant subjects, and macro lenses, which allow for extreme close-up photography. Each type serves unique functions in photography, catering to different styles and subjects.
How does aperture affect image quality?
Aperture, measured in f-stops, controls the amount of light entering the camera. A larger aperture (smaller f-stop number) lets in more light, allowing for better performance in low-light conditions and creating a shallow depth of field, which can produce a pleasing background blur (bokeh). Conversely, a smaller aperture (larger f-stop number) lets in less light, which increases depth of field, making more of the image sharp and in focus. This means aperture significantly impacts exposure and the aesthetic quality of photographs.
What should I consider when choosing a lens for portraits?
When selecting a lens for portrait photography, consider the focal length, aperture, and lens type. A focal length between 85mm to 135mm is commonly preferred for portraits, as it provides flattering perspectives without distortion. A wide aperture, such as f/1.8 or f/2.8, is also beneficial, allowing for a blurred background, which helps the subject stand out. Additionally, prime lenses, which offer fixed focal lengths, are often sharper and can produce higher quality images than many zoom lenses at their extremes.
What is the significance of lens compatibility with camera bodies?
Lens compatibility is crucial, as different camera manufacturers use distinct mounting systems. A lens designed for one brand may not physically attach to another’s body. Additionally, factors such as crop factors for APS-C sensors versus full-frame sensors can affect the effective focal length of a lens. Before purchasing a lens, it’s important to ensure it matches your camera system to maximize its performance and functionality.
How do I clean my camera lens properly?
To clean your camera lens safely, start by using a blower to remove dust and loose particles. Then, apply a small amount of lens cleaning solution to a microfiber cloth, avoiding directly spraying the lens. Gently wipe in a circular motion from the center outward to prevent streaks. If there are stubborn spots like fingerprints, use a lens cleaning pen designed for optical surfaces. Always handle lenses with care to avoid scratches and damage.