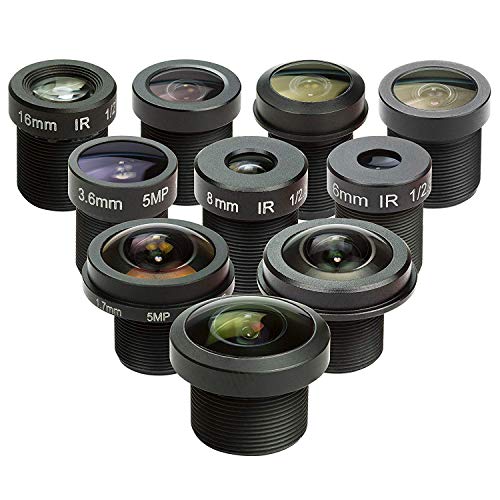
One practical approach to revive unused glass elements is to convert them into unique artistic tools. For instance, using a vintage lens on a new body can yield stunning results. Adapters for various mounts are readily available, allowing seamless integration with modern systems.
Another innovative method is turning the focal glass into an intriguing macro attachment. By reversing a lens using specific adapters, I achieve remarkable close-up shots that highlight intricate details of subjects. This technique breathes new life into those pieces that would otherwise collect dust.
Exploring the realm of optical filters is also an option. The front element can be modified to function as a creative filter, altering the way light interacts with the shot. By combining different elements, I create unique combinations that produce striking effects.

Finally, using the glass elements for DIY projects expands possibilities. From creating custom kaleidoscopes to building unique lamps, the only limit is imagination. Each repurposed piece becomes a conversation starter, with its own story to tell.
Transforming Vintage Optics into Unique Creations
Attach an antique piece of glass to your smartphone using a simple DIY adapter. I crafted one by utilizing a 3D printer to make a mount that holds the lens securely. This setup allows for fascinating macro photography options that standard smartphone cameras can’t achieve.
Utilize large formats by integrating these optical components into a telescope setup. I replaced the eyepiece of my telescope with a lens from a vintage film camera, which provided astounding views of celestial bodies and enhanced the overall stargazing experience.
Create unique artwork by using the glass elements as filters in light fixtures. I assembled a lamp that incorporates these prisms, producing enchanting light patterns that dance across walls, adding a creative touch to my living space.
Experiment with the optics in academic projects. I designed an affordable projector by combining a lens and a simple light source to display images on walls, perfect for presentations or home entertainment.
Construct optical filters for different artistic effects in photography. By modifying the lens surfaces, I achieved distinctive blur and bokeh effects, elevating my images to a new artistic level.
Assessing the Condition of Vintage Glassware
Examine for scratches or fogging on the front and rear elements. A bright light helps reveal any imperfections that could affect image quality. If you spot significant damage, consider the cost of repairs versus new alternatives.
Check the aperture mechanism. It should open and close smoothly without sticking. If it feels sluggish, a cleaning might be necessary. Testing the blades is crucial; they should be free of oil or debris to function correctly.
Focusing System Evaluation
Test the focusing ring for consistency and resistance. It should rotate smoothly without any grinding sounds or excessive play. If it’s challenging to achieve sharp focus, internal components might be dry or misaligned.
Mount Integrity
Inspect the mount for any signs of wear or damage. A secure fit onto a camera body is vital for stable operation. Loose fittings can lead to misalignment and affect performance. If needed, a replacement mount can enhance usability.
Cleaning Tips for Vintage Lenses
Mix a solution of distilled water and a few drops of isopropyl alcohol for effective cleaning without leaving residue. Use a microfiber cloth to gently wipe the glass surfaces, applying minimal pressure to avoid scratches.
Always begin by removing dust and loose particles with a blower or soft brush. This prevents debris from scratching during the wet cleaning process.
For stubborn smudges, dampen a corner of your cloth with the cleaning solution, and use circular motions to lift the grime. Rinse the cloth with clean distilled water before making a final pass to eliminate any cleaning solution residue.
Examine the lens elements under good lighting to ensure completeness of the cleaning. Small scratches can often be buffed out lightly using a specialized lens polish, while larger issues may require professional assessment.
Never use household cleaners or paper towels, as they may contain chemicals that damage coatings or scratch the glass. Store your pristine equipment in a dry, dust-free environment to maintain its condition long term.
Inspect the aperture blades for oil or dirt; if present, a few drops of lighter fluid and a gentle wipe may restore function. Ensure any residue is thoroughly removed.
Creating DIY Macro Lenses from Old Glass
To create a macro lens using vintage glass, begin with a standard lens and a supplementary optic, such as a close-up filter or another lens element. This method allows for remarkable magnification without a significant investment.
Follow these steps for optimal results:
-
Select the Base Lens:
Choose a prime or zoom lens with a wide aperture, preferably 50mm or longer. Look for models that mount securely to your camera body.
-
Choose a Supplementary Element:
Consider using a lens from a discarded camera or a close-up filter. Ensure the thread size matches or use a step-up ring for attachment.
-
Attach the Supplementary Lens:
Screw or mount your chosen optic onto the front of the base lens. Ensure it is snug to avoid light leaks.
-
Adjust Settings:
Utilize manual focus for precision. Start at a wide aperture and adjust as necessary to achieve desired sharpness.
-
Experiment with Distance:
Vary the distance between the subject and the lens. Closer distances provide increased magnification but may reduce overall clarity.
-
Stabilize:
Use a tripod to minimize movement for clarity. Consider remote shutter releases to prevent camera shake.
For further enhancement, investigate additional optical elements such as macro tubes or bellows, which can expand your range. Always assess the combinations for compatibility to avoid damage.
With practice, stunning close-up images along with superb detail can emerge from these unique arrangements. Make sure to document your process, noting which combinations yield the best results for future reference.
Using Lenses for Unique Photography Effects
To create striking results, I often attach vintage glass elements to my modern setup. Using a lens from an older model can significantly alter depth of field or produce unexpected bokeh. This transformation enhances portraits or adds creativity to street photography.
Another technique involves using a prime lens with a wider aperture. This can introduce a dreamy quality to images, especially when paired with soft light. I find that focusing on distant subjects while allowing the foreground to blur creates a captivating frame.
Combining various glass elements for unique flares or distortions also works wonders. An old projector or film lens can introduce interesting light artifacts. By holding them in front of my current lens, I manipulate the light that enters, resulting in artistic effects.
Traditionally, I utilize a lens reversal ring paired with a standard lens to achieve extreme close-ups. This method can reveal intricate textures and surprising details, perfect for macro photography or abstract compositions.
For a vintage feel, I sometimes shoot through a faintly scratched lens. The wear adds character, imbuing photos with a nostalgic quality that digital clarity often lacks. Experimenting with different imperfection levels yields diverse results.
Lastly, varying the distance between the glass and the subject significantly impacts focus and atmosphere. This experimentation allows for an endless array of creative avenues, transforming mundane scenes into captivating visuals.
Modifying Lenses for Different Camera Mounts
To adapt vintage optical equipment for various mounts, I typically start by identifying the required mount type and researching compatible adapters. Many online resources and forums provide valuable insights for successful conversions.

Choosing the Right Adapter
Selecting the appropriate adapter is crucial. It’s essential to ensure that the adapter offers a secure fit and maintains proper alignment to avoid image quality degradation. Brands like Novoflex and Metabones are renowned for their reliability. However, always check user reviews for specific model compatibility.
Physical Modifications
If an adapter isn’t available, I consider physically modifying the lens. This involves removing the existing mount and replacing it with a new one. Precision tools such as a small screwdriver set and a lens wrench are required. Caution is necessary to avoid damaging internal components. I often consult detailed guides or videos to ensure accuracy throughout the process.
If optimal focus distance doesn’t match, adding extension tubes can help. These allow the lens to focus closer while compensating for any changes in depth of field caused by the modification.
A well-thought-out approach ensures that once adapted, the optical performance remains intact, giving me the creative flexibility to explore diverse photographic avenues.
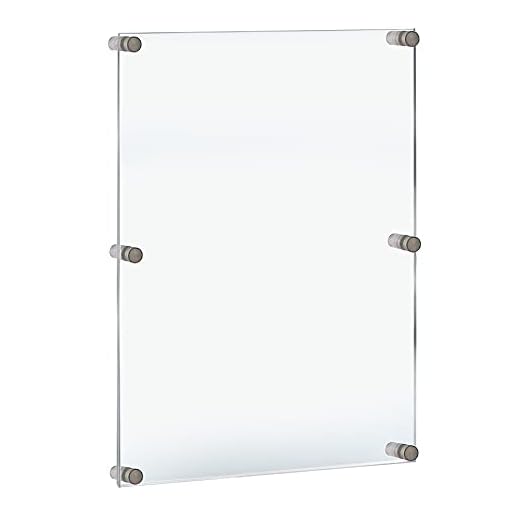
Transforming Lenses into Artistic Wall Displays
Creating an eye-catching wall display with these optical pieces can give a unique character to any room. First, collect a variety of glass to add texture and visual interest. Consider using different sizes and types to create a dynamic arrangement.
Materials Needed
- Vintage optical items
- Mounting hardware (screws, hooks, adhesive)
- Display board or shadow boxes
- Decorative twine or wire for hanging
- Optional: paint or stain for finishing touches
Steps to Create Your Display
- Select a focal point: Choose an eye-catching piece to serve as the centerpiece.
- Arrange items: Lay out your collection on the floor or a table before committing to a format on the wall. Mix colors, shapes, and orientations for visual variety.
- Secure items: Use adhesive or screws to attach each piece to the display board. Ensure they are firmly affixed to avoid accidents.
- Hang your display: Choose an appropriate wall to showcase your work, ensuring it is visible and well-lit.
- Optional: Incorporate additional decorative elements, such as succulents or small frames, to enhance the display.
This method not only preserves the beauty of vintage optics but also transforms them into conversation starters, making your space feel more personal and inviting.
Crafting Jewelry from Vintage Optical Components
Transforming vintage optics into unique jewelry allows for a creative blend of artistry and nostalgia. Start with selecting components like glass elements, metal casings, or even the focusing rings from the lens. These materials can be fashioned into pieces like pendants, earrings, or bracelets.
Materials Needed
- Disassembled lens components
- Jewelry wire or chains
- Jump rings and clasps
- Plier set
- Drill with a small bit (if needed)
- Resin or epoxy (optional for encapsulation)
Step-by-Step Process
- Disassemble the lens carefully, ensuring you don’t damage the glass.
- Clean all segments thoroughly to eliminate dust and smudges.
- If required, use a drill to create holes in the glass for wire attachment. Be gentle to prevent cracking.
- String together the components using wire or chains, arranging them in a visually appealing manner.
- Secure with jump rings and attach clasps where necessary.
- Consider applying a layer of resin to enhance and protect the glass finish.
This method not only results in stunning wearable art but also provides a meaningful way to cherish photographic history. Each piece tells a story, embodying both style and purpose, perfect for personal wear or unique gift-giving.

Building a Lens-Based Telescope
To create a telescope using surplus glass components, I choose a long focal length objective lens paired with a suitable eyepiece. For a simple yet effective design, a 50mm or 100mm diameter objective works best, while a 25mm to 32mm eyepiece complements it well.
First, gather the necessary materials: a sturdy tube (PVC or cardboard), two lens elements, and a mounting system for the eyepiece and objective. I cut the tube to my desired length, typically matching the focal distance of the objective lens.
| Lens Component | Recommended Size |
|---|---|
| Objective Lens | 50mm-100mm Diameter |
| Eyepiece Lens | 25mm-32mm Diameter |
I mount the objective lens securely at one end of the tube, ensuring it is centered. For precise alignment, I use adhesive or small spacers. The eyepiece fits into the other end, with adjustable positioning to fine-tune focus. It’s important to check that the lens elements are clear and free from damage for optimal performance.
Experimenting with different focal lengths can yield various magnification levels. By adjusting the distance between the lenses and the observed object, I can achieve a clearer image. Using this setup, I explore celestial bodies or distant landscapes, capturing stunning views with my unique telescope design.
Turning Lenses into Alternative Light Sources
Convert those unused optical components into stunning light fixtures. The principles behind this transformation are simple yet delightful, allowing for both functional and artistic lighting solutions.
Materials Needed
- Vintage glass elements
- LED light strips or bulbs
- Custom-made bases (wooden, metal, etc.)
- Wire and connectors
- Switch or dimmer
- Adhesive (high-strength or epoxy)
Steps to Create Unique Light Sources
- Select a suitable glass piece. Lenses with interesting curvature and coatings can create unique light patterns.
- Build a sturdy base to support the glass. Ensure it can accommodate the weight and size of your chosen optic.
- Install LED lights. Attach strips or bulbs to the base or behind the glass to maximize illumination. Experiment with positioning for unique effects.
- Secure all components using high-strength adhesive. This ensures that the glass stays in place during use.
- Wiring should comply with safety standards. If unsure, consult an expert to avoid risks.
- Add a switch for convenience, allowing you to easily control your new light source.
These creations not only serve as eye-catching illumination but also function as conversation starters. Using varying designs and shapes can lead to a collection of visually stunning light sources.
Repurposing Lenses for Scientific Projects
Utilizing vintage optics for scientific applications opens up numerous possibilities. For instance, transforming a prime or zoom optic into a microscope can be a straightforward project. The lens can be mounted to a tube or a 3D-printed holder and aligned with a light source to magnify small specimens effectively.
Creating a Simple Microscope
To build a basic microscope, acquire a sturdy piece of tubing, ensuring it matches the diameter of your lens. Secure the lens at one end with glue. At the other end, create a platform for your specimens using a piece of glass, ensuring adequate illumination. Adjust the focal length by moving the lens along the tube until the object is in sharp focus.
Using Lenses for Spectroscopy
Lenses can also serve in spectroscopic studies. To do this, you can place a prism in front of the glass to disperse light into its spectrum. This setup helps analyze light sources and materials. Ensure that your light source is bright enough for capturing spectra while keeping the setup stable.
Using Lenses in Home Decor Projects
Transforming vintage optics into decor items adds a unique touch to any room. One idea is creating a plant holder by mounting a lens to a wooden base. Secure your chosen lens inside a drilled hole, allowing the opening to cradle a small potted plant. This eco-friendly approach breathes life into your space.
Creating Candle Holders
Another engaging project involves crafting candle holders. Select larger optics and attach them to a sturdy base. Secure them using adhesive or screws. The glass will magnify the candlelight, providing a captivating ambiance. Opt for a clear lens for a modern look or a colored one for a vintage feel.
Making Unique Clock Faces
Turn a lens into a clock face for a one-of-a-kind timepiece. Install clock hands at the center while ensuring a clean and protected surface. Attach it to a wall or place it on a stand. This functional art piece serves as both a practical item and an eye-catching conversation starter.
Creating Custom Lens Filters
To craft a unique filter for your glass optics, select a suitable material such as colored gels or polarizing sheets. Begin by cutting the material to fit the circumference of your optic. A circle approximately 2-5mm larger than the glass will ensure a snug fit when attached.
Attachment Techniques
Use double-sided tape or adhesive putty to secure the custom filter onto the front element of the optic. For a more permanent solution, consider using a lens filter step-up ring, allowing you to screw the filter directly onto the lens without damage.
Filter Effects
Experiment with different materials such as sheer fabrics or even plastic lids from containers to create diffusion effects or unique color flares. Stacking filters can enhance creative outcomes, providing unexpected textures and tints. Always test your combinations before finalizing your choices for shooting.
Making a Lens Coffee Table or Display Case
Transforming a collection of vintage optics into a functional yet artistic piece, like a coffee table or display case, can be incredibly rewarding. Choose a sturdy base–wood or metal works well–and ensure it can support the weight of the lenses. Arrange the optics under a glass top, allowing the intricate designs to be visible from above. Depending on the number of glass elements you have, you might opt for an asymmetrical layout to create an engaging visual. Secure the lenses with adhesive or small brackets to prevent shifting.
Building a Coffee Table
Start with a solid tabletop surface. I recommend using tempered glass for safety and durability. Measure and cut a wooden frame that will support the lenses securely beneath the glass. Attach the frame to the underside of the table surface, ensuring it’s level. Lay out your lenses within the frame, considering varying sizes for depth. Use felt pads to create a stable bed for each lens, preventing any scratches to the glass.
Crafting a Display Case
If a coffee table feels too ambitious, try a display case instead. Use a shadow box frame to showcase individual elements. Attach the optics to a backing board using adhesive strips. This method highlights each piece and makes it easy to swap out lenses when desired. Paint the interior of the box to enhance contrast against the glass, and use LED strip lighting to illuminate the display, enhancing visual appeal and drawing attention to the intricate craftsmanship of each component.
Incorporating Lenses in DIY Projects for Kids
Transforming vintage optics into fun projects is an exciting way to engage children while encouraging creativity and scientific exploration. Here are some hands-on activities that utilize these fascinating components.
1. DIY Kaleidoscopes
Creating a kaleidoscope is a fantastic introduction to optics. Use one or two small glass pieces and a cardboard tube to construct a simple kaleidoscope.
- Cut the cardboard tube to a desired length.
- Attach mirrors cut at a 45-degree angle inside the tube.
- Glue colorful beads or small items at one end to serve as moving visuals.
- Secure a glass element at the opposite end, allowing kids to observe the patterns created.
2. Making Simple Magnifying Glasses
Kids can create their own magnifiers with basic materials. All that’s needed is a circular glass element and some popsicle sticks.
- Safely clean the lens to prevent smudging.
- Affix the glass to the top of two parallel popsicle sticks using strong adhesive.
- Encourage kids to explore nature, focusing on small objects such as leaves and insects.
3. Building a Mini Projector
A mini projector can be a fun way to explore light and shadows. Use a flashlight and a larger glass piece to see images projected.
- Set up a strong flashlight in a dark room.
- Position the lens in front of the flashlight beam.
- Project simple drawings or printed images onto a wall for viewing.
4. Exploring Color with Filters
Use colored glass pieces to create filters, allowing kids to understand light and color mixing.
- Gather multiple colored glass shards or transparent colored sheets.
- Use a flashlight to shine light through the filters in various combinations.
- Observe how colors blend and change.
Engage children with these imaginative and educational projects, helping them appreciate the beauty of physics and creativity. Keep safety in mind, ensuring supervision when handling glass materials.
Utilizing Lenses for Unique Gift Ideas
Transform vintage optical glass into memorable gifts that stand out. Start with a creative approach to crafting unique coasters by encasing small lenses in resin. These functional pieces not only protect surfaces but also serve as conversation starters.
DIY Lens Decor
Adorn spaces with artistic displays using large elements. Arrange several lenses on canvas or wooden boards, creating a stunning wall art piece. This idea appeals to photography enthusiasts and those who appreciate unique art.
Table of Creative Gift Ideas
| Gift Idea | Description |
|---|---|
| Lens Coasters | Encased lenses in resin for stylish coasters |
| Wall Art | Arrangement of lenses on a canvas to create a decorative piece |
| Jewelry | Craft pendants from smaller lens fragments for unique accessories |
| Keychains | Attach small lenses to keychains for photography-themed gifts |
| Framed Lenses | Frame a collection of vintage lenses for display purposes |
Crafters can also consider fashioning unique lamp bases using lens elements. Pair with LED light strips to create stunning ambient lighting, perfect for homes or as gifts.
Building a Lens Affiliated Art Installation
To create a captivating installation, gather various optical elements and arrange them thematically. Begin with a sturdy base to support the weight and complexity of your design. Use different focal lengths to introduce depth and create a visual narrative.
Components Needed
| Item | Purpose |
|---|---|
| Optical elements | For layering and enhancing visuals |
| Mounting supplies | To stabilize and secure the installation |
| Lighting elements | Enhances textures and colors |
| Background material | Sets the scene and mood |
Arrange the components in a way that guides the viewer’s eye. Consider using varying heights and angles to create interest. Incorporating light, whether natural or artificial, can dramatically transform the perception of the installation, making it more immersive.
Interactive Elements
To engage observers, implement interactive features. Allow the audience to manipulate certain elements, such as rotating the optical pieces. This interaction can lead to unique reflections and shadows, adding to the overall experience.
Finally, document the installation process and outcomes. This not only showcases creativity but also serves as inspiration for future projects. Engaging with the art community through sharing these experiences can foster collaboration and further exploration of such artistic expressions.
Using Lenses for Educational Purposes
Integrating vintage glass elements into educational projects can greatly enhance hands-on learning experiences. Here are several practical ideas to incorporate optics into the curriculum:
1. Basic Optics Experiments
- Use magnifying elements to explore the principles of refraction and focus. Place various objects beneath the lens to visualize how light bends.
- Construct simple telescopes with long-focus optics. Students can observe distant objects, connecting real-world application with theoretical concepts.
- Conduct light spectrum experiments with prisms crafted from lenses. Utilize these to separate light into its component colors and discuss the science behind it.
2. Photography and Visual Arts Education
- Incorporate glass components into multimedia art projects. Create layered visual displays that challenge students’ creativity and understanding of composition.
- Teach film techniques using vintage optics. Experiment with techniques like double exposure or light leaks for practical demonstrations.
- Organize a photography unit where students can use different types of optics to achieve various visual effects. Analyze resulting images for aesthetic and technical qualities.
These approaches foster an engaging atmosphere for learning, blending theoretical knowledge with practical application.
Combining Lenses with Other Repurposed Materials
To create innovative projects, I often integrate glass elements with other materials. Using items like wood, metal, or plastic alongside vintage optics yields unique results. For example, I fashioned a decorative lamp by attaching an old glass element to a wooden base. The soft illumination cast through the lens adds character to any room.
Items to Consider for Integration
| Material | Application |
|---|---|
| Wood | Base for lamps or furniture |
| Metal | Supports for display cases or brackets |
| Plastic | Casings for DIY projects or camera kits |
| Fabric | Soft coverings for mounting or protecting optics |
Assembling a timepiece by incorporating a lens into a clock frame, where the glass acts as a magnifier, provides not only functionality but a unique aesthetic. The combination of disparate materials often generates striking visual and practical applications.
By experimenting with connections, I can develop stand-out pieces that reflect both art and engineering. Exploring the marriage of these elements expands creativity in projects, enhancing both style and utility.