


For achieving high-quality imagery with a PL mount device, I recommend using a reliable adapter that fits seamlessly with both the optical assemblies and the hardware. Look for an adapter specifically designed for compatibility with your particular model, as this ensures a snug fit and minimizes light leakage, which can affect image quality.
Once equipped with the correct adapter, align the optics with the mount, ensuring that the index marks on both the adapter and the optics line up perfectly. Carefully twist the optics clockwise until you hear a click, indicating a secure connection. This step is critical, as improper alignment can lead to focus issues or vignette in your shots.

After securing the optics, it’s wise to perform a quick check. Point the setup at a well-lit subject and adjust the focus to ensure clarity throughout the frame. This process verifies that the optical performance meets your expectations and is free from aberrations.
Attaching Still Optics to PL Mount Systems
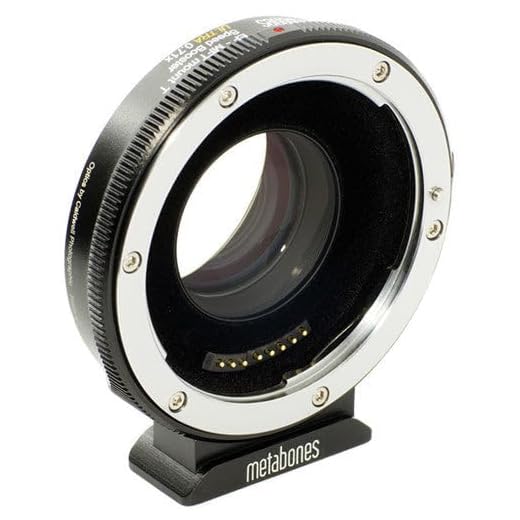
Utilize a quality adapter designed for your specific optic to ensure proper fit and functionality. Common brands like Metabones, Viltrox, or Fotodiox offer reliable solutions for adapting various optics to PL systems. Compatibility is key; check the focal distance and the sensor size of your setup.
Adjusting for Focus and Aperture Control
Manual control is necessary for focus and aperture settings. Using an adapter with electronic contacts allows for electronic aperture adjustments. If this is not available, set the aperture on the optic before attachment. Consider using follow focus systems to maintain smooth adjustments during shooting.
Ensuring Stability and Alignment
Verify that the adapter is properly aligned with the mount to avoid uneven pressure and potential damage. Tighten all screws securely and check for stability by gently testing the connection before use. Use a lens support if the setup is particularly heavy to prevent stress on the mount.
Understanding PL Mount Specifications
To successfully integrate various optics with a PL-based system, it is critical to grasp specific measurements and standards associated with the PL mount. This type of attachment operates on a standardized registration distance of 52mm from the mount to the sensor plane. Precision in this metric is paramount for optimal focus and image quality.
Flange Depth and Compatibility
The flange depth of a PL mount is typically set at 45.0mm. Any deviation from this standard can cause misalignment, leading to issues such as focus discrepancies. Ensuring that the optical attachment conforms to this depth is vital for maintaining image integrity.
Locking Mechanism and Durability
The PL mount features a robust locking mechanism, primarily utilizing a series of hard metal pins that securely grip the optical component. Familiarity with this securing system allows for confident and reliable connections. Additionally, individual components must be crafted from durable materials capable of withstanding the rigors of professional use without compromising performance.
Choosing the Right Adapter for Still Optics
Selecting the proper adapter significantly affects performance and usability. Ensure compatibility with your platform by checking the specifications for both the optic and the connector. Consider the following factors:
Optical Quality
Some adapters introduce optical aberrations that may degrade image quality. Look for high-quality glass elements in the adapter, or choose a model designed for minimal light loss and distortion. Read reviews and user feedback to assess the optical integrity of different adapters.
Mechanical Precision
Accuracy in the fit is crucial to avoid play or misalignment. Opt for adapters made from robust materials that maintain their shape and alignment over time. CNC machined adapters are often more reliable than those made with lower precision methods. Verify user reports on any wobbling issues or alignment discrepancies.
| Adapter Type | Optical Quality Rating | Mechanical Precision Rating |
|---|---|---|
| Basic Adapter | Low | Moderate |
| Premium Adapter | High | High |
| Custom Adapter | Variable | High |
Factor in any additional features such as electronic contacts for autofocus or lens metadata transmission. These can enhance functionality, but ensure that they do not compromise stability and integrity. Always double-check the manufacturer’s specifications to confirm that the adapter can support the features you need. Prioritize support from reputable brands to avoid compatibility issues down the line.
Compatibility Check: Lens and Camera
Ensure the focal flange distance aligns with your setup. For optimal performance, verify that the lens you choose complies with the necessary specifications to fit easily with a PL adapter. Typically, PL mount systems require a 52mm flange distance, whereas many photographic optics usually have a shorter distance. This discrepancy can lead to focusing issues.
Check Mount Type
Investigate the type of mount your selected optic possesses. Common types include Canon EF, Nikon F, and Micro Four Thirds. Incompatible mounts necessitate specific adapters, so research each to find matching solutions that maintain functionality.
Sensor Size Compatibility
Evaluate the sensor size of your filmmaking apparatus. For instance, full-frame optics might not perform properly on a Super 35 sensor without significant vignetting. Always consider the combination of the lens and the imaging surface to avoid undesirable artifacts that may impact your visuals.
Tools Needed for Mounting Lenses
My first recommendation is to have a dedicated lens adapter. These adapters bridge the gap between different mounting systems, allowing for seamless attachment. Ensure the adapter matches the specifications of both the camera rig and the optical element.
A lens alignment tool is also beneficial. This helps to ensure precise positioning of the glass, reducing the risk of vignetting and other optical distortions. Invest in a tool that can accurately align the focal plane with the sensor.
Next, consider a set of calibration shims. These thin spacers are useful for adjusting the distance between the optical element and the sensor. Proper spacing can significantly impact focus and image quality.
A torque wrench is advisable for securing the components. This ensures the fittings are tight enough to prevent any movement during shooting, yet not overly tightened to avoid damage.
| Tool | Purpose |
|---|---|
| Lens Adapter | Connects different mounting systems |
| Lens Alignment Tool | Ensures correct lens positioning |
| Calibration Shims | Adjusts distance for optimal focus |
| Torque Wrench | Secures components without damage |
An appropriate cleaning kit is advisable as well. Keeping the glass surfaces clear of dust, fingerprints, and smudges is critical for maintaining image quality.
A reliable flashlight can come in handy for inspecting internal mechanics and ensuring there is no debris present in the mount area before assembly.
Gathering these specific tools will allow for a smooth and efficient process when working with interchangeable optical elements on various configurations.
Step-by-Step Guide to Attaching the Adapter
First, ensure both the adapter and the lens are clean and free from dust. Any debris can impact performance and image quality.
Next, align the mounting points. On the adapter, locate the index marker, usually a dot or a line. Line this up with the corresponding marker on the back of the lens. This positioning is crucial for proper fitting.
Gently insert the lens into the adapter while engaging the bayonet-style lock, if applicable. Apply slight pressure, turning the lens clockwise until you hear a click, indicating a secure connection. Do not force the lens into place, as this can cause damage.
Ensuring a Secure Fit
After securing the lens, check for any wobble or looseness. A stable connection is vital for consistent performance during shooting. If the lens feels loose, detach and reattach it to ensure proper alignment. Make sure to handle both the adapter and lens with care to avoid any scratches or damage.
Once fitted, connect the adapter to the PL mount on the filming device. Align the adapter’s mounting points with those on the PL connection. Rotate it clockwise until it locks into place, ensuring it’s securely attached.
Final Checks
Finally, visually inspect the assembly for any gaps or misalignments. Test the aperture and focus mechanisms to ensure smooth operation. Once satisfied with the attachment, you are ready to begin filming.
Aligning the Lens with the Adapter
Ensure precise alignment of the optic and adapter by following a few straightforward steps. Begin with the indicator marks present on both the lens and the adapter. These marks assist in achieving accurate positioning, which is critical for optimal functionality.
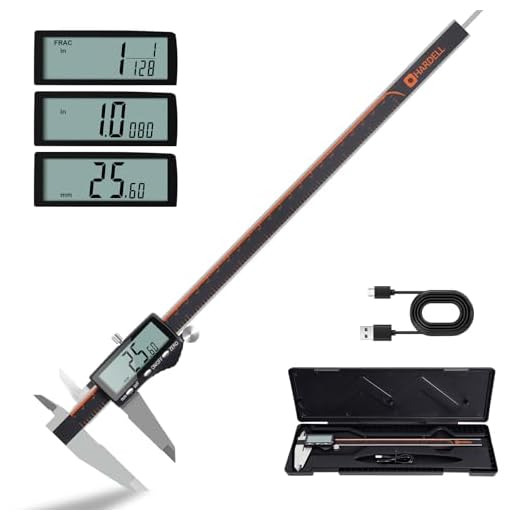
Checking the Flange Distance
Verify the flange distance between the optic and the adapter. Use a digital caliper for this purpose. Comparing the measurement with specifications helps identify any discrepancies that could affect focusing and overall performance. If there’s inconsistency, consider using shims to correct the alignment.
Final Adjustments and Testing
Once aligned, gently tighten the locking mechanism of the adapter. Avoid over-tightening to prevent any stress on the components. Following installation, conduct a test by capturing a few images or video clips to ensure the setup operates smoothly across different focal lengths. Pay attention to the focus accuracy and sharpness to confirm that the alignment is spot on.
Securing the Lens to the PL Mount
First, ensure that the adapter is firmly attached to the camera. I tightly hold the camera body with one hand while using the other to align the lens to the adapter’s mount. It’s vital that the locking mechanism on the adapter clicks securely into place. If there’s any misalignment, adjust the positioning slightly before securing.

Next, check the locking pin on the adapter. Once the lens is positioned correctly, gently but firmly press the lens into the adapter until you hear a reassuring click. This sound signifies that the locking pin has engaged. For added security, I manually rotate the lens slightly in the direction indicated on the adapter–usually clockwise–to ensure proper seating.
Final Tightening
Use the accompanying locking lever or ring on the adapter to finalize the attachment. I turn this lever until it is snug, but not over-tightened, to avoid any damage. After securing everything, I perform a visual inspection to confirm that both the lens and adapter sit flush together. A slight wiggle test can help ensure that everything is tight.
Post-Attachment Check
After securing the connection, I advise doing a quick functionality test. Activate the camera and adjust focus and zoom to verify smooth operation. Any resistance may indicate an issue with the fit, and in such cases, I would loosen and recheck the alignment and tightening process.
Adjusting Focus and Aperture Controls
Connect the lens to the adapter, and ensure that the contacts align correctly. Begin with the focus ring; rotate it smoothly to determine the focal point. For precise adjustments, use a follow focus rig or a focus puller. This setup allows for minute, controlled movements, ensuring sharpness on your subject.
Aperture Settings
Switch the aperture control to manual if your setup allows. This option gives you direct control over the iris opening. For lenses without electronic controls, use the aperture ring located on the lens itself. Adjust it based on your lighting conditions and desired depth of field.
- Set your base exposure with a light meter or by using the camera’s built-in histogram.
- Open or close the aperture aperture accordingly to achieve the intended exposure.
- Utilize ND filters if shooting in bright conditions to maintain your desired aperture settings.
Additional Tips
Pay attention to the exposure and focus peaking features available in your equipment. These tools can greatly aid in achieving precise adjustments while shooting. Always do a quick test shot to check focus accuracy and exposure levels before final takes. This ensures that both settings work harmoniously, providing desired results.
Frequent practice with these adjustments can lead to improved efficiency and confidence in adjusting focus and aperture while working with your specific gear.
Testing Lens Functionality After Mounting
I recommend conducting a thorough examination of the functionality of the attached optic to ensure optimal performance. Begin by powering on the device and verifying that the lens is recognized by the system. This acknowledgment can be indicated through on-screen display options or a status light on the device.
Next, proceed to check the aperture settings. Manually adjust the f-stop and observe if the changes reflect accurately in the viewfinder or monitoring screen. If your configuration includes an electronic coupling, confirm that the autofocus systems respond correctly.
Focusing should be seamless; rotate the focus ring and verify smooth movement across the entire focal range. Test both near and far distances to ensure no sticking or discrepancies occur.
Take test shots or record brief video clips at various settings, noting the exposure and focus accuracy. Review the captured material to detect any issues such as soft focus or exposure inconsistencies.
If applicable, confirm that any additional features, such as image stabilization, operate correctly. Test these features in various shooting scenarios to assess their functionality under different conditions.
Finally, if discrepancies arise during testing, examine the interfaces for any misalignment or incompatibility with the adapter used. This inspection may involve readjusting or securing components as necessary.
Troubleshooting Common Mounting Issues
Inspect for any debris on the adapter or lens surfaces that could hinder proper attachment. A clean microfiber cloth can typically resolve this issue.
If the lens doesn’t fit snugly, confirm that the right adapter is being utilized. Adapters vary in design; ensure yours matches the specifications of both the lens and the mount.
Misalignment during installation can lead to difficulty in securing the glass. Gently rotate the lens while pressing it towards the adapter until the appropriate notch engages correctly.
Should the focus ring feel stiff or unresponsive after installation, check for any obstructions within the adapter setup. A potential issue could be caused by improper clearance.
After securing the glass, perform a functional test. If the device fails to record or display correctly, revisit the connections. An incorrectly seated adapter may disrupt communication between components.
Incompatibility can also result in focal length discrepancies. Verify that the adapter maintains the correct distance to prevent vignetting or image distortion. It’s crucial to consult specifications for accurate details.
If the aperture mechanism fails to operate, ensure the adapter maintains a clear path for electronic contacts, especially with electronically controlled models. Resetting the connection may remedy this.
| Issue | Solution |
|---|---|
| Debris on surfaces | Clean with microfiber cloth |
| Loose fit | Verify adapter compatibility |
| Misalignment | Rotate gently until engaged |
| Stiff focus ring | Check for obstructions |
| Recording/display issues | Revisit connections |
| Focal length discrepancy | Consult specifications |
| Aperture not operating | Ensure clear path for contacts |
Resolving these issues early enhances the shooting experience and helps maintain the integrity of both the equipment and the footage captured.
Recommendations for Popular Still Lenses
For a versatile shooting experience, I recommend the Canon EF 50mm f/1.8. Its compact size and exceptional image quality make it ideal for various scenarios. Plus, it provides a beautiful shallow depth of field.
The Nikon 24-70mm f/2.8 is another excellent choice, offering a versatile focal range perfect for both wide and tight shots. The consistent aperture ensures performance in low-light conditions.
Consider the Sony FE 35mm f/1.4 as well. This prime lens is sharp, lightweight, and has a fast aperture, making it suitable for capturing dynamic scenes with stunning clarity.
Additional Recommendations
- Fujifilm XF 56mm f/1.2 – Outstanding portrait lens with superb bokeh.
- Sigma 18-50mm f/2.8 DC DN – Compact and sharp, excellent for travel and vlog shooting.
- Tamron SP 15-30mm f/2.8 – Provides wide-angle coverage for landscapes and architecture.
Ensure to evaluate compatibility with your specific setup before selection. Each model will bring its unique strengths to your production environment, enhancing your creative possibilities.
Maintaining Your Camera and Lens Setup
Regular upkeep of your equipment is key for achieving optimal performance and longevity. Here are some specific steps I take to maintain my gear:
- Clean the exterior: Use a soft, lint-free cloth and lens cleaner to wipe down surfaces. This prevents dirt and debris from interfering with functionality.
- Inspect for dust: Frequently check for dust and residue on both the lens and sensor. A blower is useful for removing loose particles without scratching surfaces.
- Check for signs of wear: Examine the adapter and connection points for any physical damage or degradation, ensuring a secure fit during operation.
- Calibrate regularly: Perform calibrations on focus and aperture mechanisms to guarantee they function correctly, especially after frequent use.
- Store properly: Keep your setup in a padded case when not in use to avoid accidental damage. Ensure the environment is dry to prevent fungus growth.
- Utilize lens caps: Always use front and rear caps to protect against scratches and dust accumulation when the equipment is idle.
Staying organized is also beneficial. I label my adapters and accessories clearly to avoid confusion during setup and transport. This keeps everything readily accessible and prevents mishaps.
Lastly, document any maintenance activities performed and any irregularities observed. This creates a reference point for future checks and assists in troubleshooting if issues arise.
Adapting to Different Shooting Conditions
For varying environments, selecting the right setup enhances the final output. I prioritize controlling light to achieve desired effects.
Natural Light Scenarios
- Consider using a fast aperture to capture sharp images in low-light conditions.
- Utilize ND filters to manage exposure without affecting shutter speed.
Artificial Lighting Environments
- Balance colors by adjusting white balance settings according to the light source.
- Experiment with diffusion materials to soften shadows and improve skin tones.
Experimentation is key. The more I adapt my gear to specific conditions, the more I refine my skills and improve my results.
Comparing Image Quality Between Lenses
When evaluating optics for video work, I focus on several aspects that influence the final image. Key factors include sharpness, color rendition, contrast, and bokeh characteristics. I often find that prime optics generally provide superior sharpness compared to zoom variants, making them a go-to choice for critical shots.
Sharpness and Resolution
In my experience, high-quality primes yield higher resolution, especially at wider apertures. Testing the center and edge sharpness across aperture ranges helps determine optimal settings for capturing details crisp and clear. I have observed that older models may exhibit softness at wide open but can still shine when stopped down.
Color and Contrast
Color accuracy varies significantly between different optical systems. I personally prefer optics that deliver a neutral color palette, allowing for better grading flexibility in post-production. Additionally, contrast levels affect perceived image depth; models that render high contrast give a more dynamic look. I often perform side-by-side comparisons to identify which optics maintain color fidelity across various lighting conditions.
Bokeh quality can also define a scene’s mood. I recommend testing the out-of-focus areas to see how they render highlights and transitions. Compared to others, some formulas create smoother bokeh, which can enhance aesthetic appeal–especially in portrait work.
Exploring Creative Possibilities with Adapted Lenses
Utilizing adapted optics expands my creative toolkit significantly. I appreciate how each lens brings its own character to the image, influencing depth of field, color rendition, and contrast. To capture unique visual stories, it’s advantageous to explore vintage glass or specialty options often overlooked in modern shooting setups.
Embracing Vintage Glass
Choosing older models can yield unexpected results. These lenses often exhibit distinct bokeh and a softer image quality that can contribute artistic flair. I recommend testing a few primes, particularly those with manual aperture control, to gain full creative control. Factors like lens flares and chromatic aberrations can add interesting elements to my shots.
Exploring Specialty Options
Macro and fisheye types can create surprising perspectives. I find that using a macro lens opens up the world of detail and texture, enhancing storytelling in close-ups. On the other hand, fisheye tools provide a dramatic viewpoint, perfect for establishing a sense of scale or emphasizing distortion. Experimenting with these variations can redefine the visual narrative in unexpected ways.


