


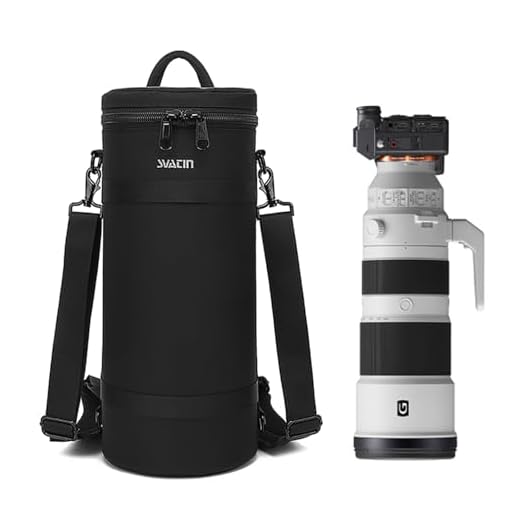
Use a dedicated, padded case to shield your optical tools from impact and dust particles. Opt for a container with dividers to separate each piece, minimizing the risk of scratches or damage during transit. An airtight box can also prevent moisture buildup, which poses a threat to internal components.
Store in a cool, dry environment with stable humidity levels. Avoid placing in areas prone to extreme temperature fluctuations, as this can lead to condensation within the glass elements, potentially causing mold growth or fogging. A temperature-controlled space is ideal, with humidity ideally maintained between 30-50%.
Regularly clean the exterior surfaces before storage to eliminate dust and fingerprints. Utilize a microfiber cloth for this purpose, and consider using lens cleaning solutions free of alcohol, which can damage coatings. For deeper cleanings, follow the manufacturer’s specific instructions to ensure that coatings remain intact.

Lastly, always check seals and caps before and after use. Ensure that protective caps are securely placed to guard against dust and scratches. Establishing a routine for these tasks helps maintain the functionality and longevity of your equipment.
Proper Care for Optical Equipment
Humidity levels should be maintained between 30% and 50% to prevent mold growth. I use silica gel packets in storage cases to help regulate moisture.
Always place items in a padded case or dedicated holder to prevent impacts that can cause misalignment or damage. I opt for hard-shell cases for long-term storage.
Protective filters can be left on the front to shield against scratches and dust. I frequently check these for any signs of dirt or condensation.
Avoid exposing the gear to extreme temperatures or direct sunlight, as this can lead to lens misalignment or other issues. I keep my collection in a controlled environment with stable conditions.
Regular cleaning using a microfiber cloth ensures any surface dust or smudges are removed, but I keep liquids to a minimum. I prefer using blower brushes to clear particles without risking scratches.
Labeling cases or compartments aids in easy identification, which saves time and reduces the risk of mishaps. I have a simple color-coded system that helps me stay organized.
Evasive actions against insects or pests can be achieved with natural repellents, and I often check for possible infestation in storage areas.
Periodic checks of all equipment ensure functionality, and I make it a point to test functionality every few months, including the autofocus and zoom mechanisms.
Understanding the Importance of Proper Lens Storage
Utilize climate-controlled environments for optimal preservation. Maintaining a temperature between 20°C to 22°C (68°F to 72°F) with low humidity levels helps protect delicate elements from mold and fungus growth.
Container Choices
Invest in high-quality padded cases or lens pouches. These not only provide physical protection but also guard against dust accumulation. Avoid leaving optics in bags where they might shift or collide with other equipment.
Regular Maintenance
Conduct routine checks for signs of dust or moisture. Use a microfiber cloth for cleaning and storage. Ensure that caps are securely placed to keep contaminants out. Lightly oiling the mount can prevent seizing due to prolonged disuse.
Incorporating these practices into the care regimen for optics significantly enhances longevity, preserving the integrity of the glass and mechanics.
Choosing the Right Storage Environment for Lenses
Maintain humidity levels between 30% and 50% to prevent mold and internal fogging. A dehumidifier can effectively control moisture in the air, especially in humid climates.
Temperature Stability
Keep the temperature consistent, ideally between 15°C and 25°C (59°F to 77°F). Rapid temperature fluctuations can cause condensation inside the optics. Invest in a climate-controlled storage unit if necessary.
Light Protection
Direct sunlight can lead to damage over time. Use opaque containers or cabinets to shield your gear from UV rays. Consider using lens caps and UV filters for extra protection.
| Storage Factor | Recommended Range |
|---|---|
| Humidity | 30% – 50% |
| Temperature | 15°C – 25°C (59°F – 77°F) |
Prioritize keeping your setup dust-free. Consider silica gel packs in storage cases to absorb any excess moisture. Regularly inspect your gear for signs of wear or mildew.
Temperature Considerations for Lens Storage
Maintain lenses at a temperature between 15°C and 25°C (59°F to 77°F) to preserve optical quality. Temperatures outside this range can cause problems such as condensation, which can lead to mold growth inside the elements.
Extreme heat may damage protective coatings, warp mechanical parts, or affect the integrity of adhesives used in construction. Avoid placing any optical equipment near heaters, direct sunlight, or inside hot vehicles.
Conversely, extremely low temperatures can lead to oil thickening within focusing mechanisms, impacting functionality. If transitioning from a cold environment to a warmer one, allow the equipment to acclimate gradually in its case to prevent condensation.
Investing in a temperature-controlled storage solution can significantly contribute to maintaining an ideal atmosphere. Using a dehumidifier or silica gel packets within storage spaces helps to regulate humidity levels and protect against moisture buildup.
Monitor temperature fluctuations frequently, especially during seasonal changes, to ensure a stable environment that safeguards performance and longevity.
Humidity Levels and Their Impact on Lenses
A humidity level between 30% and 50% is ideal for preserving optical devices. Anything below 20% can lead to static electricity, which may attract dust and debris. Excess moisture above 60% can foster mold growth inside focuses and impair performance.

Consequences of High Humidity
When excess moisture accumulates, it can induce fogging and condensation internally. Over time, this may lead to irreversible damage, like lens fungus. Not only does this degrade image quality, but it may also necessitate professional cleaning or replacement, which can be costly.
Mitigating Humidity Risks
Utilizing silica gel packs in storage containers can significantly reduce humidity levels. Regularly checking humidity through hygrometers offers insights for adjustments. For those in particularly humid climates, consider climate-controlled environments to combat moisture effectively.
Maintaining appropriate humidity ensures lenses remain in optimal working condition, ready for use at a moment’s notice. Employing these strategies can greatly extend the lifespan and quality of your optical equipment.
Utilizing Lens Cases for Optimal Protection
Investing in quality cases is a fundamental step for safeguarding optics. I prioritize padded, rigid cases as they offer superior defense against impacts while minimizing vibrations. Selecting cases that snugly fit each optical unit ensures there is no unnecessary movement, which can lead to scratches and internal misalignment.

For added convenience, I choose cases with individual compartments. This arrangement prevents unwarranted contact between different pieces, especially during transport. Additionally, I appreciate cases that are lightweight yet robust, allowing easy mobility while maintaining strong defense against external elements.
Water-resistant designs present a viable option for outdoor use. I often check for seals and zippers that provide an extra layer of defense against moisture. Furthermore, integrating desiccant packs within the cases can absorb excess moisture, effectively combating humidity-related issues.
In terms of organization, I employ labels or color codes. This simple strategy aids in swiftly identifying the equipment I need, reducing the risk of accidental exposure to harmful environments while the equipment is being transported or accessed.
Regular inspection of the cases is also part of my routine. I ensure that there are no cracks or wear and tear that might compromise protection. Routinely replacing worn-out cases is a small investment that greatly extends the lifespan of my glass components.
Best Practices for Storing Lenses in Bags
To ensure maximum safety, I always place each optic in a separate padded compartment within my bag. This prevents them from scratching or impacting each other during transit.
Choose quality pouches: I use microfiber or dedicated nylon pouches that provide cushioning and protect against dust. These materials also help absorb minor shocks that may occur while traveling.
Keep in lens caps: I never leave the front and rear caps off. This protects the glass from dust, scratches, and potential damage.
Arrange by size and weight: I store the heaviest items at the bottom of the bag and lighter ones on top. This maintains balance and prevents heavier optics from crushing lighter ones.
Avoid overcrowding: Overpacking can lead to pressure, which may harm delicate internal components. I ensure enough space for each piece, allowing for compact yet safe storage.
Maintain organization: I label compartments in my bag. This way, I quickly access the necessary equipment without unnecessary handling or risk to their integrity.
Check regularly: Before and after trips, I inspect my gear for any signs of wear or damage. This habit helps catch potential issues early, preserving the equipment’s functionality.
By implementing these techniques, I ensure that my equipment remains in pristine condition, ready for use whenever needed.
Vertical vs. Horizontal Storage: Which is Better?
I recommend opting for vertical placement when securing optical instruments. This orientation minimizes the risk of pressure on the front element and helps maintain proper alignment, which can be crucial for optimal performance. Storing upright also aids in avoiding potential scratches on the glass surface.
If you choose to position items horizontally, ensure that they are well-cushioned to prevent any potential contact or motion that could lead to damage. Using padded storage can mitigate these risks, particularly when conventional or heavier models are involved.
The selection of either storage method may depend on available space and organization preferences. Regardless of the choice, maintaining a dedicated area free from dust and vibrations is paramount to ensure longevity. Regular checks for debris and moisture will also be key to preservation.
Lastly, understand that both orientations can work effectively when paired with appropriate storage solutions like cases or shelves designed specifically for safe keeping. Prioritizing the quality of these containers is just as critical as the method of placement itself.
Avoiding Dust and Dirt Buildup on Lenses
Utilize high-quality microfiber cloths for cleaning the surface of each optical component. These cloths effectively remove particles without scratching the delicate coatings.
Store items in airtight, dust-resistant containers. This prevents airborne debris from settling on the surfaces, reducing the need for frequent cleaning.
Maintain cleanliness in the storage environment. Regularly dusting shelves and surfaces helps keep grime away from valuable equipment.
Consider using lens caps at all times when equipment is not in use. This simple step keeps dust and scratches at bay, preserving the integrity of the glass.
Equip yourself with a blower brush to gently remove dust before wiping with a cloth. This method minimizes the risk of scratching from harder particles.
Avoid handling optics with bare hands as oils and dirt from fingers can transfer onto glass. Always use a designated cleaning tool or cloth.
Regularly inspect equipment for signs of dust accumulation. Addressing buildup early prevents it from becoming a larger problem that affects image quality.
Position storage solutions away from open windows or areas with high traffic to reduce exposure to particles. Sealing containers provides an additional layer of protection.
Consider using silica gel packets within sealed storage to absorb moisture, which can contribute to dirt buildup and lens deterioration.
Lastly, make it a habit to clean the storage area, ensuring that all environments used for keeping optical gear are optimally maintained.
Using Silica Gel Packs in Lens Storage
Placing silica gel packs in your storage containers or cases significantly reduces moisture levels within. These small packets effectively absorb humidity, preventing the formation of mold and fungus on delicate glass surfaces.
Optimal Quantity and Placement
Avoid overcrowding by using one pack per liter of storage volume. Distributing them evenly ensures consistent moisture control. Keep the packs away from direct contact with surfaces to maximize air circulation. Regularly check the gel; replace or reactivate them by drying in a low-temperature oven if they become saturated.
Monitoring Humidity Levels
Incorporating a hygrometer alongside the silica gel provides real-time humidity readings. Aim for a range of 30-50% humidity for optimal preservation. Adjust the number of packs used based on your specific storage conditions and monitoring results.
Protecting Lenses from Scratches and Damage
Utilizing protective filters is an immediate recommendation for safeguarding optical surfaces. These filters serve as the first line of defense against scratches and unintended impacts. Always keep a filter on the front element unless conditions deem it unnecessary.
Proper handling techniques significantly reduce the risk of harm. Hold equipment with both hands and avoid resting them on surfaces that may harbor debris. Additionally, clean lenses only with approved microfiber cloths to prevent micro-abrasions.
Organizing storage space is key. Use padded compartments or cases with individual slots to avoid contact between items. This minimizes the risk of scrapes that occur from shifting during transport.
Covering unused items with lens caps is vital. Utilize rear caps as well, as they protect the mounting area and prevent dust accumulation. Ensure caps are secured properly after use.
Investing in a quality case is another critical strategy. Look for options with foam inserts designed for snug fit, providing cushioning against shocks that could otherwise damage delicate optics.
When moving gear, opt for backpacks or shoulder bags equipped with protective padding instead of hard cases, particularly for long treks. They offer a balance of accessibility and security.
Regularly inspect equipment for dust or signs of wear. Prompt cleaning reduces the chances of permanent damage. When cleaning, apply solutions designed specifically for optical surfaces, ensuring a gentle approach.
Lastly, maintain a habit of checking that all items are accounted for before traveling or wrapping up a shoot. This reduces the likelihood of leaving gear exposed to harmful elements.
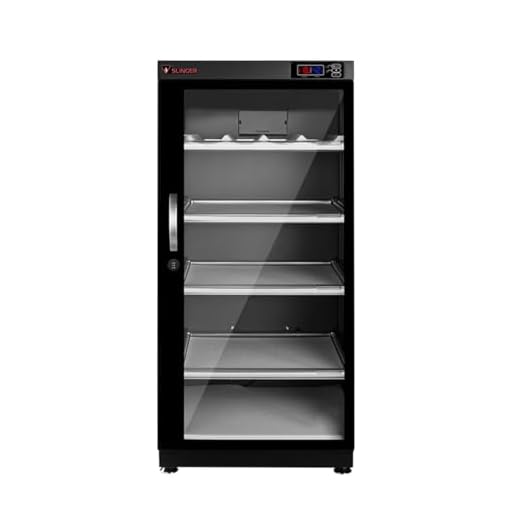
Storing Lenses in a Climate-Controlled Space
A climate-controlled environment is a prime solution for safeguarding optical gear. This setting mitigates the risks posed by fluctuations in temperature and humidity, both of which can adversely affect precision optics over time. An ideal temperature range lies between 20°C to 22°C (68°F to 72°F) with a relative humidity of 30% to 50%.
Temperature Management
Consistent temperature is critical. Sudden changes can create condensation on the glass elements, leading to mold growth. To maintain an even environment, I utilize a dedicated closet or storage box equipped with an HVAC system. If that’s not feasible, a portable climate control unit can be effective in smaller spaces.
Humidity Regulation
In addition to temperature, humidity requires attention. Too much moisture can deteriorate internal components and promote fungus. I employ a hygrometer to monitor levels and use a dehumidifier if necessary. Silica gel packs are also beneficial; they absorb excess moisture, thus keeping the air dry within storage containers.
Road and Travel Considerations for Lens Storage
For outdoor enthusiasts, choosing a reliable, cushioned case for fragile equipment is crucial. I prefer rugged materials that offer impact resistance while remaining lightweight for portability. Ensure the internal compartments securely hold each optic, preventing movement during transit.
Transporting Equipment
When embarking on a trip, utilize dividers or padded inserts within bags to maintain separation between different glass units. This step minimizes the risk of scratches or collisions with other gear. Additionally, employing a backpack designed for photography can significantly facilitate organized storage and quick access.
Weather Adaptability
Anticipating fluctuating weather conditions is essential. If rain is in the forecast, carrying waterproof coverings or rain sleeves protects against moisture. I also recommend checking the forecast daily and adjusting storage accordingly, ensuring that delicate units are not exposed to extreme elements during travel.
Regular Maintenance of Stored Lenses
Every few months, I inspect each optic for dust or grime. Using a blower or soft brush, I gently remove any particles from the surface. Avoid direct contact with the glass; instead, I rely on microfiber cloths specifically designed for this purpose.
To preserve the integrity of the glass, I examine seals and caps, ensuring there are no signs of wear or damage. Any degradation in these protective components can lead to exposure to harmful elements. If I notice any issues, I replace the affected parts promptly.
Occasionally, I assess the performance of the optics by testing them on a camera. This helps me identify any changes in focus, sharpness, or other optical qualities. Keeping track of my findings in a maintenance log allows me to spot trends or potential concerns over time.
I also check for any signs of mold or fungus, especially in humid conditions. If discovered, I use specialized cleaning solutions, applying them carefully to the affected areas. Seeking professional help is advisable if the situation appears severe or beyond my expertise.
Lastly, I schedule a deep clean annually. This entails disassembling the unit if necessary, but I only attempt this if I have appropriate knowledge. Recognizing professional services is essential for more intricate maintenance tasks.
Stacking Lenses: How to Avoid Pressure Damage
Always place weight sensitive optics in a dedicated location to prevent distortion or damage. Avoid stacking multiple units on top of each other unless they are specifically designed for it. If storage space is limited, consider the following methods:
- Utilize padded dividers in cases that allow for organized placement, ensuring no single unit bears the brunt of pressure from others.
- Store items upright whenever feasible. This minimizes weight distribution on each piece.
- Opt for rigid cases that provide structure, keeping contents secure without risk of shifting during movement.
Avoiding Pressure Points
When organizing within a bag or dedicated container, arrange items based on size and weight. Heavier optics should remain at the bottom, while lighter components can rest on top. This hierarchical approach maintains stability.
<h3: Proper Padding
Incorporate soft cloths or pre-made padded covers between items to serve as a cushion against jolts or pressure. Periodically assess the layout in storage; remove and rotate components regularly to ensure no item remains under constant pressure.
Labeling Storage Containers for Easy Access
Use clear, descriptive labels on all storage containers to streamline the retrieval process. This can significantly reduce the time spent searching for equipment.
- Include specifics like the type of equipment (e.g., zoom, prime) and focal length on each label.
- Organize containers by frequency of use; place the most utilized items at the front.
- Create an inventory list that corresponds to labeled containers, helping track your collection effectively.
Consider utilizing color coding for different categories, such as:
- Red for high-use items.
- Blue for less frequently used gear.
- Green for specialty equipment.
Ensure labels are resistant to wear and tear, either by using waterproof materials or laminating them. This guarantees that vital information remains intact even in humid or variable conditions.
Regularly update labels and the inventory list to reflect new purchases or changes in usage. This proactive maintenance enhances organization and accessibility.
When to Use Original Lens Packaging for Storage
Using original packaging for safeguarding optical equipment is advisable in specific circumstances. The molded foam and custom-fit compartments in factory boxes offer optimal protection during transport or long-term storage, minimizing the risk of damage.
If planning to travel or needing to pack items away for an extended period, maintaining the original box is wise. These containers are tailored to absorb shocks and prevent movement, ensuring the delicate components remain intact.
In cases where the device is not frequently utilized, boxed storage helps in keeping dust and moisture at bay, particularly when combined with desiccant packs. For those engaging in seasonal photography, returning items to their original packaging during off-periods preserves their integrity.
Additionally, if there’s a chance of reselling or trading the equipment, retaining the original packaging increases its value. Collectors value items that come with their complete original boxes and paperwork.
Whenever using the original box, ensure it’s kept in a dry, temperature-stable environment. Avoid stacking heavy objects on top of the box to prevent crushing or warping. Using the original packaging when appropriate can safeguard investment and enhance longevity.
Long-Term vs. Short-Term Lens Storage Solutions
For optimal performance, long-term and short-term storage strategies vary significantly. For extended preservation, I prefer utilizing a dry, climate-controlled space where temperature and humidity remain stable.
Long-Term Storage Options
In prolonged storage, placing gear in airtight containers with desiccant packs helps prevent moisture accumulation. Always ensure the environment is devoid of temperature fluctuations. My go-to method is to wrap each piece in microfiber cloths before sealing them away to further protect against scratches.
Short-Term Storage Techniques
For brief periods, keeping equipment in padded cases or dedicated compartments within bags suffices. I usually opt for vertical placement to minimize contact with other items. Bussing protective caps on both ends prevents dust intrusion. Regular inspections and brief cleanings maintain their quality.
| Storage Type | Best Practices |
|---|---|
| Long-Term | Airtight containers, desiccant packs, stable temperature, microfiber wraps |
| Short-Term | Padded cases, vertical placement, dust caps, routine checks |
Each approach serves a unique purpose, depending on how often I utilize the gear. Consistency in my methods yields lasting reliability and clarity in visuals.
Creating an Organized Lens Inventory System
A systematic approach to cataloging optical devices enhances accessibility and reduces risk of loss or damage. Begin with a written list or spreadsheet, noting key details for each piece. Include fields for model, serial number, purchase date, condition, and any special information relevant to maintenance or use.
Implement categories based on type or use–such as wide-angle, telephoto, or macro. This makes retrieval simpler and promotes better organization. Establish a referencing method, such as numbering or color-coding, linking each part with its storage location.
Consider a digital inventory management tool, which offers advantages such as reminders for regular checks or alerts for needed maintenance tasks. Cloud storage allows access from multiple devices, so I can check details whenever needed.
To maintain accuracy, schedule routine updates to the inventory. Each time a new piece is acquired or an existing item is sold or discarded, I immediately reflect those changes in my records. Regular audits ensure that everything matches up and remains orderly.
Finally, document the history of modifications or repairs performed on each item. This provides insights into its usage and helps in assessing its current condition. Such meticulous records protect your investment and enhance overall management.
| Category | Model | Serial Number | Purchase Date | Condition |
|---|---|---|---|---|
| Wide-Angle | Model A | 123456 | 01/01/2022 | Excellent |
| Telephoto | Model B | 789012 | 05/15/2021 | Good |
| Macro | Model C | 345678 | 07/20/2020 | Fair |
Inspecting Lenses Before and After Storage
Each time I handle a piece of glassware, I make it a point to examine it closely before placing it in its designated spot. I start by checking for any visible dust, scratches, or debris on the surface. A microfiber cloth comes in handy for cleaning, ensuring I don’t leave any residues behind. I also inspect the mount and other critical elements, making sure everything is in good condition.
After taking the time to clean and inspect, I document any imperfections or notes about the condition of the optics. This practice allows me to track changes over time, which is particularly useful for long-term retention.
Post-Storage Examination
Once I’m ready to retrieve the glass from storage, I repeat the inspection process. I look closely for signs of moisture, especially in humid environments. If I notice any condensation or water spots, I take immediate action to dry it out before further handling.
Additionally, checking the lens cap and other protective gear is critical; I ensure that everything is intact and functioning properly. By conducting these routine examinations, I not only safeguard the optical quality but also extend the lifespan of my equipment significantly.
Avoiding Direct Sunlight Exposure on Lenses
Always store optical equipment in a location shielded from direct sunlight. Prolonged exposure can cause degradation of internal components and color accuracy. Use opaque storage solutions or place items in drawers or cabinets to minimize exposure.
Utilize UV-filtered storage units or protective cases that block harmful rays. If possible, arrange your setup in an area where sunlight intensity fluctuates, such as a room with blinds or curtains that you can adjust according to the time of day.
Regularly inspect your setup for potential sun exposure points and adjust shelving or placement to eliminate direct light. This proactive approach ensures longevity and optimal performance of your valuable optics.
Understanding the Risks of Storing Lenses in Vehicles
I strongly recommend against leaving photographic equipment in vehicles for extended periods. Temperature extremes can adversely affect the delicate internal components of the system, leading to degradation of image quality or even permanent damage.
Vehicles can become significantly hotter or colder than the outside environment, particularly in direct sunlight. Fluctuating temperatures may lead to condensation forming inside, risking mold growth on sensitive surfaces. To illustrate this, consider the following table:
| Temperature Range | Potential Risk |
|---|---|
| 0°C to 40°C (32°F to 104°F) | Image quality degradation, condensation risk |
| Below 0°C (32°F) | Internal components freezing, lubricant solidification |
| Over 50°C (122°F) | Functional failure, potential melting of adhesives |
Humidity presents another significant threat. Excess moisture can lead to corrosion and spontaneous growth of mold on optical surfaces, difficult to remove once established. A dry, shielded area would offer more security for such delicate items.
Direct sunlight exposure not only warms but can also damage coatings and plastics. I make it a habit to ensure any gear left in a vehicle is either taken with me or stored in a properly insulated case out of direct sunlight.
In conclusion, the risks associated with vehicle storage greatly outweigh any convenience. Arranging for secure, climate-controlled storage options is far more beneficial for protecting fine optics.
Using Lens Caps and Filters for Extra Protection
Always equip each piece of glass with a proper lens cap. A well-fitted cap guards against dust, scratches, and accidental impacts while not in use. Choose caps that snugly fit to prevent any risk of being dislodged during transport.
Incorporating filters into your setup further enhances protection. Here’s why:
- UV filters shield against harmful rays, minimizing the risk of sun damage over extended periods.
- Clear filters act as a protective layer, absorbing potential impacts that could scratch the front element.
- Polarizing filters reduce glare and reflections, which can prolong the lifespan of your optics by preventing excess cleaning.
When utilizing filters, ensure they are of high quality. Inferior options may introduce additional distortions or decrease image clarity. Regularly inspect and clean filters to maintain optimal performance.
Store both caps and filters separately in protective pouches. This prevents any risk of scratches or damage when they are not in active use. Avoid stacking heavy items on top of stored filters to maintain their integrity.
In summary, using lens caps and appropriate filters adds an essential layer of defense, securing the investment and ensuring quality performance for years to come.
Storing Vintage Lenses: Special Considerations
Maintain a consistent environment for vintage optics. Ideally, room temperature should be kept between 65°F and 75°F (18°C to 24°C) with minimal fluctuations to prevent any potential damage to delicate internal components.
Humidity levels are critical; levels above 50% can encourage mold growth, particularly in older models. Frequent monitoring using a hygrometer can help manage moisture. Consider using silica gel packs regularly to absorb excess moisture in storage containers.
Opt for padded lens cases specifically designed for vintage models. These cases offer protection against bumps and falls. If possible, choose cases with individual compartments to avoid contact that may lead to scratches or other cosmetic damage.
- Always use front and rear caps when storing to shield from dust.
- Consider keeping filters attached to offer extra protection to the front element.
Positioning is key–store horizontally unless the design specifically allows for vertical placement without pressure on the barrel or mount. Avoid stacking multiple items directly on top of one another, as this can lead to misalignment or damaged mounts.
It’s wise to also implement a labeling system for your storage, aiding in easy identification and minimizing handling of each piece. Regular inspections should be part of your routine; check for signs of deterioration, such as fungus or sticky aperture blades, ensuring any issues are addressed promptly.
Avoid leaving vintage gear in vehicles, as temperature extremes can warp materials and affect performance. When traveling, carry them in well-padded bags or protective cases to avoid potential harm during transit.
Long-term storage of these special pieces may benefit from original packaging, which provides a perfect fit and protection from environmental factors. Always ensure they are clean and dry before sealing them away.
Storing Lenses with Different Mount Types
Evaluate the specific requirements of each mount type for optimal protection. For bayonet mounts, ensure a secure connection to prevent misalignment. Screw mounts benefit from periodic inspection to ensure threads remain clean and free from wear. I recommend using compatible lens caps to protect the mounting area from dust and contaminants.
Special Considerations for Unique Mounts
For vintage or specialized optics, maintain their value by utilizing original packaging whenever possible. This protects original finishes and keeps the focus mechanism intact. I prefer keeping adapters separately, stored in anti-static bags to avoid scratching or damaging any sensitive parts.
Storing Adaptable Mounts
Adaptable mounts can be stored with corresponding adapters attached, but they should be kept away from high humidity environments. Using silica gel packs in the storage containers is crucial to combat moisture. I always check compatibility before attempting to use different mounts with my gear to avoid potential damage during mounting and unmounting.
Using Foam Inserts for Customized Lens Storage
Foam inserts are a practical way to secure my optical tools. Custom-cut foam provides snug fits, preventing movement and minimizing impact during transport or storage. I measure each piece precisely to match the dimensions of the equipment, ensuring it remains stable.
Benefits of Foam Inserts
Utilizing foam allows me to create compartments tailored specifically for each unit. This not only saves space but also protects against scratches and accidental drops. I often choose closed-cell foam for its moisture resistance and durability, making it a superior option for safeguarding against environmental hazards.
Implementing Foam in Storage Solutions
When designing my storage, I carve out sections in the foam for accessories like caps and filters, keeping everything organized. I frequently use labeled containers, enhancing my ability to quickly locate each item. Regularly inspecting the foam for wear and tear ensures it continues to provide optimal protection.
Rotating Lenses to Prevent Drying Out of Seals
Regularly rotating mounted optics can significantly minimize the risk of the seals drying out. This practice helps maintain the integrity of the seals, ensuring they remain flexible and effective. I recommend doing this every couple of months, especially if the equipment is not in regular use.
Benefits of Rotation
- Maintains seal elasticity, preventing cracks and degradation.
- Ensures smooth operation of zoom and focus mechanisms.
- Reduces the risk of dust or particles getting trapped due to stagnant gaskets.
Practical Tips for Effective Rotation
- Gently twist the focus and zoom rings multiple times in both directions.
- Apply a light touch; excessive force can cause damage.
- Rotate in a clean environment to avoid introducing dirt.
- Incorporate this practice into your routine maintenance schedule.
By implementing these simple rotation techniques, the longevity and performance of your optical tools will improve, ensuring they remain ready for action whenever called upon.
Best Practices for Cleaning Lenses Before Storage
Begin by gathering a microfiber cloth, blower, and lens cleaning solution free from alcohol or ammonia. These items are crucial for maintaining the integrity of your optics. Gently blow away any dust or loose particles using the blower. Avoid using your breath, as moisture can lead to spots.
Next, lightly moisten the microfiber cloth with the lens cleaning solution. Wipe the surface in a circular motion, starting from the center and moving outward. This technique minimizes the risk of scratches. Pay particular attention to smudges and fingerprints, as they can affect the clarity of future images.
Removing Stubborn Residue
If there are stubborn stains that do not come off with the initial cleaning, apply a few drops of the cleaning solution directly to the lens and repeat the circular motion with the cloth. Be mindful not to saturate the lens, as excess liquid can seep into the edges. For even better results, consider using a lens brush for dried debris.
Final Checks and Safety Measures
After cleaning, perform a thorough inspection under good light. Check for any remaining particles or streaks. Once satisfied, replace any lens caps and store them in protective cases. Keeping lenses clean prior to storage prevents contaminants from causing damage over time.
Avoiding Pitfalls in Lens Storage
Never place optics in damp areas or near sources of moisture. Instead, choose a dry environment to prevent mold growth.
Refrain from exposing optic equipment to extreme temperatures. An ideal range is typically between 15°C and 25°C (59°F to 77°F). Sudden changes in temperature can cause condensation.
Don’t skip using protective caps. Always seal front and rear elements to shield them from dust and scratches. Additionally, avoid leaving filters on lenses during storage, as this may lead to unwanted pressure and potential damage.
Improper Organization and Handling
Avoid stacking multiple units on top of each other. Pressure from upper items can cause misalignment and affect performance. Use custom foam inserts or padded dividers for individual placement.
Disregarding regular inspections of optics can lead to unnoticed issues. Check periodically for dust accumulation or signs of mold, cleaning as necessary before storing.
Inadequate Protective Measures
Be cautious with the placement of stored optics in direct sunlight. UV rays can degrade materials over time, affecting seals and coatings.
Also, resist the temptation to store in vehicle compartments. Fluctuating temperatures and potential vibrations can lead to wear. A stable indoor climate is preferable.
- Avoid moisture exposure.
- Keep within recommended temperature ranges.
- Ensure protective caps are always used.
- Do not stack multiple units improperly.
- Perform regular inspections.
- Prevent direct sunlight contact.
- Do not use vehicles for storage.
Monitoring Your Lens Storage Conditions Regularly
Establish a routine to check environmental conditions regularly. I recommend conducting evaluations monthly to ensure temperature and humidity levels remain within optimal ranges.
Key Aspects to Monitor
- Temperature: Aim for a stable room temperature, ideally between 60°F and 75°F (15°C to 24°C).
- Humidity: Maintain relative humidity between 30% and 50% to prevent mold growth and component damage.
- Dust Levels: Conduct visual inspections for dust accumulation and clean storage areas as needed.
Tools for Monitoring
- Digital Thermohygrometer: Use this for accurate readings of temperature and humidity levels.
- Storage Visuals: High-quality storage cases allow you to quickly observe the condition of your equipment without opening them frequently.
Routine checks help identify fluctuations that may harm your gear. Adjust environmental conditions promptly to safeguard against potential issues.
Dangers of Improperly Storing Lens Accessories
Inadequate organization of lens add-ons can lead to significant issues. In my experience, neglecting proper handling exposes accessories to contaminants that may cause irreversible damage. For instance, failing to use appropriate cases allows dust and moisture to accumulate, affecting filters and other vital components.
Common Risks of Poor Accessory Storage
| Risk | Impact |
|---|---|
| Scratches on Filters | Degrades image quality and necessitates replacement. |
| Corrosion of Metal Components | Damages lens mounts and reduces compatibility. |
| Loss of Small Parts | Inconvenience and potential disruption to shooting sessions. |
| Fungal Growth | Severely damps performance, often requiring professional cleaning. |
Preventative Measures
Utilizing airtight containers with moisture-absorbing substances is key to maintaining a safe environment. Regularly check these storage solutions for any signs of wear or degradation. Investing in padded pouches can further insulate fragile items from shocks and impacts.
Regular audits of stored items help ensure that everything is in working condition. By understanding these pitfalls, I can preserve the longevity and functionality of my essential gear.
Assessing the Need for a Lens Maintenance Schedule
Setting a routine for checking your optical equipment can significantly enhance its lifespan. I recommend creating a timeline based on usage frequency. For equipment in constant use, a monthly inspection is ideal, while items used less frequently can be checked quarterly.
Consider marking your calendar with reminders to inspect seals, glass surfaces, and interior elements for dust or mold. If you notice changes in image quality or mechanical resistance, it may indicate that service is required sooner than anticipated.
When planning for maintenance, keep notes on each inspection. Document any issues found and the corrective actions taken, as this will help track performance trends and preemptively address potential problems.
Lastly, always use quality tools for cleaning and inspecting. Avoid generic solutions that might cause more damage than good. By maintaining a consistent evaluation routine, I ensure all optical apparatus remains functional and in pristine condition for capturing striking images.


