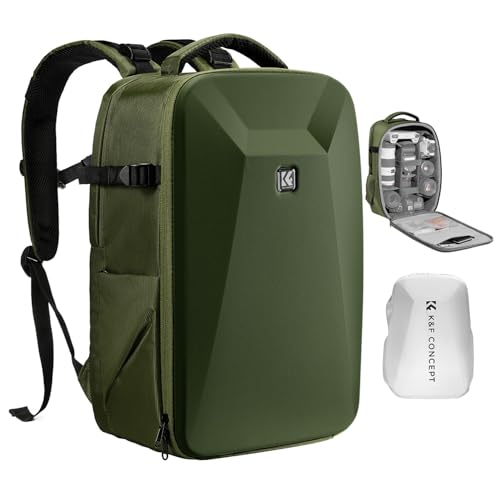
Utilize a well-structured backpack specifically designed for photographic gear. Choose one with customizable dividers to securely hold different optical attachments in place. This prevents movement during transit and minimizes the risk of damage.
Prioritize lightweight and compact designs to reduce strain on your shoulders and back. Consider using padded inserts or dedicated lens cases for added protection. Some options even include weather-resistant materials, ensuring your equipment remains safe in various environments.
Invest in lens pouches that can be clipped to your belt or bag exterior for easy access. This not only keeps your essentials organized but also allows for quick swaps without digging through a main compartment. Always ensure each attachment is capped to protect the glass from scratches.

Finally, think about the arrangement. Place frequently used pieces at the top of your bag or within easy reach. This strategic positioning allows for seamless transitions between shots, making your photographic experience more enjoyable and efficient.
Optimal Methods for Transporting Various Optics
Using a dedicated lens case or pouch can significantly enhance protection and accessibility during transport. Select options with padded interiors to cushion your optics against impact. Ensure the case’s size matches the specific lenses you will remove.
Customizable Inserts
Consider investing in adjustable dividers within a camera bag. This customization allows for tailored compartments that fit snugly around optics, preventing movement and potential damage.
Shoulder Straps and Harnesses
Utilizing an ergonomic shoulder strap or a harness system aids in the comfortable transport of your kit. These accessories distribute weight evenly, allowing for prolonged use without strain.
| Method | Advantages | Disadvantages |
|---|---|---|
| Padded Case | Provides excellent protection, organized | Can be bulky, limited portability |
| Adjustable Dividers | Custom fit for various sizes, space efficient | Setup time may be needed for full customization |
| Shoulder Straps | Comfortable, accessible, allows quick access | Weight distribution may vary |
Layering lens caps with lens hoods inside your carrying method further protects front elements from scratches. Planning specific arrangements maximizes space and minimizes risk.
Selecting the Right Lens Case
For optimal protection and accessibility of my glass, I prefer a dedicated lens pouch or case that suits specific needs. Hard-shell cases provide superior defense against impact and weather, making them ideal for outdoor sessions. On the other hand, soft pouches are lightweight and compact, suitable for situations where space-saving is vital.
Size and Compatibility
Choosing a case that accommodates various dimensions is crucial. I measure each piece of equipment, ensuring the case offers sufficient padding and room without being overly spacious. Adjustable dividers within cases are beneficial, allowing me to customize compartments based on my collection.
Portability and Accessibility
Look for options with comfortable handles or shoulder straps, enabling me to transport my gear effortlessly. Quick-access openings, such as zippers that extend fully, allow immediate retrieval of my equipment, minimizing downtime during shoots. Water-resistance or weather-proof features enhance security during unpredictable conditions.
Organizing Lenses for Quick Access
I always prioritize functionality when arranging my optics. The first step is categorizing each piece based on purpose: portrait, landscape, or macro. This allows for swift selections depending on the shoot type.
Next, I utilize lens pouches with clear labels. A simple system of color-coding or numbering can help identify which pouch contains which optic. For example, use red for telephoto, blue for wide-angle, and green for macro.
To ensure rapid retrieval, I position the most frequently used items within easy reach. I place heavier or less-utilized optics towards the bottom of my bag, allowing my go-to choices to sit on top.
Incorporating small organizers or dividers within the case can also keep everything secure and categorized. This prevents any unwanted movement and protects valuable gear from scratches.
Finally, routine checks of my setup keep it tidy. Regularly rotating through the optics helps me become familiar with their locations and ensures that everything is organized and ready for use at a moment’s notice. This practiced approach turns what could be a time-consuming task into a smooth operation during shoots.
Using Lens Pouches for Protection
Choosing high-quality lens pouches is crucial for safeguarding equipment during transport. Look for pouches made from padded materials that offer shock resistance. Soft interior linings prevent scratches, while robust outer layers withstand the rigors of travel.
Features to Consider
- Size: Ensure the pouch fits snugly around the specific optic, minimizing movement.
- Closure Type: Zippers or Velcro should secure contents efficiently, providing easy access.
- Attachment Options: Select pouches with clips or loops for easy attachment to bags or belts.
Organizing Pouches
Group pouches by type of lens, making it straightforward to locate the desired item quickly. Labeling each pouch enhances organization, especially in large collections. Consider color-coded options to streamline access on location.
Invest in pouches with weather-resistant capabilities for outdoor shoots, ensuring protection against moisture and dust. Regular cleaning and upkeep prolong the lifespan of the pouches and the delicate contents within.
Choosing the Best Camera Bag for Multiple Lenses
Opt for a bag with customizable compartments and dividers. This feature allows me to adjust the internal layout according to the size and shape of the optics I want to transport.
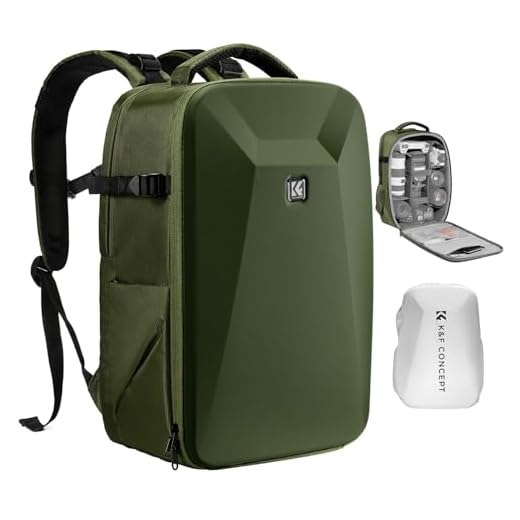
Consider weight distribution. A well-designed bag should have padded straps and a supportive back panel, ensuring comfort even during extended use. A sling or backpack style may offer better ergonomics than a traditional shoulder bag.
Water resistance is another must-have. Choosing a bag made from weatherproof material protects my equipment from unexpected rain or spills. Look for models that also feature sealed zippers for added security.
Check for quick access features, like side openings or front flaps. Being able to reach my gear swiftly means less interruption while shooting.
Lastly, assess overall storage capabilities. Additional pockets for accessories like filters, batteries, and memory cards keep everything organized and easily accessible, allowing me to focus on capturing the moment.
Strategic Lens Arrangements to Minimize Weight
Prioritize lightweight optics. I avoid heavy glass whenever possible, choosing prime options that offer superior quality without excessive bulk. When selecting zooms, I favor compact models that maintain a reasonable weight while delivering versatility.
Utilize a modular approach for positioning the gear. I often place the largest and heaviest optics close to my body for better balance, while lighter units can be situated further out, which enhances stability and reduces strain on my shoulders.
Group by Use Cases
Organizing gear based on shooting scenarios makes a tangible difference. I often keep specific sets together–for instance, portrait or landscape sets–so I can quickly grab what I need. This system also allows me to eliminate any unneeded weight during outings.
Incorporate Materials Wisely
When it comes to storage, I select cases made from lightweight yet durable materials. Silkscreened fabrics or ballistic nylon not only protect but also minimize overall carrying weight. Storing fewer items in heavier cases ultimately adds unnecessary load, so I opt for streamlined solutions that sacrifice only minimal protection for the sake of transport efficiency.

Regularly reassessing the contents of my kit ensures I only bring what’s required. By prioritizing equipment that offers maximum utility with minimal weight, I maintain agility and comfort during shoots.
Incorporating Lens Caps and Filters in Your Setup
Always keep lens caps on to protect glass surfaces from scratches and dust when not in use. Consider getting high-quality caps that fit snugly, preventing accidental detachment during transport.
Invest in filters for additional protection and creative effects. A clear filter can shield the front element from debris, while polarizing filters enhance colors and reduce glare. Carry these accessories in designated pockets or compartments within your gear bag to ensure they remain secure and accessible.
Storage Solutions
Utilize filter cases or pouches designed for protection against impacts. This separation reduces the chance of scratches occurring from filters rubbing against each other or other equipment. Choose cases that feature padding, so they can withstand bumps during movement.

Efficient Organization
Label your filters for quick identification. Categorize them by purpose, such as neutral density, UV, or polarizing, for faster selection according to shooting conditions. This approach saves time and allows for more fluid adjustments while I capture images.
Practical Tips for Traveling with Lenses
I recommend utilizing a dedicated lens pouch for each optical piece. This approach minimizes the risk of damage during transit. Opt for padded pouches with secure closures, ensuring they fit snugly in your bag.
Utilizing Labels for Quick Identification
Labeling each pouch can save valuable time. Use waterproof tags or markers to indicate the specific type of lens within each pouch. This added detail allows for effortless identification without rummaging through your entire setup.
Consider a Modular Approach
Investing in modular storage systems can provide flexibility. Choose designs that let you customize the arrangement based on your outing. This flexibility enables you to adjust weight distribution based on your specific needs for each trip. Try balancing heavier pieces toward the center of your bag for stability.
Always monitor environmental conditions when traveling. Use silica gel packets in your storage setup to absorb moisture, which protects against fogging and potential damage. For extreme temperatures, be mindful about transitioning between climates to prevent condensation on your gear.
Incorporate clear plastic bags for filters and holder systems. This protects them from scratches and keeps everything tidy. Simple organization is key to an efficient packing experience.
Regularly inspect your chosen containers and accessories for wear or damage. Replacing worn items proactively prevents unforeseen issues during your photographic adventures.
Maintaining Lens Hygiene While on the Go
Utilizing a microfiber cloth is my first line of defense against dust and smudges. Before switching out glass, I give my lens surface a gentle wipe to ensure optimal clarity. This quick step becomes a habit, making a notable difference in image quality.
A blower is a compact yet effective tool I carry with me. It helps eliminate particles that settle on the lens. When working in outdoor settings, using this tool before and after each shoot has proven beneficial in keeping my optics pristine.
Additionally, I opt for lens wraps or pouches that offer protection against contaminants. When not in use, I make it a point to keep the front element covered. This practice minimizes exposure to environmental factors that could lead to unwanted marks.
When experiencing sudden weather changes or damp conditions, storing equipment in waterproof bags can safeguard against moisture–essential for preserving glass integrity. I prioritize using these special cases during unexpected rain showers.
- Regular maintenance is crucial. I schedule a thorough cleaning of my gear every few months to restore its functionality.
- I avoid touching the glass with my fingers, as oils can easily transfer. Instead, I handle lenses by the edges.
- Staying organized allows me to keep everything in its designated place. A clean, clutter-free environment minimizes the likelihood of accidental contact with potential contaminants.
Incorporating these practices into my routine ensures that every session goes smoothly, resulting in cleaner images and happier shooting experiences.
Customizing Your Carrying System for Specific Shoots
To optimize my gear setup, I analyze the shoot type beforehand. For landscape photography, I prioritize lightweight options. I pack only the essential zoom and wide-angle options to reduce bulk while still covering diverse scenarios. In contrast, for portrait sessions, I bring several prime options for their superior quality and clarity.
Adapting to Environments
Weather protection is vital. For rainy conditions, I opt for weather-sealed pouches or cases that safeguard against moisture. On the contrary, in dry environments, I choose breathable materials to prevent overheating and dust accumulation. This ensures the integrity of my equipment throughout the shoot.
Accessibility During Use
During events or fast-paced environments, I attach pouches to my waist or use sling bags for quick lens changes. This accessibility allows me to capture spontaneous moments without fumbling through a larger bag. For static setups, I create a clear layout on my table, placing each optic within easy reach based on priority.